
Welcome back! We left off having made all of our straps, sewing some curves, and fusing our fleece to the outside pieces. Today we're going to finish the outside of the bag. It looks like a lot because I try to be thorough so give a quick read-through before you start so your brain will be prepped :)
Prepare the Outside Pocket
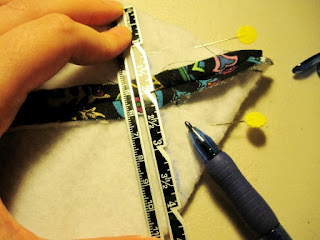
1. Take your piece of pocket trim/bias tape. Fold it in half lengthwise and press. Then unfold, press the raw edges towards the center crease, and then fold in half and press again (just like we did with the straps). We're basically making bias tape, but it's cut on the straight of grain.
2. Fuse a piece of fleece to the wrong side of one of your pocket pieces. Lay this on top of your other pocket piece, wrong sides facing.

3. Pin your bias tape you made in step one across the top, sandwiching the fabric and fleece between it. Stitch close to the edge, making sure to get both sides of the tape.

Attaching the Loop Straps and Sewing Down the Pocket
1. Lay down one of your outside pieces, right side up. Use a pin to mark the center. Fold your pocket piece in half (side to side) and use a pin at the center (for the larger bag this is the 3 1/2 inch mark, or thereabouts). Lay this down on your exterior piece with the pins matching - now your pocket should be perfectly centered :) Stick a few pins (more towards the center).
2. Following the strap markings on the pattern pieces, lay down your loop straps (those with the rings) on the sides of the pockets, covering up the raw edges. There is some wiggle room here if you want to make the strap placement wider - just make sure that the raw edges of the pocket are covered, and that the straps are each the same distance from the sides of the bag. Pin, pin, and pin.

3. Starting at the bottom of one of the strap, stitch up towards the ring, as close to the edge as you're comfortable doing (I usually stick with 1/8 inch), stopping about three quarters of an inch away from the ring. Pivot, and sew across the strap to the other side. I like to sloooowwwwlly reverse over my stitches and come forward again for some extra reinforcement at this part. Then stitch down the other side of the strap, close to the edge. Repeat with the other loop strap on the other side of the pocket.

4. Lay your remaining two loop straps on the other exterior piece, matching the placement as best you can. Stitch up one side and down the other.
5. On the pocket only, stitch between the straps two inches from the bottom. This is entirely optional, but I like to do it to keep things in the pocket from going down too deep almost under the bag and resisting retrieval.

Our outside pieces are now ready to sew together.
Make Up the Bag Exterior
1. Place the right sides of your bag exterior together. Stitch across the bottom, using a 1/4 inch seam allowance. Press this seam open. Be very convincing with your iron and show it who's boss :)
2. Sew up the sides of your bag. Take care to match up the seams near the band. Press these seams open as best you can.
Now we're going to create a flat bottom for the bag by boxing the corners. This is what will give our bag some dimension.
4. Make sure the bag is inside out. Stick your hand in the bag and push the corner out and flatten to create a triangle. You can take a peek inside the bag to make sure the side seam and bottom seam are lined up one on top of the other (this takes a little wiggling).
5. Grab a ruler and measure a line four inches across. You want the 2 inch mark to be directly on the seam line - this may take some maneuvering, but it makes for a nice even bottom. I usually have to play around with it a minute or two to make sure everything is lined up. Once it's all set, put in a few pins to keep it from wiggling out of place. Sew along this line.


Prepare the Outside Pocket
1. Take your piece of pocket trim/bias tape. Fold it in half lengthwise and press. Then unfold, press the raw edges towards the center crease, and then fold in half and press again (just like we did with the straps). We're basically making bias tape, but it's cut on the straight of grain.
2. Fuse a piece of fleece to the wrong side of one of your pocket pieces. Lay this on top of your other pocket piece, wrong sides facing.

3. Pin your bias tape you made in step one across the top, sandwiching the fabric and fleece between it. Stitch close to the edge, making sure to get both sides of the tape.

Attaching the Loop Straps and Sewing Down the Pocket
1. Lay down one of your outside pieces, right side up. Use a pin to mark the center. Fold your pocket piece in half (side to side) and use a pin at the center (for the larger bag this is the 3 1/2 inch mark, or thereabouts). Lay this down on your exterior piece with the pins matching - now your pocket should be perfectly centered :) Stick a few pins (more towards the center).
2. Following the strap markings on the pattern pieces, lay down your loop straps (those with the rings) on the sides of the pockets, covering up the raw edges. There is some wiggle room here if you want to make the strap placement wider - just make sure that the raw edges of the pocket are covered, and that the straps are each the same distance from the sides of the bag. Pin, pin, and pin.

3. Starting at the bottom of one of the strap, stitch up towards the ring, as close to the edge as you're comfortable doing (I usually stick with 1/8 inch), stopping about three quarters of an inch away from the ring. Pivot, and sew across the strap to the other side. I like to sloooowwwwlly reverse over my stitches and come forward again for some extra reinforcement at this part. Then stitch down the other side of the strap, close to the edge. Repeat with the other loop strap on the other side of the pocket.

4. Lay your remaining two loop straps on the other exterior piece, matching the placement as best you can. Stitch up one side and down the other.
5. On the pocket only, stitch between the straps two inches from the bottom. This is entirely optional, but I like to do it to keep things in the pocket from going down too deep almost under the bag and resisting retrieval.

Our outside pieces are now ready to sew together.
Make Up the Bag Exterior
1. Place the right sides of your bag exterior together. Stitch across the bottom, using a 1/4 inch seam allowance. Press this seam open. Be very convincing with your iron and show it who's boss :)
2. Sew up the sides of your bag. Take care to match up the seams near the band. Press these seams open as best you can.
Now we're going to create a flat bottom for the bag by boxing the corners. This is what will give our bag some dimension.
4. Make sure the bag is inside out. Stick your hand in the bag and push the corner out and flatten to create a triangle. You can take a peek inside the bag to make sure the side seam and bottom seam are lined up one on top of the other (this takes a little wiggling).
5. Grab a ruler and measure a line four inches across. You want the 2 inch mark to be directly on the seam line - this may take some maneuvering, but it makes for a nice even bottom. I usually have to play around with it a minute or two to make sure everything is lined up. Once it's all set, put in a few pins to keep it from wiggling out of place. Sew along this line.

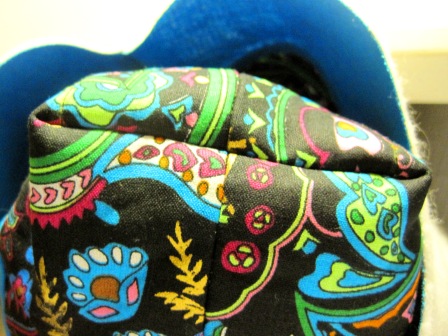
6. Repeat with the other corner. Trim off the edge of the triangle about a quarter inch from your seam line. Try and give it a press, but it is a bit tricky to do. Turn your bag right side out, and you'll see that you now have nice boxy corners - give the corners a poke with something like a chopstick to neaten them up.
Adding the Purse Feet and Gridded Bottom
This part is entirely optional, but it gives a very nice finished look and feel to the bottom of the bag, and the gridded bottom prevents a bit of sag.
1. Measure the bottom of your bag's length and width (due to differences in sewing machines and cutting/trimming, it's best to measure for an accurate fit). Cut your gridded bottom to match this measurement, making sure the edge is smooth. You may need to trim this a little more for a perfect fit.

2. On the outside bottom of your bag, make 4 marks, each the same distance from the edge for the purse feet. I used the box created from the bottom seam, the straps, and the outside edges as my guide, and put my mark right in the center (scroll down and see the second picture under the next step). Using a seam ripper, CAREFULLY make a tiny hole where your marks are, making sure to go through all the layers.

3. Poke the prongs on your purse feet through those holes, and also through the gridded bag bottom. Open the prongs so they're nice and secure. I'll be honest - I hate doing this part of the bag. It's such an odd angle and not much room to maneuver, but it gives such a nice finished look to the bag that I refuse to skip it.


The outside of your bag is now finished. That was a fair bit of work, but it wasn't too bad, right? Right? Hello? Is anyone still there?
See you on Friday! We'll be tackling zippers. If you want. They're really not so scary, but they're optional. But you should do them anyway to get bragging rights because they look hard but they're not.
See you Friday - we're getting there :)

Obrigada por compartilhar o passo a passo. Esse modelo de bolsa é muito lindo
ReplyDeletebeijos
You do great work kiddo!!!
ReplyDeleteLove the bag, your work is amazing! Looking forward to the zipper part, zippers scare me, I don't know why.
ReplyDeleteBethany...make some bunting. My reason for making it was....I love it! Life is short. We don't need a reason all the time. Do it for the sheer desire of wanting to!
ReplyDeleteHugs,
Kris
Love your sew-along, my bag is really lookin' good. I'm following along on my blog too. Thanks for the time you're putting into this and the beautiful pattern.
ReplyDeleteI am feeling purse feet envy :(
ReplyDeleteOh why don't we have craft supply stores here with all the bag-making doodads I need?
In other news, I am in love with the blue-ness and paisley-ness going on here. :)