Pages

Thursday, January 31, 2013

A Few for Friday - #5

Ahoy ahoy! It's been quite an interesting week around here all around. Here are my little moments I captured just for you :)

Last Friday we got a wee bit of snow--enough to make the evening commute slow but beautiful--the soft headlights hitting the white flakes gave everything a quiet glow. It was almost all gone by the next day.

My cousin and his girlfriend (who we're in love with--she's so sweet!) had us over for a yummy dinner. We brought these flowers with us--I wish we had bought some for here. So warm and cheery!

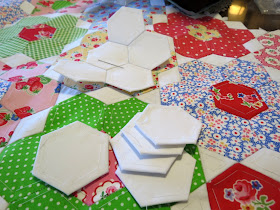
 I now have the short sides filled in with white, and just have to do the top and bottom (which could take a while). I can only work on this in smallish doses--it's not exactly easy on the fingertips. I think I'll cut the papers out very soon so it's not so cumbersome (I've been too lazy to do it).

 Back in the fall I decided I did not need to add Winterkist to my stash. Then last week I saw the quilt Katy is making and tracked down an online shop that still had the whole line. I called and asked if I could get a FQ bundle made up instead of half-yards and they did. I'm waiting on some solids to come and then I can start thinking. But not doing--I have other projects to finish first.

 We have a large pond behind my work that attracts tons of geese. They were covering the back lawn the other day--I could only discretely get one pic, but there must have been over a hundred of these buggers. 

We went from snow, to seasonable, to warm and humid, to extremely windy and cold, all in the span of one week. You can tell it's getting darker later now as there are no more purple skies at quitting time.

This made me laugh. Just inside the door on the can of rock salt (at work) was a random sock. I hope it fell out of someone's gym bag because otherwise I just don't understand a) where it came from and b) why it was saved and placed in an arbitrary lost and found. My work campus is on private property and fairly isolated. But even if it wasn't--how does one leave behind their sock like that? Someone's wig was in the street the other night when we were going out to dinner--just laying there on the asphalt. Classy. But amusing.

I'll be at my sewing machine this weekend--how about you?
 

Tuesday, January 29, 2013

Sewing Machine Present

About two weeks ago, I was taking a sanity break at work and checking my email. I had received an ad from Joann's saying that all Janome machines were on sale. I wanted to see what they carried (since they only have Singers in the store, and I think one model at that). I saw this machine for what I consider a high price, but on sale for a nicer price. I scouted the web for reviews, and all of them were excellent. Then the waffling started. "I'm going to. No, I don't need it. But all those stitches! But no, I'm good with what I have. But think of the quilts! OK, but Lola's in great shape." So I made a few calls and was soundly convinced I should. So I did.

Janome Memory Craft 6500 Professional.

 I looked at a few other machines just to make sure, and decided this one would be perfect. Others had embroidery, some were newer models but had problems with certain aspects that provided quite a bit of angst. So I went with the packed-to-the-gills but slightly older model that had five star reviews wherever I looked.

At the basic level, this one is not vastly different from Lola--same buttons and placement, same throat plate markings, same set-up for changing feet--so it wasn't hard to get used to. But that deeper throat space (I've also heard it called harp space) is very nice, and should be comfy for quilt sewing (as opposed to the wrestling and wrangling I was doing).

There is a ton of stitch variety here, including a few sets of letters and numbers on the reverse of this flippy chart thingee.

I thought I was going to have a difficult time figuring out how to work the stitch programming, but it's actually quite simple and almost intuitive. I read the manual for good measure, but the machine is set up so nicely you could probably figure it out without it.

 See that purple knob up top and the 0-3 dial towards the bottom? That's the adjustable pressure of your presser foot--by turning the knob either way you can ease up or press harder depending on your fabrics (this is NOT the tension--just foot pressure).

These buttons are fairly standard. The purple is reverse, sitting on it is the lock-stitch, and the double triangle button is the needle up/down selector. The scissors? Read on.

One feature this has that is new to me is the automatic thread cutter (the scissors button). It seems like such a luxury, and it surely is, but oh. My. Heavens. I love it. It's my new favorite thing. When you press it the mechanism cuts your threads on the underside of your fabric about a half inch away. While I wouldn't use this for ordinary sewing as I like to trim my threads closely, this is an absolute delight for quilts! I never before realized how much time I spend pulling the project out, trimming, pulling the threads to the back, and so on. Not to mention how much thread I realized I was wasting.
 These buttons are how you boss the machine around. 

This is where you lengthen the stitches and adjust the needle position, select twin needle mode, edit your stitches, and even ask for help! This machine has a separate bobbin motor so you can theoretically wind a bobbin while you're sewing, but I haven't tried that yet. You just select the bobbin button, move the little doohickey over, and away it goes. There's also a double spool holder mechanism on the back, which is nice for twin needle action (or will be, once I try it).

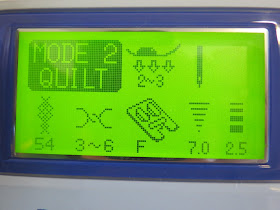
Back-lit LCD screen gives a butt ton of info. Yeah, that says butt ton :)

The screen gives a lot of information. On the left is the stitch you've selected (#54 in this case), then the suggested tension settings, the best foot to use, and the stitch settings (some of which can be changed, others not). At the top it shows you the mode you're in, and the presser foot pressure that would work best. Sometimes if you try to do something it doesn't want you to it shows you a polite little message that tells you to knock it off. 

I had such a nerdy amount of fun organizing the feet. Like a ridiculously nerdy amount.

You get a nifty plastic box that contains a ton of presser feet, some that I've never heard of. But it comes with a walking foot, which is a nice score (especially since my other one has been limping along lately). I ordered my machine from a site called Mr. Vac and Mrs. Sew, which is where Lola came from, too. They even gave me next-day shipping (!!!) and a freebie pack of other goodies.

 Feet, bobbins, and needles. Always fun stuff. Especially when it's free.

I put her through the paces with a huge piece of scrap muslin, and some lime green thread that was still rolling around on my table. I would have chosen differently if I had thought how they might photograph, so these aren't the greatest shots. Firstly, the machine is vewwwwwy quiet (like it's hunting wabbit, hahahahahaha). The backstitch you do to secure the seam is almost invisible it feeds so accurately. And I definitely did notice a difference in the way it feeds overall. Here are a few little tidbits I stitched up.

This was the first fancy stitch I tried. I love how it sews up. I'm thinking of getting some of those fancy rainbow threads they sell and getting creative.

 Trying out some writing. I'm thinking I'm going to stitch 'Sweet Bee Creations' on some twill tape and sew it as a tag of sorts into my bags. I forgot to delete the 'A' on the top version - it's not a mistake. Well...not a machine-induced mistake.

 One of the things I'm excited to try with this is the reverse stitch button. You select your stitch and ask TOM (or Turn Over Memory) to flip it and it stitches mirror image. 

 These are the same stitch. I used the regular stitch and then flipped it (the bottom stitches in this pic) with the programmed settings. For the top row of stitches I hit the elongate button and it lengthened the stitch five times. This can't be done on each stitch but it politely tells you so.

 I wanted to try some satin stitching to look like embroidered letters. This will definitely be doable in the future once I figure out the swirlies on the curvy letters (cut me some slack on the disjointed B--it was my first shot). This was an option on Lola, but it took too much fiddling with tension and stitch length and width for my meager store patience. This is much easier to do when the machine tells you what it needs.

I haven't been in a sewing mood lately, even with this baby in da house, but I did make a project with it. I had mentioned here that I needed to make a runner to protect the wood on a cabinet my dad made, so that's what I made. It was simple wholecloth quilting, but I finished the entire thing in one evening. ONE evening. That never happens! That's how much time I saved from not wrestling with the piece and snipping threads. 

 This quilted so smooth and easy you almost can't tell it's quilted.

I sewed with black thread and followed the black lines.

 I meant to use yellow thread on the back but completely forgot. 

This also came with a nice big extension table, but it wasn't necessary for a teeny quilt. It should make regular quilting much easier as I won't be trying to defy the laws of physics. It also comes with one of those extension bar things that will raise and lower the presser foot for you when you need both hands to control your project.That's quite nice! This machine does not come with automatic tension adjusting--that would be marvelous for free motion quilting, but I've also seen that some people have had issues with it that then extends to straight sewing. I enjoy straight line quilting anyway, though I love the look of FMQ (but don't enjoy doing it), so it's kind of a break even for me. The other thing it lacks is a free arm (you don't really need one for quilting or bag making). Lola has one, so if I need to stitch a wee circumference I'll call her back to service.

All in all, I'm really really happy with my new toy. Really happy. But I do have one problem. I don't know what to name her!!!! Any ideas? Suggestions are welcome!

Sunday, January 27, 2013

Sewing Machines Past

Hi, kids! How's tricks? I mentioned a few posts ago that I got a new sewing machine. When I tell people this I almost always get the question "What was wrong with the old one?" Absolutely nothing. I just was ready for something advanced and very versatile, not to mention a workhorse. You'll meet her soon. But when I discuss sewing with people I often get asked what I sew with, what was my first machine, etc. So I'm going to give you a brief tour of the ghosts of sewing machines past.

Before I learned how to sew, knitting and crocheting were how I spent my time. After seeing an uber-adorable crocheted handbag my cousin Mollie made, I decided I wanted to try bag-making. I crocheted a cute yellow and white bag (with matching daisy) for my mom, but needed to line it. Never having sewn much of a stitch I was in need of a sewing machine but didn't want to spend a lot.

If I'm to be perfectly honest my very very first machine came my way a very long time ago and was long gone at this point (but it may be in the attic--note to self: search for it). I don't remember ever sewing anything useful with it, perhaps just some straight stitching. But here's a rough idea of what it looked like (and the decade whereabouts I owned it :)

A My Little Pony sewing machine. After a quick internet search a Cabbage Patch Kid version was also sold at the time.

If I still had it, I would have definitely found a way to use it. As such, I had to scour the internet for something that looked simple. Which led me to what I call my teapot sewing machine, because that's what it reminded me of.

Rex Mini Sewing Machine

I found this on the Joann's website--after a coupon it cost me a whopping $12.00 plus shipping. It was...weird. You didn't use a spool of thread, you used two bobbins, both of which sat on top of the machine. There was no foot pedal - you pressed that white thing to the left of the needle down to start, and then pressed it when you were done. There was one speed, which, if you haven't sewn a stitch since that day in home-ec in seventh grade, was way too fast for anything accurate. Still, I was able to muster out two handbag linings with this thing (which I then hand-stitched in a winging it fashion to the bag exterior). Nothing complicated at all  as far as bag linings go- I was more pleased that the measurements fit than that I managed to get the pieces together with this thing. I didn't sew again for a while after that. Mostly because the bobbins ran out of thread and I had no clue what to do.

Then came Christmas 2006 (or 2005? I think 2006). Years ago I stopped wanting anything very much for Christmas so my mother was often left pleading with me to think of something, anything, that she could add to the few things I did want. That year she saw a simple sewing machine on sale at Target for crazy cheap. She thought I might want to make more stitched bags and line them (and remembered the teapot machine escapades, complete with naughty words) so she thought a simple sewing machine would be a good idea. It scared the crap out of me to look at it, so I put it in my closet for a year. And then decided to try and make it work. I was still a fraidy-cat about it, so I signed up for sewing lessons, which I took for two years. I used only this machine during that time span.

 My Singer Prelude 8280. Where it all started. It makes me grin now to think how afraid I was to touch this thing.

I took this machine to every lesson for the next two years. My teacher sneered at it. Visibly and audibly. She told me I wouldn't be able to make anything with it and should have gotten a Bernina (ha! Okaaaaaayyyyyyy). My hackles were raised because it was a gift from my mumsy/best friend and how dare she speak ill of it! Whilst this machine is nowhere near the top of the line, it did (and will still do) its job very well. Having only ten stitches under its belt and no fancy bells and whistles made me, I believe, a better seamstress. Modern machines do so much of the work for you, but with a simple machine you must build your skills at a more basic level. When the teacher told me I would grow out of this I thought "What more could I want in a sewing machine?" For a very simple machine I highly recommend it for someone new to sewing or for someone who is going to do occasional sewing (though I used it daily for a variety of projects with no problem). I used this machine an immense amount in the two years it was my only, and we got along amazingly well. I cleaned and oiled it regularly, and never had much of a complaint from it. She was a regular at the far end of the kitchen table :)

After a couple years I begrudgingly saw what my teacher meant about wanting more out of a sewing machine, but I wasn't forking over the dough for a Bernina. I was getting much more serious about bag making and needed something with more power and a little more variety. I still didn't feel like I needed to take a grand old plunge into anything too high end, so I went with a fairly basic computerized Janome.

My Janome 7330 Magnolia.

I was kicking this machine around in my head, and when I saw a review of it online I decided to go for it. It cost what I considered a lot at the time, but it is a great machine and one I would recommend for any level of sewist. Fifteen needle positions (which took me way too long to discover), thirty-odd stitches, up/down needle settings, extra high presser foot lift, and automatic speed control. These things are all little luxuries that I am glad I had (especially with bag making). This girl, my Lola, is a stinkin' work animal. All she has asked is that I keep her clean and lint-free. Almost every single thing you've seen on this blog has been stitched by her. We're buds.

Towards the end of last year I was thinking I might start selling some quilts, but found that I was wrestling them through the machine quite a lot and it was having an effect on the quilt. Any issues were purely cosmetic, but when you want to sell a quilt you can't say "Oh, it's perfectly fine, it just looks bad here and there." Add to that the fact that I've been seeing a lot of quilts with a lot of stitch variety on them and have been a little envious. So although my Lola can sew quite the bag and even more, I felt I needed more if I want to make quilts that truly look good to anyone besides my mother. I've also been wanting some simple embroidery options that Lola just doesn't have. 

A couple weeks ago I spotted a fabulous deal for what is now my new sewing machine. I hastily conducted the "Should I? What do you think? Should I?" opinion poll, and kept getting the answer I wanted. You'll meet her next post. And no, it's still not a Bernina :)

Friday, January 25, 2013

A Few for Friday - #4

It's Friiiiiiiiii-daaaay! Here are a few snippets from my week (you know you're like "Yesssssssss. Been waiting for this ALL week!").

We babysat over the weekend. Someone is starting to crawl. That someone is also a fabulous napping buddy. And in love with the dog (you've never seen a face light up in such joy over the dog walking into the room).

 Katy had a destash sale. I volunteered to buy the roll of Sherbet Pips. She threw in a bunch of extra goodies--including a mini charm pack,  a few finished quilt blocks, and other blocks bagged and tagged for assembly. It's still my favorite fabric line so I almost backflipped out of my chair when she said she was all 'meh' over this project and wanted to find a good home for it. 

 A week and a half ago a spring-weight jacket was enough. Not this week. I think that's about ten below on the Celsius scale. It is freezing out there! It doesn't bother me so much but I could do without using my gas for warming up the car. They're calling for snow tomorrow.

I pulled over on my ride home to take this one. I think people thought I was crazy. I hastily pulled to the curb, took a picture of seemingly nothing, and then got back into traffic. I'd have been all WTF, too, if I wasn't the one doing it.

Much better than the gray gloomies of last week.

Tuesday, January 22, 2013

Entrelac: My New Project

Right at the beginning of the year I decided that I needed a new blanket project. One of my favorite things is curling up on the couch with a bag of yarn and a hook and stitching a growing piece of warmth that crawls down my lap and keeps me cozy. As I was prancing (almost literally, guys--no joke) into the store to buy my yarn for this, it finally hit me what I wanted to do for the Bavarian crochet style I mentioned here (totally random tangent, there, eh?). Filed that idea away, and continued on. I chose and arranged and rearranged and put back and reselected and so on until I was satisfied with my colors. I won't tell you how many people asked what I was making. OK, I will--it was about seven.  I wanted to tell them all to shut it and go away as I was doing my thinking, but I'm not that rude so I simply said "WTF do you think I'm making?" OK, no I didn't--I answered quite honestly and nicely. I like when people ask :)

Then the learning started.


Have you ever heard of entrelac crochet? I've heard of entrelac knitting, but I am a very basic skills knitter and have no desire to try that technique. But entrelac crochet? Or, to be more specific, tunisian entrelac crochet? OK, sure!

Entrelac means (loosely) interlaced, or interlocked. TE crochet grows block by block, each worked into the other to give the fabric a woven look. It requires you to know some basic tunisian crochet steps, and to have a loose hand while stitching as this creates a piece that is thicker than normal.


I wanted to do a piece with bright colors, but to also tone it down with a neutral every other row. My original idea was gray, but I fell in immediate love with the linen shade above. I started with a chain of about 230, neglecting to check that it would be long enough--so now it's 230 stitches wide and the length remains to be seen.

One of the interesting things that happens with this fabric is that the back looks very different from the front. You don't turn the work--you fasten off at each end and then start at the beginning again--the front always faces you.


The back has a knitted look as that's where all the loops end up when you work them off of your hook. Usually, with tunisian crochet, you use a very long hook that almost looks like a knitting needle. With this technique, no special hook is needed. I've tried plain tunisian before, but quickly lost interest. This, however, still has me interested and intrigued. One must keep track of stitches, but not to a high count, so it becomes very rhythmic but never boring as you still must pay attention.


It took me a few evenings to get this just right. I did that thing I do where I immediately assume I know everything there is to know and jumped right in, only to have a very strange piece of stitchery. So I frogged, and then decided to follow a pattern. The pattern wasn't working out for me so I slapped myself mentally and said "Look it up, dummy!" So I found a video that provided everything I needed to know--how to start, how to do the stitch, the counts, how to start each row, everything. I followed it to the letter, and was finally on my way.


The fabric works a bit tight and tends to curl, but I'm pretty sure once I wash and dry it (the yarn is 100% arylic) it will be soft and have a beautiful drape to it. I'm working in the ends as I proceed for the most part--this type of stitching makes it quite easy to weave in ends invisibly.


I won't lie--this was not the easiest thing to get the hang of, at first. I tend to stitch a little bit tight, so I had to consciously tell myself to ease up. I tried a large hook, but was still having some issues so I switched to a smaller hook (a K size) and sailed right along. It seems that whenever I've used my larger hooks I've had huge trouble, and I finally figured out why, quite by accident. It all comes down to branding.

Almost all of my crochet hooks are the Susan Bates brand. I've never had an issue with them (and especially love the version with the bamboo handles--easier on the hands than frigid rigid aluminum). My larger hooks are the Boye brand, and they are shaped quite differently, hence all my troubles with them in the past.

The left is Susan Bates (my preference), the right is Boye.

I certainly am not saying one is better than the other, just that one works better for me. I like the deeper...throat?...that the one has as well as the head shape (those are not official terms so don't quote me on those :)  If I had a modicum of patience when it comes to starting new projects I would have bought the larger hook in the brand I like, but all local stores didn't have them and I wasn't in the mood for a journey. The larger hook may have given a slightly less stiff feel to it, but so far I'm quite pleased with the progress I'm making.

So here are the details in case you'd like to try something similar. I'm using Lion Brand Vanna's Choice yarn in linen, cherry, fern, duckie, and aqua. I have two balls of each color, and eight of the linen. I'm using a K hook, I've made it about 230 stitches wide, and have used this video to get me started. The video is a bit repetitive but the best resource I found for learning this technique. She even shares a nifty little trick for what to do if you chain too many, a problem that has historically had me ripping and starting over (no tricks for if you don't chain enough, though).

I'd love it if you joined along and stitched up some cozy warmth! If you do, pop your creations in the Flickr group--I'd love to see! And I do apologize for the photos--no matter the settings or the editing, there is no substitute for the natural light that is in short supply lately. I'm off now, to finish my row of green :)

Sunday, January 20, 2013

Sunshine and Wet Leaves

Soooo hey--whoever sent the sunshine this weekend? Thank you! I don't know how you worked that one out, but I send you my kudos and my gratitude. It came just in time for me to photograph for you the runner I just made for my mother's windowsill. I usually go rectangular, but this time my sister and mom suggested that I try to extend the edges to protect more of the wood. I used a charm pack I had that I don't recall exactly why I bought it--it came with 40 squares instead of the usual 42. I made do, but 42 would have been perfect.

The charm pack was a set called 'Dancing in the Rain Batiks' by Moda. That name strikes me as ironic since the sun is shining on the finished product, teehee. Not my usual colors as they're very earthy and look like wet leaves (in a good way--not in a sodden, mushy way). But once I laid them out they looked warm, and very pretty--perfect for the kitchen. I took the pictures with it in the window so the shaping wouldn't look so odd, so the lighting varies from one side to the other.

 So here's almost the whole thing--I had nothing stashed to add to this and my goal was to not buy anything. It covers most of the sill and I didn't mess up the math part, so that was good enough for me. The fabrics are the same on both sides, but look very different on the right from that glorious sunshine coming through!

 See? Not my normal colors at all, but it looks like it belongs.

I've never used batik anything before, but I might start now that I have. There's something about how the colors all run together that I didn't appreciate until I used them.

I quilted by sewing straight on both sides of each seam, and then did a little diagonal action. I've never combined the two before, but I like how it turned out.

I had some plain muslin I used for the back. I ironed this so earnestly but it refused to press flat--I'm only showing you this so you can see how neat the quilting looks on the back. The binding fought me like you wouldn't believe, so no close-ups of that action.

I stitched just next to the binding instead of on top of it - it's kind of a fake hand-stitched look. I was cursing this binding by the time I was finished. I don't think I was in a sewing mood for this part. Note to self: know when to take a break.

All set up.

So that's my make for this week. I've got one more to make, but that will be an easy whole-cloth piece to protect the wood on top of a cabinet my dad made. It'll be nice practice for my new sewing machine. What what? Yeah, I splurged and completely indulged myself. I'll introduce her soon.

Happy Monday!

Thursday, January 17, 2013

A Few for Friday - #3

Hi gang. It has been one dreary week, both mentally and weather-wise. No sunshine since I don't even remember when translates to no energy, and no motivation. I did make a quilted runner for the kitchen windowsill for my mother, but I'm waiting to get some daylight up in this joint so I can show you the colors in their truest form. Not my usual, but reeeeaaalllly pretty (and a total stash project, too, so yay!).

Anyway, here goes for this week. You'd think I'd be taking better pictures by now, but I'm not using my big camera as it's easier to take my little one everywhere or grab it for a quick shot--hence the wee bit of fuzziness in #2 and 3.

Every morning, it seems. Who wants to get out of bed when that's what's waiting for you outside?

 Someone hung this random ornament in the kitchenette at work. I turned around from the counter to throw something away and came face to face with it. I want to steal it because I think it's stinkin' adorable.

I came home from work with the start of a migraine and wanted everyone to get away from me. Then I heard the boy and his dad plunking out that classic piano duet 'Heart and Soul.' Then they slowed it waaaaay down, and agreed that it was quite depressing when played that way. This is the only clear shot as most of them had blurry hands.

Not terribly inspiring, I'm afraid. Just a few teeny bits in a very dreary week. Send some sunshine this way! Or some snow! I won't be picky. Just get the rain out of here, please!

Wednesday, January 16, 2013

The Love Mantle

I know it's kind of early to be thinking Valentine's Day already (although Blogland is full of ideas already, and at this same length of time before Christmas everything was decorated) but a little color was needed. The thing I dislike most about the post-Christmas dreariness is how everything seems so bare and colorless. I get so used to cozying up on the couch with twinkly lights on everything that I miss the warm glow when they're gone. So between things I've made and things I bought at the dollar store or Michael's, my mother and I worked up a pretty, sparkly Valentine's mantle. Just to cheer up the very gray days we've been having.

It's only fair to give you a glimpse with crappy flash photography.

And with all the lights off. I love the shadows that the lights throw up on the wall.


Most of the stuff is easy-peasy-nothing-special...weezy. Yeah, that's it. The heart garland hanging in front? Find the tutorial here--it's super simple. The big paper balls nestled in the little sparkly buckets? I mentioned them/linked to the tutorial here. The sparkly garland, buckets, and love lights are from AC Moore (like Michael's, but I don't think as widespread).


The plastic champagne flutes with the sparkly hearts on sticks are all from the dollar store. They get a little top heavy so there are some beads in the bottom for a bit of extra weight.


After Christmas many places had a lot of Christmas items on sale. I found a few strands of pink garland, and  box of giant ruby ornaments nice and cheap. I crammed them in this vase to catch the light. I contemplated cutting off the silver hanging threads, but you never know when you'll need certain things for other purposes so I left them--extra sparkle never hurts anyway, right?


Crammed in the top are two beaded heart sprays I bought at Michael's. To the right you can see some shiny heart bunches--got those at Michael's, too. They're poked through one of the tiny holes that forms where the pieces come together on those paper globes. It keeps them nice and upright, and everything at the same height, for the most part.


So that's that. It definitely adds a bit of a warmth to the room. I cant' wait to light a fire and have the whole wall aglow. I don't have much in the way of sewing going on at the moment, so I've been able to hook up a storm. I promise I'll show you pics soon. It's a new-to-me technique, so I wanted to make sure I had it down pat before I showed you anything. Back soon!