Pages

Wednesday, December 26, 2018

Intarsia Sweater (The Thing That Tried to Kill Me)

Um...hello? <tap tap> Is this thing on?

Isn't it funny how almost four months can go by without a post and you don't even notice it because time flies, and then one day it hits you that it's been ALMOST FOUR MONTHS since you last posted, and how does that happen and what have you been doing with yourself anyway? It's the first year I haven't posted anything Christmassy, or gone on and on and on about how much I love Christmas lights, or how I can't believe how big the nephews are, and so on and so forth. But I very recently gifted a sweater to someone, and thought "I must remember to blog about this" and then thought "Hey, I haven't done that for a while!" So here we are.

So this sweater. I feel like I've got my sea legs when it comes to stranded colorwork, but intarsia was still twisting my gut and causing a "Gah! NO!" reaction. But when someone says "Hey, is this a thing you can do?" and it's someone you care about, you say "Of course I can!" and then hide all the angst because where did this overconfidence come from? I made a few practice swatches, carefully selected my yarn for color, ease of caring for it, and suitability for color work, and then set to.

The sweater pattern was simple while having just enough detail to keep it interesting. I used the Harvard Square Pullover from Lion Brand patterns, which has a great big stockinette front that was perfect for intarsiafying. I had my requested graphic--

This is Vault Tec guy or something like that from the Fallout video game

I used the Stitch Fiddle pattern-making site to get my chart (after carefully counting and figuring the size that would be best and all other sorts of mathy things that raised my blood pressure). And then I had other people cross their fingers (I couldn't cross mine--I had to knit) and got down to business. After a LOT of swearing and muttering of phrases like "I am going to burn this" and "No wonder there's a boyfriend sweater curse" I was as finished as I could be if I hoped to maintain my sanity.


Intarsia itself is not the absolute worst I found (once you get your yarn management sorted--I used those little plastic bobbins you can find in almost any craft store that carries knitting supplies). The issues I had came from inexperience and there are definitely things I would do differently next time (yes, I said next time, but not for a long time because this was enough for a while). For example, I'd go with a thinner yarn to get a lighter weight sweater, which would also allow me to use a MUCH more detailed chart that would give me a picture I'd be happier with. So then I wouldn't have to embroider a face in sock yarn so that it wouldn't scare small children.


I'd also look for a top-down pattern as I was very worried about the length of this (even though I measured like a lunatic) and I like the option of making something as long as you want.


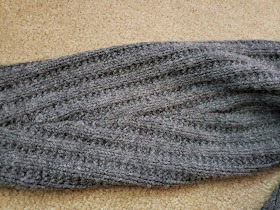
I love that 'broken rib' stitch on the sleeves--it added some nice texture, and when I sewed everything together it came together really neat.


For the collar, I didn't want to leave the ribbing raw, or unfinished, as I personally find that scratchy. So I made it twice the size it was supposed to be, and then sewed it down for a nice soft edge.


I contemplated doing the graphic in duplicate stitch, but didn't want a heavy weight blob on the front center; in retrospect I'm glad I didn't as it would have looked too puffy. Besides, the inside looks kind of neat.


I probably overdid the weaving in of the ends, but as this was a wool/acrylic blend (I used Plymouth Encore) I wanted to make sure they were really in there). Better safe than apologizing for a sweater falling apart, amiright?

So that's that. I'm over my fear of intarsia, I've learned a LOT in the making of this sweater, and most important--it fits!

Monday, September 3, 2018

Fimmel Hat

While I do love simple, fast projects, when it comes to knitting I prefer a little oomph. Whether it's self-striping yarn or new techniques I've never tried, I like having something different to look forward to as I work. My knitting goal for the year (is that a normal thing to have? Do other people set those?) is to become...I'll call it functionally literate...at color-work. And the Fimmel Hat was a great project for this (as long as we ignore the strands of yarn that kept wanting to get involved with each other instead of minding their own business).


The pattern for this was available only if you bought the kit, and the shop has since shut down, so apologies for teasing you if you were interested (but if it makes you feel better I got the kit on sale). I believe the gold color was supposed to be more of a khaki color, but it still works.


The yarn is 100% alpaca, which was a new fiber to me. I've always read that alpaca loosens a bit and can stretch way out, but this hat is small enough of a project that it wasn't an issue (though I certainly wouldn't make a sweater out of straight alpaca). Anyway, I like the little bit of haze the fiber gives.

I'm always in awe of pattern designers who are geniuses about decreases and increases, especially when color-work is involved. I mean....how do they DO that? Look at the crown of this hat (and ignore where I'm pretty sure I messed up a teeny bit, because you still get the idea)--


Now with stranded knitting, the most important thing to remember is to not pull those floats too tight or everything goes kerplooey. I was so focused on this that as I did the decreases and knit the top, I forgot that the hat would be cinched shut, and that those floats could be shorter. So I had to do some fancy fudge work to finish it off (but you can't tell because who turns a hat inside out and looks at the bind-off?).


As I knit more things like this, I realize that one of my favorite things to do is to turn it inside out and look at the floats (in a completely normal and non-gloaty sort of way).


I neglected to take a photo with this on, I'm just now realizing, but it fits just right. The looseness of the alpaca is nice as it keeps the hat from being smashed on my head and is something I can wear without my hair getting that look about it, but it's not so loose that it falls off.

The pattern also came with a design for wristers, but I haven't attempted those yet. There were a lot of colors in this (though no more than two in any row), but they did love to twist and twine, and I very nearly chucked the leftovers in a rage due to far too many detangling sessions.

Tuesday, August 21, 2018

Broken Waves Shawl

When I went on a knitting retreat back in October, I bought some beautifully squishy yarn. Due to other projects, and certain unforeseen circumstances, it took me a really long time to cast it on for the pattern I had bought to go with it. But now it is finished, and blocked, and the first day of appropriate weather I'm wrapping myself in this and strutting around.

Disclaimer: this color was nearly impossible to photograph accurately.


The pattern is called 'Broken Waves.' I bought a paper pattern, but it's available on Ravelry as well. It's a looooooong triangular shawl, predominantly stitched in garter stitch, with a cabled and ribbed border.

This is probably the closest approximation of the true color.

The shawl is knit as a long triangle (almost like half of a diamond), and then stitches picked up along the edge. Then these picked up stitches are knit, one at a time, as you go back and forth across the border. The cabling is supposed to stop at the point, but I have issues, and I knew that the lack of symmetry would bother me. So I just kept going with it.


The yarn is an absolutely luxurious sport weight merino. The shop had the exact yardage I needed, and even though this color is no stranger to my shawl collection I couldn't resist. Especially when I saw the name of it--


Who can resist a little Alice in Wonderland, especially when you're eternally twelve years old? I'd like to say this shawl was a total pleasure to knit, but it wasn't, until I made a minor change. I say a minor change, but I ended up knitting the body of this shawl twice. As the pattern was written, increases were done on the very edge of the shawl. When it came time to pick up the stitches it made for a very messy edge. And I just couldn't have that. So I started over, but did the increase as a kfb, and did it one stitch in from the edge. This made everything much neater. I also omitted the yarn overs because I didn't like how that looked, either. BUT, once I got going with those changes, this was fun to knit. 


Now back to stitching my sweater. Because while it's steaming outside, one doesn't wait until sweater weather arrives to knit a sweater, amiright?

Wednesday, August 1, 2018

Hydrangea Wreath

I made this wreath a while ago, and every time I walk by it I think "Yep, must share that" but I always forget. But today I break that streak.

Last year I bought a kit for a shawl, but didn't really love it, so I used the one set of yarn for this blanket, and then used the remainder to make this wreath, as when I looked at the colors I could think of one thing and one thing only. Hydrangeas.

I found a pattern online (I think it was this one, but it was a while ago so I'm not entirely sure), and just stitched and stitched and stitched until I ran out of yarn (which is Scheepjes Catona, by the way), and was left with a giant pile of hydrangea petals.


I found a styrofoam wreath and wrapped it the yarn that wasn't flower colored. It wasn't that much fun, let's be honest here.


Once the wreath was wrapped, I placed the flowers (and did it again, and again, and then again, because I just couldn't decide) and then finally pinned them down. Then I realized the pins were mighty short, so I added hot glue for extra security.


I ran out of steam, and just did not feel like making leaves for green, so I bought this floral...thing...and then cut that apart and glued pieces here and there.


Not my favorite thing ever, but it's definitely reminiscent of hydrangeas, which is what I was going for, so it's a win, right? I mean...they can't all be gnome wreaths, can they?

Sunday, July 8, 2018

Floral Fossil Workshop

My youngest sister follows  a butt ton (an actual measurement, mind you) of local artists on Instagram. She is very much a fan of the various local arts that are trying their darndest to regain a foothold in Philadelphia (at one time Philly was huge in fashion and textile manufacturing, as well as many other things, but those industries left some time ago). At some point, she happened across local artist Ron Nicole, and began...I'll call it stalking...her social media pages for announcements of workshops. When she saw one, she asked if I'd be interested. I love trying new things, even if I might only do it once, so we both jumped to sign up.

The workshop was yesterday down in the City at the Art Star Gallery and Boutique. We had a blasty blast, and left with finished pieces and a lot of new knowledge (and the encouragement to play and experiment and try new things). I tried to take enough photos to show you the technique, and also to remind myself in case I do want to do this again.

Let's start with the obligatory materials shot:


We've got clay, a scraper, the adjustable part of an embroidery hoop, tweezers, a twisted wire hanger, stirring sticks, and a dust mask.

First you roll out the clay until it's a little bigger than your hoop and trim off some of the excess.


Then you select flowers. This involves a lot of trial and error, and the stiffer the flower the better (or so we were told). She had pre-selected what would work best, so we knew we'd be getting decent impressions (but also told us what doesn't work well at all in case we left with any bright ideas).

Laying out the flowers is the trickiest part. It was taking me forever, so I just decided to go for it and whatever happened would be fine.


The part I had difficulty with is that you have to visualize this in reverse. It made my brain hurt trying to do this, and I could see me taking hours on this part if I had limitless time. Once you have your arrangement somewhat figured out, you push them down into the clay. You have to smush them in there good, but at the same time not too hard so you don't go all the way through. A rolling pin helps a little bit. Looking at this now, I can see where it's a little messy looking in certain parts (but again--limited time had me cutting corners).

Once you've done a jolly good smash, you just pull all the flowers back out. They're covered in clay, but actually bounce back much more than you'd ever think.


Pulling them out was a little tense, as I was just absolutely positive I was going to mess things up spectacularly. But you just remove the flowers, and then use tweezers to pull out any of the larger bits that are being stubborn. Some bits were so small it might have ruined the mold to remove them all, so I just left them, hoping for a pop of color in the finished piece.


Then, you mix up your plaster and water, let it sit for a couple minutes, and then pour it into the hoop. She had measured things so precisely that it filled the hoop practically perfectly.


Then we had donuts and chatted for about an hour while this set. When it was cold to the touch, we peeled off the mold and had the most satisfying reveal ever.


Then you unscrew the hoop, neaten up the edges a bit, and voila!


I can certainly see how you need a few tries to work out the kinks. I'd be more mindful of the stems, and you can see where the little bits that didn't want to be removed from the clay decided to scatter themselves around the plaster cast. But the level of detail is amazing.


It's going to take about a week for this to fully set, and then I have to figure out where I'm going to hang it. I had a lot of fun doing this, and I learned a lot. It's a fairly easy thing to do, but you can certainly see how there's a bit of a learning curve with the finer details.

If you're interested in seeing some really beautiful pieces, check out her website here.

Tuesday, June 26, 2018

Mandala Hoop

Well. Long time no...write. It's funny how it just gets away from you. I've been working on the same shawl for a bazillion and seven years (I didn't like how it turned out following the pattern instructions, so I frogged the whole thing and redid it my way). I've been devouring books for some reason (I love to read anyway, but have been doing more and more of it lately). And I finally managed to get my hands on the object of my Barnes and Noble stalking.

I used to have a Mollie Makes subscription, but ended it a while ago as it ended up seeming like a waste of money. However, I follow them on Instagram, and I decide if I want to buy the issue based on the free kit (very mature, I know). BUT I fell in love with the way this hoop turned out, so I figured when they put out the hoop kits I'll buy those issues. Of course, when they show the kit and the issue is on sale are not always synced up, and I made more than a handful of trips to the store, and then stormed out when the magazine section did not fulfill my needs.

Last week, they finally had the issue I was after, and I skipped out of the store like a happy kid with a bag full of candy. It was a super quick thing to stitch, and I adore the colors, but the energy expended stalking this item was probably overkill.


The yarn was a shimmery (probably mercerized) cotton, and the hoop is maybe four inches across? But those colors!!!!!!! This is what the hoop looks like on the right side. I don't know if I made it too small or stitched it on too tight or if the final round is supposed to be laying more on the outside of the hoop, but I really don't care.


And that's the back side. Not much different at all, but something has to be the back.


Isn't that hot pink center color absolutely divine???????? I think I was able to stitch this in an evening. I didn't have to rip anything out. I didn't have to curse at anything. It just flowed. It's a mandala, so I think that's how it's supposed to happen anyway.

Not very interesting, I know. But have I mentioned the shawl? That is sincerely all I've been working on. I can't wait until it's finished, because while I love the yarn I'm also tired of it right now. Especially since I have to tuck it away until it's chilly enough to wear it. BUT. Hopefully it'll be done soon. I can't wait to show you the border--I've never done this technique before so I'm quite pleased with how it's turned out (i.e. just like it was supposed to).

Toodles for now!

Tuesday, May 29, 2018

Catching Up on Things

Back in...maybe January...ish...I bought an issue of Mollie Makes that came with a really cute embroidery kit. It was supposed to be for Valentine's Day, but I didn't get to it. And then when I had big plans to do it, it had to wait a little longer. A couple weeks ago, I spent a Saturday afternoon happily stitching and drinking tea so I could cross one more thing off of my to-do list. This wee little bit of embroidery made me quite happy (mostly, because after a million years, I FINally mastered the French knot).


I had a stinker of a time getting the pre-printed fabric into the hoop. It's still not in there correctly, but I was thiiiiiiis close to losing my temper with it, so it's good enough. But isn't that a delightful freebie?


I don't have much experience with embroidery, and sometimes I curse too much while I'm stitching, but I do so enjoy it. Especially all of those beautifully colored threads.


The great thing about kits is that you generally get just enough so you don't have oodles of leftover materials. But the thing about kits is that you get just enough. There wasn't much fabric on the back to gather it in with some simple stitches and hide it behind the hoop, so I cut a piece of lightweight cardboard and shoved it in there nice and tight.


And here is another detail shot, because those are my favorite.


In other news, I saw the specialist again last week. He's still inclined to think this is not MS. I see him again in September, have another MRI in November, and at that point he'll be ready to make a diagnosis (some fancy talk about blood-brain barriers, contrast uptake, and anti-inflammatory medication). He's leaning towards an ever-present vascular abnormality that became inflamed (perhaps due to a virus--remember my vertigo?) and is in the absolute perfect spot to cause the symptoms I had (and will probably never bother me again). I'm keeping it in my brain that this is indeed MS so I don't have to wrap my brain around it again, but I've got all my fingers and toes crossed that in a few months he'll say "Nope. Now leave." And then I shall skip out the door with a smile on my face, and probably buy myself some ice cream.

Wednesday, May 16, 2018

Gray Matter--A Ta-Dah Post

When I first got home from the hospital a couple months ago, there was a lot of naps and a ton of questionable TV show viewing. It wasn't pretty. Reading was uncomfortable, and I couldn't fathom picking up my sweater and continuing with the colorwork. My mom said "Is there something small you could work on? Just so you don't go crazy?" And then I remembered the drawer full of leftover Stylecraft DK from this blanket. You can't get much smaller than a granny square, and you can't get much simpler than a single-color granny square.


The first dozen or so felt like a triumph, and I was quite proud of myself. I don't know if it was psychosomatic, but it felt difficult, like I was just learning. But my hands quickly remembered what they were supposed to be doing, and I had 130 squares in not much time.

From the outset, I knew I wanted to break up the squares with a grayish-brownish-somewhere-in-betweenish color, and Stylecraft 'Parchment' fit the bill. I may have bought entirely too much, but I am thinking I can get a sweater out of what's left (I don't know how much I thought I'd need).

Anyhoodle--here's the finished product.


My plan was to use as many leftovers as I could, and I obviously had more of some colors than others, but I love the outcome. The extra pink and yellow make it brighter, that's for sure. And the connecting color really makes it all pop nicely.

I decided to name this Gray Matter for a few reasons. First, I've had a lot of pictures of my brain taken recently. Sometimes, brain pictures have a lot of colors to them. Second, while most of the blocks are ordinary and plain, in my efforts to use all the yarn some colors were combined in interesting ways. Just like--most of my brain is totally normal (I know my mom just snorted and thought 'Child, you were never normal'), but there's this little spot that could be something, but might not.

Sometimes I feel perfectly myself--chipper, and just fine, and perfectly balanced (I consider red and pink my 'me' colors).


Sometimes I feel just slightly....off.


Sometimes? I nick a little something when I do my injection. And I blot it with an alcohol swab. (After yelling "We've got a bleeder!" for comedic effect).


Most of the time, I feel great. And lucky. And grateful.


But, even though I've had all my tests and scans, I still don't know what's up for sure until I see the neurologist. In one month. One very long month (although my mom is going much more crazy than I am). It's all a big gray area right now. Just like the gray (or is it tan? see? that's a gray area too) that holds together these flashes of color.

My favorite part of this blanket? The border.


It's got a delightful ruffle to it that somehow doesn't overpower the rest of the blanket.


It was quite simple. I used this join-as-you-go method to connect all of the squares. I then did a round of single crochet, then a round of double crochet (putting five stitches in each corner stitch). For the next round I did (double crochet, chain one) in each stitch around, giving things a slight wave. Then I went whole hog, and did three double crochets in every stitch all the way around.

Considering my little bit of a theme here, this made me think of the convolutions in the structure of our brains. My 'therapy blanket' was quickly becoming an 'art blanket.'


It's simple granny squares, with the most neutral of colors holding it all together. But that little detail of the ruffled edge makes me smile every time I see it draped across the back of the love seat.


I didn't think I'd be so pleased with this, but I am. Out of all of the blankets I've made, this might be my favorite (but don't tell the others--they each think I like them best).

Sunday, May 13, 2018

Giveaway Winner

Happy Mother's Day, to all of you moms in the States (and elsewhere. Because why not? Moms don't get enough credit as it is).

I've got the winner of the yarn giveaway to announce. There weren't many entries in this one, but someone is going to get some delightfully squishy mail. So, without further ado...


I always dislike being first in a giveaway because I think there's no way I'll ever be randomly chosen (though if something is random it shouldn't matter--I understand this, but my instinct disagrees with this logic. This is why I don't gamble).

So, number one. That would be........


Congrats, Kris, you lucky duck! This is some seriously delightful stuff. I'm sending you a separate email to get your address so I can ship you this bundle of beautiful.

Have a great day, everyone!