Tuesday, May 31, 2016

Murder Mystery Quilt Along: Block 5

Guys. It is the last day of May (it might be almost the second day of June depending on where you live, or when Blogger decides to feed this into your dashboard/reader). I can't deal with it. It's not even super hot yet. Anyway--I've got my next block for you in the murder mystery quilt along. This chapter was called 'Welcome to the Hike Inn.' I'd like to believe this month's block is a representation of the inn based on the description in the story, but at this point I have no idea.

The blocks for the summer months are going to be super simple, which is fine by me. Not that I'm not up for a challenge, but as this quilt is a total mystery it's nice that I'm not slaving over complicated blocks or fabric choices. My curiosity is killing me, though.


Good thing I love polka dots, eh? I think it took me longer to cut everything out than it did to sew it together. Since there's not too much else I can say, here's a picture of what I've got so far in the order I made them:


No clue. Absolutely no clue. While the blocks themselves aren't complicated, I do applaud the work that went into this (not even halfway through!). To come up with a story and quilt blocks to go with it sounds hard enough, but to make everything part of the mystery and the clues and the answer....to quote teenagers everywhere "I can't even."

I even went all super-nerd. I reread all of the chapters and clues, and made notes, and circled things, and highlighted, and even all-capped things like "RED SHOELACES!" I don't even know if it's relevant; I just feel like I should be doing things like that. If anyone knows a real-live detective can you ask them if 'red shoelaces' is something they'd write in their little notebooks, just so I know if I'm on the right track?

Saturday, May 28, 2016

Your Eyes Won't Believe What Your Sewing Machine Has Done: Adult Version

If you're like me, you love the look of free-motion quilting (henceforth referred to as FMQ) but are abysmal at achieving anything approaching a neat result. I have practiced and practiced, bought a special bobbin case for my machine, read up on the subject, watched videos (going for learning by osmosis)--nothing. I decided that my quilting life would consist of straight lines (which I also love, but FMQ just has a little bit of pizzazz to it). Then I received an email from Nancy's Notions letting me know they might have solved all of my problems (OK, it wasn't that personal, but it felt that way). It was a product simply titled 'Ruler Foot and Template Set.' I had never heard of ruler work. What was this mysterious thing? I watched a few videos and I was visually smitten. I strongly hinted at my mother regarding birthday wanties, and set about waiting. Question: why does Christmas take forever but birthdays arrive at the speed of light?

I gave this thing a good long play-with, and I'm now ready to share my thoughts with you. Out of the package, this is what you get (wrinkly gray fabric for contrast only):

Contents: ruler foot, pins, gripper tape, gauge, instructions, and the following templates--spiral, circle, clam shells, large and small arc, and two types of petals (or other designs depending on how you use them).

If you're wondering why there is tape on three of the templates, it's because there is a little puzzle piece taped in there that you can remove. As you sew on the inside of these templates, if you want to make a continuous pattern you'd simply remove the key, stitch over to your next starting point, and replace the key so that you again have a nice smooth edge to sew along.


First things first--fresh needle, lower the feed dogs, make a sandwich (a quilt sandwich, that is--you'll want to practice so if you've got that pile of scraps you don't know what to do with but are too big to toss, now you know what to do with them). I applied the gripper tape to the templates (you don't need much--it's just to keep things from skidding all around--and trust me, you want to use it). Final step is to put the ruler foot on your machine. This looks very similar to a free motion (or darning) foot, but is made to go with this template system. The screw hole is more of a slit instead of a hole, making this adjustable.


So you put it on, but don't tighten it, as you need to lower the foot to see how it greets your sandwich--you want it to glide effortlessly over the top of it without putting too much pressure on it (everything is explained in detail in the instructions). Then tighten the screw up.


Choose your template, and get going. I started with the clam shell template--the technique is the same for each size. There are markings on the templates and it might be helpful to draw a very light line in disappearing ink so you have a visual guide. Put the foot in the notch, and sew, keeping the foot lined up with the edge (this is where the gripper tape comes in very handy--ask me how I know).


In the photo above I've already stitched a pass along the template and moved it into the next position, ready to go again.


You then stitch up the side to get yourself into position to go again  (using the lines to square up). This is what that looks like when finished:


Of course, AFTER doing this I decided to watch the videos they made, and they are very helpful in determining how to line up the shells so they are appropriately staggered. I just wanted to give you a general idea of that to do. If I was using this on a quilt, I think I'd find it simpler to sew end to end, cut, and restart without sewing that straight line up the edge. As is true with most things you have to find what works best for you--sometimes our hands will only go so far in agreeing with our brains.

Next I decided to try one of the spinning petal templates. For this one you find your center point, and place the pin (which looks like a metal thumb tack, really) coming up through that point, and through the little hole in the template.


You start at point A, and stitch around, coming to a rest at point B. 


With the needle down, you then rotate the template on the pin so that one of those little leaf shapes overlaps the leaf you just sewed (look to the left of the foot in the photo below):


Then you stitch around again. Repeat this until the whole thing is finished.


I had a few little fits and starts, as you can see, but you get the general idea of the thing. The pin doesn't cut the fabric, so the little hole it makes should rub away easily enough.

I then gave the other templates a whirl--most of them don't spin on a pin, but you do reposition them, so it helps to have some visuals on where to line things up.


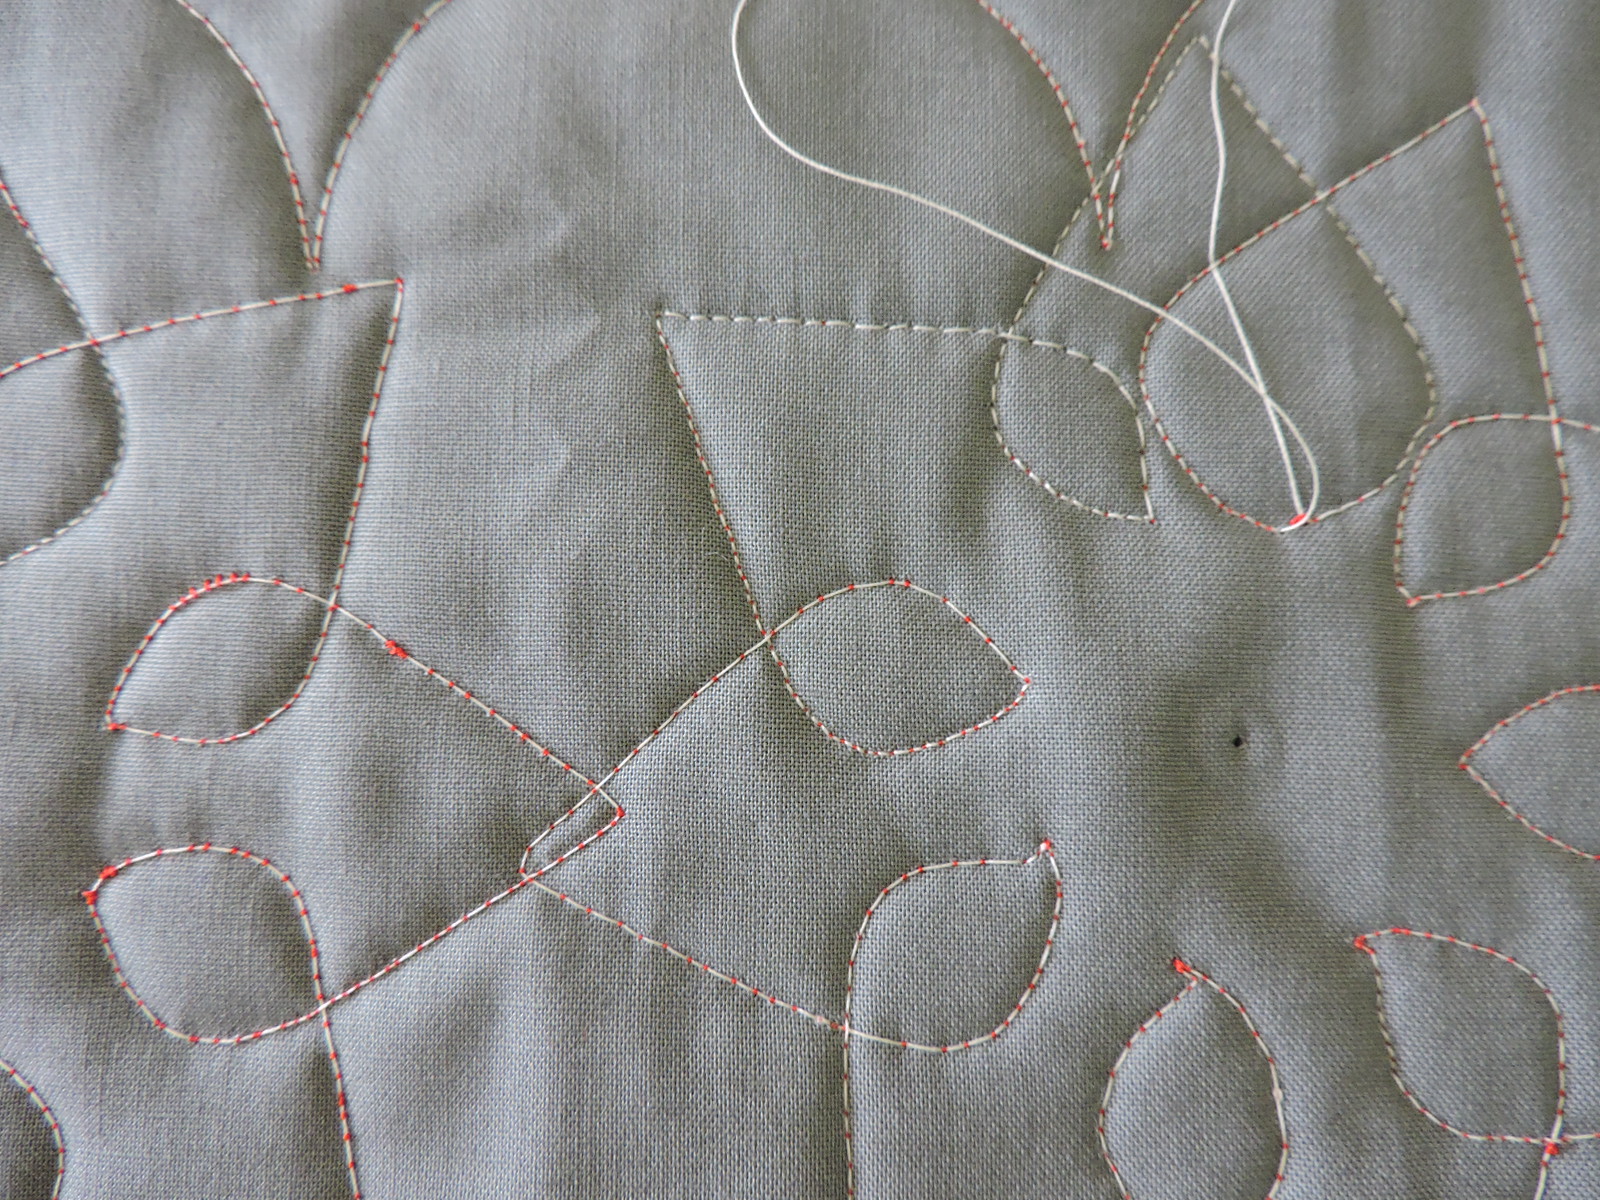
This one here is the other petal shape that creates a nifty flower (this was my first crack, hence a few wiggles in the placement). It's quite satisfying to end up dead center.


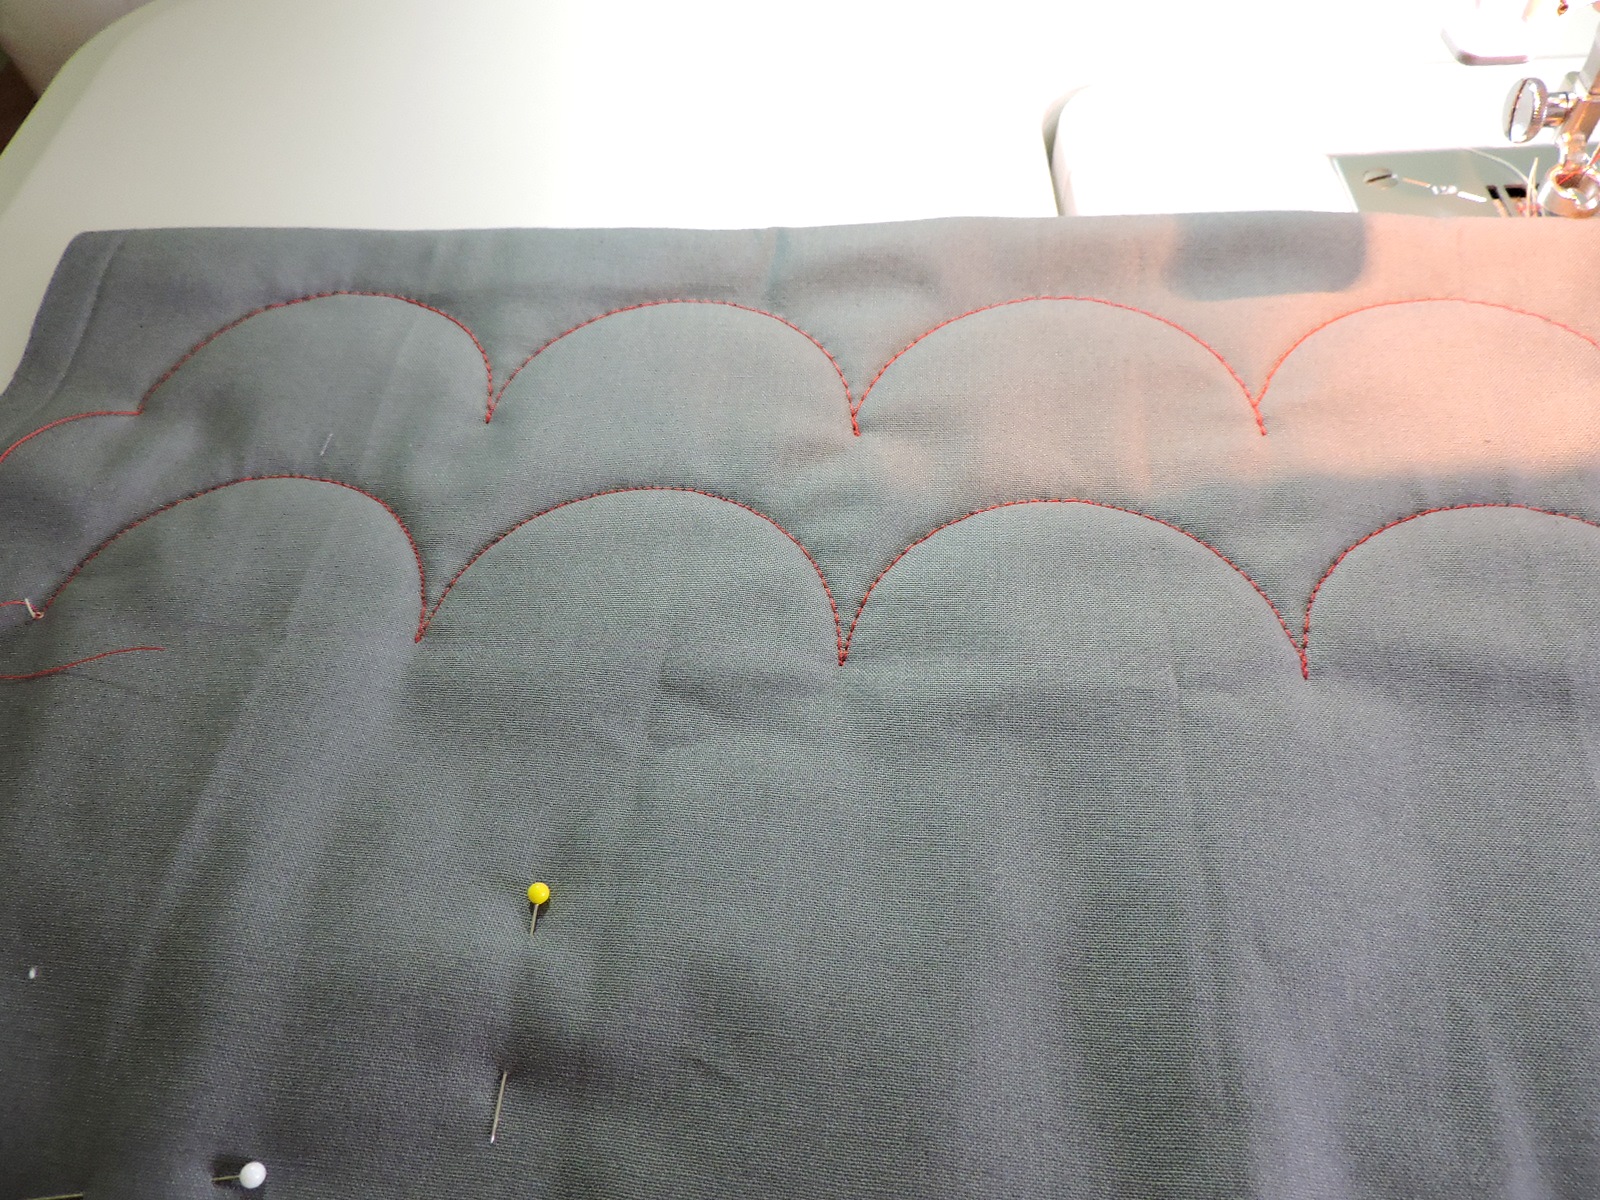
This one is the circle template--I love the way this one comes out. I did this one with eight overlaps--it makes for some fairly dense quilting.


And this one is for the arc template--probably the easiest of the bunch, but you can end up with some nifty stitching just by moving the curved template along.

After giving this several hours of play, this is definitely something I'd recommend. I do have a few bits of advice, though:
  1. Practice. If you've got a fair hand at regular free motion, this should be easy for you. However, if you've struggled with it as I have, then practice is absolutely necessary to get the feel of the tools. It feels a little bit odd at first, but the more you play the easier it is to move along.
  2. I don't know if I'd use these for a large quilt (large being bigger than a throw). I feel like an Olympic wrestler getting a quilt through my machine for simple straight lines. I hesitate to imagine what my poor back and shoulders would feel like doing this on a queen sized quilt. But imagine the adorable baby quilts and table runners you could stitch up!!
  3. Tension (on the under-side). This goes along with number one, but can also be its own point. I've played with this a fair bit, and I am still working to find just the right speed to get just the right tension. Now mind you, my  tension with this method is light years better than with regular FMQ--I somehow break needles and manage to have big loose loops all over the back at the same time (this seems counter-intuitive, but I obviously have no idea how these things work, soooo.....). I still need some work this way, but at least you can see that I'm getting there (sometimes):

Part of my problem is that there is a definite height difference between my machine bed and the extension bed--things seem to get a little hung up there, and that's where the teeny stitches jumping into big stitches come into play (things get stuck and go slow, and then pop free and take off like greased lightning). I should be able to easily fix this with some masking tape to help smooth that gap out. 

So other than needing to get my sea legs, I can honestly say I love this product as I am already better than how I usually FMQ, and that's just playing with it for a few hours. The shapes are very nifty (and they have even more), there are videos available to help out, and it can pretty much work with any machine. I'd love to know your thoughts if you use this system or something similar for your quilts!

Monday, May 23, 2016

Your Eyes Won't Believe What Your Hands Have Done: Kids Version

A few weeks ago I went into AC Moore (it's like a Michael's) with the sole intent of buying one calligraphy pen and nothing else. I DID buy just one pen, but I failed on the nothing else bit. I had a fifty percent off coupon, and they had a Spirograph set . I'm sure you can do the math. I remember we had this when I was little, and how awesome I thought it was. Now that I know it was invented by a mathematician and the thought and ingenuity that went into it, I think it's even more awesome.

Anyway--does this bring back any memories for any of you?


It was a little tricky to get used to (I remember it being super simple) as you have to keep the wheel pressed just so against the ring. But once you get the hang of it, it's like anything else. There's a little guidebook that comes with it that tells you what to do to create certain designs.


I was annoyed that my neon gel pens aren't compatible with this as I had visions of neon ink on a black background and something totally flower-powery. But then I moved on to combining line work with a spiro base and occupied myself for way too long with something sold in toy stores.

Same design, but one is plain and the other is decorated a la moi.

I love the difference! Like those quilt blocks that are constructed the same but can look entirely different depending on fabric choice.

The entire thing is fairly soothing. And the best part is that I start with a nice symmetrical base, so even if my lines aren't perfect the shell is.

If you are sitting there thinking "Did I just really read a blog post written by a grown-a$$ woman about a child's toy from the sixties?" I can assure you that yes, you did. And if you come back in a few days, I'll show you my new quilting toys that are kind of the adult version of a spirograph.

Tuesday, May 17, 2016

My Very Own Red Ryder BB Gun

Not really. Metaphorically. But with all the feels.

Not long ago was my birthday, and I wrote to you here that my sisters bought me a totally unexpected gift--tickets to a show on Garrison Keillor's farewell tour. I have listened to A Prairie Home Companion on and off and on again for about twenty years--I can guarantee you that I was the only kid (possibly the only person, haha) in my entire high school who listened to an old-timey radio variety show broadcast live from Minnesota. I had no idea he was coming to a theater in a town not far from me, but my sister did, and snagged a pair of tickets way back before Thanksgiving, and held onto them without bursting at the seams to tell (unlike me--I cannot hold onto surprises that long).

Anyway, my mother was my date, and after I had a little pre-date bash at the dentist for my six-month cleaning, we headed out to the Keswick Theatre, an old-fashioned theater that was originally a movie house.


The place was packed--I couldn't believe how many people came out to see this (because whenever I have mentioned his name it got me nothing but blank stares). The stage was set very simply--


-- a piano and a stool. The lights dimmed, the crowd hushed, and the man himself walked out onto the stage. And there he remained for two hours straight, no intermission, no cue cards or cheat sheets or notes or anything, just him and the piano player Rich Dworsky. Photos weren't allowed, so my sneaky shot is terrible, but you get the idea.


He starts the show with a sing-along of sorts, and calls the audience his 'choir.' No accompaniment, just clear, soft voices singing "God Bless America" and "Swing Low, Sweet Chariot." And then the tale-telling and the jokes commence, and we were riveted for two straight hours. This deep, soft, melodic voice regaled us with tales of Minnesota farms, and Lutheran ministers, and forgotten Norwegians. It was definitely reminiscent of the radio show, but at the same time very different. At times we roared with laughter. Other times he started to be a bit more serious, but then quickly (and unbeknownst to us for a little while) set the scene for another side-splitting story.

All too soon, it was over, this evening of as-American-as-apple-pie goodness. We wrapped up by singing "I Can't Help Falling in Love With You." Standing ovation, bows, happy faces and teary eyes. All was right with the world. Fare thee well, Mr. Keillor. You may say you come from good-enough-people, but I respectfully disagree.

Tuesday, May 10, 2016

Brain Yoga

I've been trying to find some simple things to work on to get in some drawing practice. If you follow me on Pinterest you're probably aware that a lot of these 'things' have been in the form of zentangles. What are zentangles? Well, according to their own definition, the "zetangle method is an easy-to-learn, relaxing, and fun way to create beautiful images by drawing structured patterns. It increases focus and creativity, and provides artistic satisfaction along with an increased sense of personal well-being." There's a whole 'method' and a kit you can buy, and, I guess, a way that you're supposed to do it. But why would you spend money when there is an infinite amount of inspiration online for free?

So anyway, if you make a 'traditional zentangle' (which is funny that it's traditional because it's only been a thing for about ten years) you're supposed to start with a tile (a small square of paper) and draw all over it. I wanted something bigger and more cohesive, so I traced a bunch of interlocking circles and filled the spaces in with different patterns (if planning was a skill of mine I'd have traced circles to the outer edges of the paper).


Exercises like this give you great practice at pen control and tip-size use, and also work your neurons to come up with different patterns for each section.


I worked on this piece for a few evenings, and it felt just as soothing as my yoga classes to my brain. The practice is so repetitive but can be fairly precise and intricate, forcing you to focus on what you're doing (just like when I'm in my actual yoga class and just trying to concentrate on not tipping over).


Although I am a wicked color fiend, I do love the stark black and white contrast, and the high impact that no color can have, visually.


I've been trying to get in more practice drawing things that are actual things, and I've turned out a few bits that aren't terrible, but I do find that this repetitive line-work is my favorite (right now).


My cousin sent me a message on Instagram to tell me that she thought this would be a great print for a handbag. I don't know if that was a hint or a compliment, hahaha, but wouldn't that be fun, to have fabric designs to your name? A girl can dream. And practice. One must practice, I suppose, when art in any form is not something that comes naturally. My take is that I've worked thousands and thousands of stitches, for what must be thousands of hours, to get to a point where I feel confident in my skills with knit, crochet, and sewing. So I guess a similar investment must be made here. At this rate I'll be famous after I'm dead. Which, I guess, is better than never.

Sunday, May 8, 2016

Operetta Shawl...Kind Of...

Last August, I went out to Lancaster County (Amish country) for a day trip (if you were reading my blog in December you might remember the extravaganza that was the Christmas museum). Anyway, there were quite a few fabric and yarn shops in the area. I was trying to be restrained with both, so I bought some quilt binding fabric.  And some yarn.

The yarn shop I purchased from is called Labadie Looms. This has been a family business for over NINE generations, going way back to 1683. They specialize in weaving and spinning, as well as selling looms, spinning wheels and accessories, wool roving, and yarn that is either spun and dyed on-site or is made by local artisans (all sourced from area animals). Pretty cool, right? I bought a hank of their dyed wool of a fingering weight, and a hank of beautiful mohair that was closer to a fingering weight than a lace weight. Both of these yarns have a little bit of sparkle running through them, so it has the slightest shimmer to it that I just could not capture in pictures. But it's in there.

Fast forward a few months and the Skeino company released a new shawl pattern, the Operetta Shawl. I really like this company as they're socially responsible, sell beautiful yarns, and come up with some really unique patterns. Their Arabella Shawl is one of my favorite things I've ever made. Now, their Operetta Shawl kit is a combination of a worsted weight wool and a lace weight mohair. I had two fingering-ish weight yarns that had been sitting in the original paper bag and no idea what I would use them for. So I decided to make this pattern using slightly different yarns, and see what happened. What happened is a shawl that I love.


I was a bit nervous I'd end up with a small scarflet thingee, but this ended up the same size (about five feet across the top, and about three from the center to the point).


It is so lightweight and fluffy, but also warm--perfect for cool spring/summer nights, but also as a little something extra over a sweater in the winter without adding too much weight. The rows of mohair almost make it look like all those wooly loops are just floating.


The mohair feels thin and delicate, like there is no way possible it could hold up, but it's quite strong, and barely created a fuzz cloud when I wound the ball, but bloomed beautifully as it was being knit, giving the whole shawl a misty aura.


The pattern itself is quite smart. Usually in alternating row patterns, you either carry the yarn up the side or weave in more ends than should be legal. This pattern uses a clever back-and-forth-on-circulars technique that leaves you with just a few ends to weave in when you're through.


The only thing that bothers me slightly is that, even with wet blocking and pinning, the point still wants to curl a little bit. I'm certain this has to do with my bind-off--it feels loose enough as I bound off purl-wise, but there's probably just enough pull around the corner to tighten it just so slightly.


The cast-on is that little section that looks just a little different there in the photo--it's a garter tab start, which I've never done before but is quite simple. I was a little worried that the top edge would pull too much on the stitches, but it feels just right. Which is good. Because I don't know if I have enough yarn left to crochet a little bit of strength into that top edge.


This shawl is quite large and of pretty thin yarn, so it took me about a month to knit. I tried to make it while I was watching the Amazon series The Man in the High Castle, but it was entirely too interesting and I didn't get much done (seriously--check that show out). But as it's entirely garter stitch with a few increases thrown in, there's not much you have to pay attention to (except for the slide-your-stitches part).


While I do love Skeino products, I'll be the first to admit that they are by no means inexpensive, and might even be prohibitive for some. However, they do provide their patterns for free on Ravelry--you can find this one here. So if you've got yarn you like you can very easily make your own version at a cost that's more agreeable to you. Skeino also teams up with VeryPink to provide comprehensive tutorials on their patterns. This one is available here.

Happy knitting!

** I'm aware this post reads as a sales ad of sorts for Skeino and VeryPink, but I am in no way affiliated with them. Skeino is a company whose product and ethics I like, and VeryPink is a resource I find to be immensely helpful. 

Wednesday, May 4, 2016

Murder Mystery Quilt Along: Block 4

I almost forgot to post this month's quilt block (I know you sit there at the edge of your seat, just waiting for these). We're up to chapter four already, which seems insanely fast. I still have no idea where this is headed and what I'm making, but I guess that's the point of the whole thing.


There was some debate over what this block is supposed to represent, and it definitely would have influenced my fabric choices. I waffled for quite a bit, and then just went with the suggested fabrics as I've been doing all along. I've never reverse-appliqued before, and I'm not a fan of doing it (though I like the look of it). I originally cut out all the circles in the background fabric at once, but things got very wonky when I tried to sew the appliques to it. So I scrapped that, and cut and sewed one at a time.


I wanted to do a blanket stitch, but called it a day after managing just to stitch these down successfully with a straight stitch. Of course I can always go back and add it--it would probably be much easier with some stitches stabilizing the rest of the fabric.


Normally I wouldn't show you the back, but here it is anyway. I didn't trim anything yet, because at this point I still don't know what is a clue and what is meaningless.

My plan (when I can get a little chunk of time) is to spread out my blocks and reread the chapters to see if the detective portion of my brain can be activated. Or maybe I'll just find a detective and ask him/her to help me out.

Sunday, May 1, 2016

Sunshine on a Gray Day

Today is my birthday. I write that not to garner wishes, but as a simple statement of fact, just like I'd say "I have brown eyes." I'm on the upper edge of my thirties, but I still feel like I could be somewhere between 12 and 19 (I've never felt comfortable in bars so I don't think my 'feels like' age would be legal drinking age, hahaha). It was rainy and cold and dreary today, so the pics are from last weekend when we had a beautiful sunny day. 


I have always liked my birthday, but only in that spend-it-with-your-loved-ones way. I don't like being the center of attention, so I don't think a large party would suit me. But a nice day spent with your loves is just right.


I received some beautiful presents. A fabulous set of watercolor markers that are crazy fun--you can use them either as regular markers with a brush tip, OR you can do a few brush strokes and apply water to achieve a watercolor paint effect. So nifty. No matter how hard I try I cannot paint--what I see in my brain refuses to come through my fingertips. But I can do okay with coloring and doodling, so these markers are great for that.


I also received this very cool looking quilting set that I can't wait to try out and show you. The set comes with a presser foot, and a variety of plastic templates. The point is to help you achieve nifty quilting results on a domestic machine. I only ever grid quilt, so I'm looking forward to trying this out (it's kind of a free motion assist for those of us not inclined to free motion successfully).


I spent the first part of the year in a relationship that we both recently agreed just wasn't working. This afternoon, he dropped off a gift to me, catching me by surprise. It was a beautiful assortment of teas. Other than my one cup of coffee in the morning, I drink tea and water all day long, so this is a delightful gift.


My brother, sister-in-law and nephew gave me a beautiful mug and some tea that smells so delicious it's insane, along with some other goodies from a boutique shop in the mall that I love.


And then my sisters, brother-in-law and nephew gave me something that was a total surprise that they've had since before Christmas. I could not imagine what was in the envelope they handed me, and at first I thought they gave me concert tickets (I don't do concerts--I've never been to one, and don't mind if I never go). But then I realized that they bought me tickets to a Garrison Keillor show on his final tour (he's retiring after forty plus years). For those of you with a blank stare on your faces, Garrison Keillor hosts a radio variety show on NPR with an old-timey feel called Prairie Home Companion. If you've heard of Lake Wobegon then you probably have some idea of who he is. Anyway, it absolutely shocked me that they kept the secret for so long, and that they knew who he was enough to know that I'd love this gift.


Aside from perfect presents, even the food was divine. My dad made some hot caprese bruschetta (not sure if that's a thing but that's what I'm calling it). My mother made ravioli for dinner. And then there was German butter cake and homemade ice cream for dessert. All the food things I love. To finish it off, we all sat around the table creating various pictures with those aforementioned watercolor markers. All-in crafty sessions almost never happen, so I loved it.


So that was my day. Combined with a very productive Saturday, and a Friday night couch-vegging session, it was a perfect weekend. I've now topped it off with some tea, and I'm headed to bed to do some reading--I want to finish the book I'm currently reading before I dive into another one of my birthday presents. I've been waiting for months to continue the story, and I'm thiiiiiis close to it. So good night!

LinkWithin

Related Posts Plugin for WordPress, Blogger...