Sunday, March 30, 2014

Square Pouch Tutorial

A few weeks ago I received an email from Penny Cottons, a fabric company from Thailand that is venturing into the world of quilting cottons after a long history in the apparel fabric industry. I asked if they'd be interested in a project-for-fabric trade, and they quickly sent me some fat quarters to play with. I was curious as to the quality of what they would be sending--the prices are so low I thought for sure I might be getting some low-quality pieces. I was so very wrong. They sent me their Vintage Patchwork fabrics, and they are beautiful.


The colors are true to what is on the website, and they are wonderfully soft. They stitched up beautifully and I am so very very pleased with them. I've already placed an order with them for more. The selection is a bit limited right now, and postage is a little on the higher side, but the good prices balance that out. If you see something you like there I recommend that you give them a shot. And now, on to the project and tutorial.

Last week I posted a tutorial for how to make up a pattern for a boxy pouch in any size at all. This week I'm putting my money where my mouth is (or my fabric where my needle is, I suppose would be a better way to state it) to show you that it does work out.

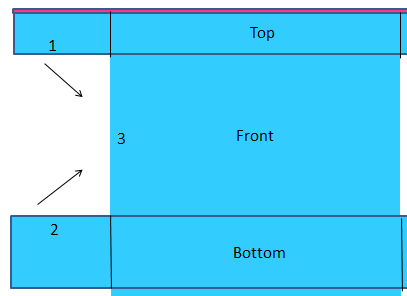
First up--I drew my pattern. I knew I wanted a three inch square pouch, and about nine inches long. I put the zipper in the center, and used a quarter inch seam allowance. Here's the pattern that resulted.


For this size a fat quarter each for the lining and exterior were perfect. I used cotton quilt batting for this one, but I would recommend using sew-in fleece (I like Thermolam Plus) as it's a bit more sturdy. You'll also need a standard zipper (one inch wide) long enough for your top edge. I recommend going longer to have some wiggle room. for the top-stitching. I started off by quilting my exterior fabric. Yum. Not necessary, but I'm glad I did.


Using your pattern piece, cut out an exterior and a lining. If you didn't quilt your fabric, cut out a piece of fleece and treat that and the exterior as one layer.

Let's make a zipper sandwich. Lay down your lining, right side up, your zipper right side up, and your exterior, right side down. Line them up nice and neat and clip/pin in place. Your layers should look like this:


In order to be able to do this with no raw edges on the inside, we need to 'indent' our stitch line a little bit. Make a mark a quarter inch in from each edge. Those will be your start and stop marks. Using a quarter inch seam allowance (a quarter inch foot is crazy good at helping you put in nice neat zippers) stitch in your zipper, starting and stopping at the marks you just drew, backstitching at each end.


It's a good thing you're hungry as we need to make another sandwich for the other side of the zipper. Layer your fabrics the same way but, because we have no bottom seam, you'll have what looks like two loops with the zipper at the top:


Make your marks and stitch as you did for the first side of the zipper. Now, to keep the fabric from getting jammed into the zipper we need to topstitch it in place. This is where a longer zipper comes in handy--opening it wide makes this step a little easier. Arrange your bag so it looks like this:


I like to finger press the folds of fabric near the zipper and pin them in place so they don't shift when I topstitch. As we need to keep those teeny flappy bits at the ends free, topstitch the same way you inserted your zipper--indent the stitch line a quarter inch.

OK. Now we need to arrange our bag so that the exterior and the lining are separate layers. Reach in through the gap and turn the bag inside out with the two layers kind of 'stacked.' It may take a little fiddling and turning the first time. Also--open up your zipper about halfway (at least).


We're going to start with the lining. With the zipper in the middle, line up the bottom piece with the top piece where the zipper is and pin together. The exterior will want to come along--just push it out of the way and tell it to wait its turn. If you did your math right (for those adventurous souls who made your own pattern) these pieces should line up perfectly.


Stitch those layers together and smoosh the exterior out of the way of your presser foot. Go right on over that zipper.


Repeat for the other side of your lining. Now you're going to repeat this with the exterior, pinning the sides together and sewing over the zipper. I didn't for this one, but if you're going to insert little tabs near the zipper (ribbon would look cute for this size) lay them between the exterior layers in the center. This is detailed better in the original tutorial.

By now you should have two flat pieces stacked up and stitched on the edges.


Now we are going to box the corners. We have to do this step for the lining and the exterior so you'll be a pro by the time we're done. Put your index fingers in the gap, one at each corner, and pull them apart so the edges are together and you have a straight line instead of the 'L' shape you see above. If you have it arranged correctly, one side will have the seam in the center (see below). Pin, and stitch across. For the lining do this for three corners, but do all four for the exterior.


When you've got seven corners boxed, work the bag through the final corner of the lining that you left open. Go gently. This is why we opened the zipper, or else we'd have an impossible task ahead of us. Once through the gap, with everything turned right side out, find the lining gap. Tuck the raw edges in and sew them shut, either by hand or machine. Tuck the lining inside, poking the corners out gently, and give it a press. Tie a bit of ribbon to the zipper pull for a little something extra. Done.


The cute polka dot lining has been in my stash forEVer. I've never had a need for it until now. It matches perfectly. I loved how this one came out so much that I immediately made another, but smaller by one inch in each direction.

I'm just noticing how, on the blue bag, the right side looks misshapen. That's only because the batting is so soft that when I picked it up I squished it slightly out of shape and am just noticing now. Isn't the pink one just the cutest?

I used fleece on the little one, and you can see how it holds the shape much better. I also put in the little tabs near the zipper for this one. It's going to be perfect to hold my crochet hooks and stuff, as my current case could use a break.

I used the same exact technique for both, and was amazed at how quickly they came together when I didn't have to pause for pictures. In the future I'll be using fleece as opposed to batting as I like the little bit more stiffness it gives. One word of advice: I wouldn't recommend making the sides smaller than two inches. I felt like an OB-GYN really earning their paycheck when I turned that one inside out. No joke.

So there you go. Another option for your bag arsenal. Link some up in the Flickr pool. I love seeing other folks' fabric choices. Thank you, Penny Cottons, for the delightful fabric to work with.

Linking up here:

Wednesday, March 26, 2014

Teeny Bits of Color

A year ago trees were wearing pale green, flowers were rearing their lovely heads, and the air had that delicious feel to it that is so specific to spring. This year...well...it snowed again last night and there is no color yet anywhere. My never-ending crochet project is mostly navy blue. And my sewing projects this week have consisted of replacing zippers in jackets of black and brown. My retinas were asking for some color.


I had bought a few packs of Lion Brand Bon-Bons. They're ridiculously adorable teeny skeins of yarn. Like...teeny.


They looked so pretty I felt the need to play with them, so to speak. I tore open the packages and then grabbed the bag with my wee little bits of remaining Stylecraft DK and headed to the kitchen to serve up some eye candy. There's something about the very late afternoon ('prevening,' if you will, for those Sheldon Cooper fans out there) sunshine that is so ideal for photos. You can't help but feel the warmth, especially when that light is falling on scrummy yarn.


These are one of those things that I have walked past in the store infinite times, mentally telling myself "No! you don't need those! We are SIMPLIFYING." But this weekend I figured what the hell and bought a few packages (with coupons--I didn't completely lose my mind). I love things in miniature, and these are so perfectly that way.


They go perfectly in weight and color with my remnants. A big pile of color like these makes some part of me so happy. How can you not grin at brightly-colored potential and sunshine?


This adorbs double-tiered serving thingee came from one of Z-man's fundraisers at school. It had to be mine. I think it looks better with yarn on it than with cookies. Especially teeny candy-colored hunks of yarn.


A few weeks ago I bought a fabulous cereal bowl at Target. It, too, seems made for my impromptu photo shoot.


I'd rather this be a serving of chips and dip, but I have been quite well-behaved with food as of late, so this will have to do. So what are my plans? Well, I have been eyeing up a book for a long time, again talking myself out of it time and time again. So I finally bought it. I'm super glad I did. I can't wait to dig in.


It says it's for thread crochet, but I'm not a fan of that. So I'm going to use these yarns (thinner than the usual worsted I use) to make a few. I think it'll be thin enough to keep the definition of the flowers, but thick enough to not bug me too much. I do so love quick little projects that are easy and cute. There are all different kinds of leaves and stems, as well as the flowers, so there are a ton of possibilities swimming in my brain right now.

I need to hit the lottery, and soon. I just want to make pretty things all day. Is that too much to ask?


Sunday, March 23, 2014

Breaking Down the Boxy Pouch

OK, so I'm going to take a crack at breaking down the boxy pouch for you folks. It's a super-easy bag to make (see my tutorial here) and useful for so many things, but I always took a shot at the size of it without any real science behind it. When I had to make a toiletry bag, the size and where I wanted the zipper placed threw a few geometrical kinks into the process, making me stop and think and puzzle and sketch.

If you've made a simple tote before (I've got tuts for those, too--check the tab above) you'll know that the bottom corners can be boxed to give a flat bottom. It's easy to figure out, for the most part, and doesn't require too much mathy sort of thinking. But with a boxy pouch, the sides are what gets boxed and the method is therefore a little bit different. I wasn't having an easy time figuring things out (remember--the math part of my brain doesn't function well), and just could not visualize the shape I was going to need. My sample had come out OK, but I wanted better than OK. I was suddenly overcome by the need to know just how this thing went together, mostly so I could make any size I wanted without trial-and-error or things coming out not quite right.

So I took my sample apart. It was a piece of ugly fabric and a zipper in such a weird color I don't even know why it existed, so it didn't break my heart to do it. I've tried to recreate it all here through the magic of PowerPoint, but you'll get the basic idea and hopefully be able to make any size you want as well.


Hmmm. That looks interesting. So let's see what's what (and keep in mind this is just a rough graphic).


If you hack off the bits that say 'Side' you'll see it's just a giant rectangle. BTW, those skinny pink strips along the top and bottom are supposed to be the zipper (note: I also have a very low-functioning art part of the brain. Second note: I cut the ends and pulled the pull off the zipper to open it up like this--it normally wouldn't be possible to do that).

So you can clearly see how the front (or back) shows the width and height of the bag, and the bottom is going to make up the depth of the bag, with the pink zipper strips meeting to form the top. The part left to consider is getting those side flaps to meet. It's as simple as one plus two equals three. Pretty much literally. Let's take a look at one of those corners.


As the pouch gets going along the sewing process, edges 1 and 2 will come up and get stitched to side 3. If your bag is going to be six inches high, for example, those two flaps that stick out need to stick out in amounts that will total six inches. And that's where you can adjust the zipper placement. If you want the zipper to fall dead center, then those two flaps would be the same. If you want the zipper to fall higher, then the tab coming off the bottom needs to be longer than that coming off the top near the zipper. If you wanted it lower then the reverse would need to happen.

What I 'drew' for you above is a rough estimation of my starting point. Now I'm going to show you how you can take this and  adjust it as I did to customize the size. Let's say I want to make a bag that is six inches high by ten inches wide, with a depth of three inches. I start off with my 6 by 10 rectangle. I add seam allowances to the sides only. Let's say I'm using quarter inch seams.


Easy enough. Now we need to add the bottom. It's three inches. The length will take some easy math. We know our bag is going to be 6 inches high. For fun, let's place the zipper 1.5 inches up from center (which would be at the 3 inch mark, so our zip will end 4.5 inches up from the bottom). Do I know how to party or what? It'll look like this now:


OK. Now we need to add that top where the zipper is going to fall. The length of this rectangle will be easy (it's similar to the bottom but with different numbers for the length of the flap). It's the width of it as we need to account for the zipper that's a little bit of a thinker. A standard zipper is an inch wide. That top rectangle you see below is where one side of the zipper gets sewn (and we'll end up with two of those in a minute). It needs to be half the bottom piece, so that's 1.5 inches. Considering the seam allowance (which is a quarter inch), once the zipper is sewn in those parts will be 1.25 inches each (totaling 2.5 inches) with a half inch of zipper showing between for a grand total of 3 inches. Perfect. If you're using a zipper larger than an inch wide make sure you account for that in your pattern measurements.


So there's your bottom, your front or back, and the top. You just need to add the back (or front) and another top piece (because that zipper has two sides) to the bottom and there you go. Just like this.


There's one last thing we have to add, and that is the seam allowances where those flaps are going to get sewn into the sides. You might feel tempted to add to the edges of those flaps but don't do it--you'll have too much fabric in there when you go to sew it all together.


And that's that.

So there you have it. The deconstructing of the boxy pouch. Doing it this way keeps your dimensions intact so that no awkward (or unintended) shaping results. It's especially important if you'd like to make a perfectly square pouch, or if you're making a larger bag and don't want the zipper to sit too far down the side.

I've only ever made one size before (the one I show in the tutorial), so this was very eye-opening for me as I was figuring this out--lots of a-ha moments. Hopefully it helps a bit in your bag-making. They work up to make pretty adorable bags that you could fill with goodies and gift, and they don't take very long once you understand the details.

For those of you who are all "Gah! The math! This reads suspiciously like math!" then never fear. This is just a bit of a primer on the process, but we'll make a few together, and I'll walk you through it. M'kay? Stay tuned!

Linking up here:

Tuesday, March 18, 2014

Blather

It snowed yesterday. I forgot it was supposed to as I was sick in bed with a touch of something or other, and didn't remember until I went to get a cup of coffee and looked outside. This is truly the winter that will never end. I loved it until a few weeks ago, and now I'm ready for warmth and color to come back into the world. A co-worker told me today that it might snow again next week. There's not a lick of green on any of the trees, and nature seems to know that it's not over yet, no matter what the calendar says. Thank heavens for cozy quilts and handmade afghans to snuggle under.


While leaving work last week I snapped this photo. Hardly anyone else seemed to notice this, and if they did they were complaining about the goose droppings they might encounter. Sometimes I feel like I exist in my own world (which isn't far off the truth) when I am the only one who gets excited by something so pretty. I really wished I had my good camera with me.

My mother had a birthday the other day, and my sister made some cute cupcakes. She considered them a bit of a fail, but I think they're stinkin' adorable (and they were mucho yummo so who cares if the flowers weren't perfect?).


A-train took a big bite out of one and emerged looking like this (blurry, because he doesn't sit still, and because I will never be a camera phone photographer)--


Z-man wanted to know if we would think it would be just as cute if he did it, so he followed suit. Then promptly tried to hide it when he saw I had the camera aimed at him (which is why he's blurry, too)--


They are two such good looking boys, and my heart aches when I think of how fast time is going. Like, literally hurts, you guys. I hate it. I hated growing up myself, and I hate watching it happen to other people.

I'm always very curious about what the dog does during the day, and yesterday I got my answer. It's this.


Lucky. But I think I'd get bored. One day of laying around was enough for me. I was glad to be back to work today.

In other "news"--thank you so very much for your marvelous comments on my toiletry bag. It looks like a sew-along will be happening. I'm going to do it that way instead of as a tutorial, as with the pockets and the handles and the zippers I'd like to be a little more in-depth with the details. It won't be too cumbersome--pinky swear! I just prefer to break things into manageable parts so it doesn't seem too overwhelming, especially if you're more of a newbie. No promises on the due date as I've also got a few other tutorials rattling around upstairs that I hope to have your way soon, but it won't be too long. Fun stuff on the way!

Saturday, March 15, 2014

Ladybug, Ladybug, Fly Away Home

When I have to figure things out I delay that project. Terrible, I know. But there's always that feeling of "If I can't figure it out I want to know later rather than sooner." But, as with most things like this, once I get started it's usually not as difficult as I imagined it would be and I actually end up feeling quite smug when I find that I was able to figure out. Smug enough that I put my hands on my hips and strut around with a smirk on my face like I just discovered the secrets of the universe and am on track for a Nobel prize.

So, back in January my friend Lisa plopped a bag on the table at lunch (we work together) and said "Jaime wants to know if you can make her a new one of something like this." Jaime is her sister, who I went to college with, a tidbit we discovered when she came in for lunch one day and we were both like "Hey! I know you!" Anyway, I was asked to please not judge this bag. It was pretty bad. Very well used and falling apart. I didn't even take a picture of it. It was a basic toiletry bag of a nice big size, with handles and zippers and pockets and all that stuff. Plus a wipe-clean lining. I got the fabric and then shamefully let it sit while I pondered its construction instead of getting on with it. Most bags like this have a gusset and separate bottom (two things I hate doing without a pre-made pattern) or require hand-sewing the lining to the zipper (which I don't like--I feel like the whole thing could just fall apart that way, even though that's probably unfounded). So I decided to make this a standard boxy pouch with some modifications. And that's where the "Huh?" came in. If you look at my brick pouch tutorial, the sides are boxed as opposed to the more traditional method of boxing the bottoms. This presented a geometrical conundrum to me at first. Until I took apart a quick sample I had sewn and everything became remarkably clear. It was smooth-sailing from then on. And yesterday a lovely set of goodies was thus delivered to its recipient. 


I took a lot of photos (and am going to write a lot of words because that's what I do when I'm excited, I don't shut up no matter the medium) so I hope you bear with me. I got a little excited as this all came together much more nicely than the hack job I imagined I would be performing. So here we go with it all.


I thought I waaaaay overshot the size of this bag, but what makes it look so much larger is that the top corners are boxy instead of rounded, adding a little bit of extra room there and deceiving the eye, but really being about the same size everywhere else. That front zipper pocket was a bit difficult as I didn't use batting but used sew-in fleece for the quilting, adding some lovely bulk to the edges. But it's in there and in there well.


I used a larger purse-size zipper for the top zip. They're a little larger than the standard, so I had to pick it out once or twice until I got the seam allowance just right.


It's hard to tell from this photo, but the zipper is placed closer to the top than a normal boxy pouch (where it falls in the middle). When I went to open my sample, my hand naturally went to a spot higher than the center. Once I took it apart and figured out the math it was an easy adjustment to make (and one I'll be sharing with you as soon as I get my act together). For the most part this goes together like a normal boxy pouch, and once all the kinks were figured out it was super simple.


I was asked about a wipe-clean lining for this, which I readily agreed to in my naivete. You may remember my iron-on vinyl misadventures... Things didn't get easier from there. I forgot this stuff sticks. So I frequently alternated between a standard and a Teflon foot, made stitch length changes like a boss, changed my needle size, and all that. In the future, I think I'll just use cotton lining and invest in some Scotch Guard. Between prep-time and sewing time plus the added cost of it it's just not worth it (I should probably check out the pre-made laminated cottons and their pricing, but prints are limited, usually). Anyway, I'm complaining but it does give a nifty look to the lining so I may go back on my word on this one. I used the pocket from the old bag as my guide and it worked out well (after a serious talking-to with those pleats, who just wanted to smoosh out of place). I forgot about a bag base, so I wrapped some cardboard in leftover fabric and called it a day. This lining reaffirms my belief that red and white polka dots are perfect and will always look cute.

Next I had to make a cosmetic brush roll. This really was not difficult at all. I have very few makeup brushes, but my sister has many (and knows how and when to use them-can you imagine!) so I used hers as a guide to make a very simple roll.


It's basically a giant rectangle with the bottom edge folded up and slots stitched into it. The top then folds down to cover the brushes, and you roll it up from there, wrapping it all in the cutest fold-over elastic that I had to buy just for this.


I had found a bolt of ladybug dot fabric at Joann's and bought the tiniest cut imaginable, just so I could make a super cute key fob, too.


I love hardware close-ups, so here comes one.


I overbought on the fabric I would need as I had no idea how I was going to make out, so I decided to make a jewelry bag, too. This might be my favorite bit of the whole lot in its cuteness.


It looks like a little drawstring pouch, but when you untie it and pull it open you'll see the most adorable little pockets to hold rings and earrings and other little bits, and the center of the bag will hold larger things or more rigid bits (like cuff bracelets). Here is the tutorial I used.


I had a limited amount of ribbon (which was the perfect color and so I absolutely needed to use it), so I only made the one opening. This thing opens up to lay flat, which no one is going to do, so I could have made two and divided the ribbon and it would probably be fine. Oh, well.


Oy. Still here? The jewely pouch, makeup roll, and key fob could all be made in an evening. The jewelry bag looks more intricate than it is. The bag is a little more involved (but not difficult at all). Other than some interfacing choices that I questioned as I went along as they gave much more stiffness and bulk than I had anticipated the only change I plan on making to this bag is the strap. I couldn't figure how I was going to do the straps I wanted as well as the zipper pocket, but the answer hit me well after the fact, and that's what I'm going to proceed with before I call this a finished pattern.

If anyone is interested in a sew-along, leave me a comment and I'll make it happen. This is a great sized bag and could be used as a small craft tote, a lunch bag, a toiletry bag, a travel gadget bag with pockets for chargers and room for tablets and cameras and stuff...the possibilities are many. So let me know and I'll feel motivated to make it happen sooner rather than later.

Thanks for sticking around for the entire month it probably took to read all my blather, but this one made me excited in its cuteness when it was finished. Have a good rest of the weekend!

And here's one more picture as it's the only one I didn't use and I don't want it to feel left out:


Linking up here:


LinkWithin

Related Posts Plugin for WordPress, Blogger...