Tuesday, September 7, 2010

Book Review: "The Butterfly Effect" by Andy Andrews

Can one person influence events well beyond their lifetime?  Can one person save two billion people?  It seems impossible to comprehend.  The idea that we are a miniscule blip in the grand workings of the universe is one put forth frequently, making us believe that our actions won't have much impact--the universe is much too vast.  That may be true, but the earth is much smaller, and the things we say, the things we do, can have a marked and lasting impact.  Such is the premise of Andy Andrews book "The Butterfly Effect."  Taken from one of his most popular speeches, this book showcases two separate events in which the world as we know it would be very different had it not been for the courageous actions of two men.

Presented as a pretty little coffee table book, "The Butterfly Effect" is well-written and easy to read (it takes about fifteen minutes), but it packs quite a powerful punch in its message.  It shows us that those small acts of kindness we think won't really matter, those courageous actions we don't take because of our fears, can and do make an impact on the lives of those around us.  Our creation, our very existence, is never for naught.  We are each put on this earth for a unique purpose, no matter how large or small we perceive that purpose to be.  A simple smile and a kind word each day can go a long way in the life of someone who needs it.  Overcoming our fear of the consequences of doing the right thing when the right thing is unpopular can have a far-reaching influence.  I can be just as cynical as the next person over the "feel good" messages in books like this...but this one definitely hit a nerve with me (in a good way).  I would fully recommend this brief read to anyone in the hope that they would overcome that feeling of "Psh...it doesn't really matter anyway, so who cares?"  It does matter, and we should all live our lives secure in that knowledge.


Disclosure of Material Connection: I received this book free from Thomas Nelson Publishers as part of their BookSneeze.com book review bloggers program. I was not required to write a positive review. The opinions I have expressed are my own. I am disclosing this in accordance with the Federal Trade Commission’s 16 CFR, Part 255 : “Guides Concerning the Use of Endorsements and Testimonials in Advertising.”

Check out my other BookSneeze reviews by clicking here.

Sunday, September 5, 2010

I promise it's not an insult...

Remember this bag?


Although I love the way the fabrics bounce off of each other in this, and the little wavy bits at the top, it's a little too large to use as an every-day bag (unless you like to carry a huge bag).  The day I bought this fabric I had bought  some other coordinating prints, and I've been trying to find the time to put them to good use.  As one of the prints (a perfect match!) was only available as fat quarters I had to be a little bit mindful as to how I was going to use them. My primary concern was having enough for decent straps.  So last week this is what I came up with:

I call this one "The Shorty," but I swear I don't mean it as an insult....

It doesn't look much different until you place them side by side:
It's 2.5 inches shorter in each direction.

There are a few things I like much better about this smaller version.  First? The pockets.  Four outside pockets are entirely too many for me.  I'd constantly be digging around for my phone, my keys, whatever, especially since these are fairly deep.  The others are much more accessible.  Next? The wavy top.  I couldn't just hack a few inches off the sides as the proportions would have been off, so I had to figure out how to tighten up that curve a bit.  It wasn't too difficult, and I like the wavier look that it has.  Otherwise, it's pretty much the same:

Slip and a zip in a roomy interior...

 Delightful set-in zipper...

 Protective purse feet and a rigid bottom.

 My favorite--hardware close-ups.

 A certain someone who wanted to be my assistant...

 ...while he was waiting for my mom to come home from work (check out how he goes from straight to curly like nobody's business).

One thing I wasn't too fond of was having to sew two strips together to make a strap that was long enough.  That seam across the middle didn't irk me as far as visual appeal, but moreso because it added a weak spot to something that should be strong.  I sewed straight across on each side of the seam to add a bit of a buffer zone and hopefully keep some of the stress off of the seam.  Otherwise, I absolutely adore this bag.  I have a feeling a co-worker of mine might want to buy it, so I won't get too attached. 

Up next?  I'm hoping to have this bag put together soon.  I'm eager to make it but haven't been able to get the leather handles so I am going to improvise with some handles I've had for a bit in my stash.  We'll see how that goes...

Friday, September 3, 2010

The (Amy) Butler Did It

So I bought me a new bag book last weekend.  I've picked out my projects but that's about it as I wanted to finish up a few other things first so they wouldn't be weighing on my mind while I was trying to do some selfish sewing.  So I'm going to give you a quickie review of this little lovely:


It was good. I liked it a lot.  The end.

Hahaha...ok, being serious now...

I've heard here and there that Amy's  patterns are very difficult, and then I've heard that they can be a bit intricate but are doable.  I feel that at this point I've had a productive year of making all different kinds of bags and that I have a solid enough background to be able to tackle this book. The directions are plentiful for each pattern, because there are modifications for every bag in this book (which I dig big-time, as I always seem to want the bag but a little larger or smaller than the size usually given, or want a different strap length, or some other such business).

There is something here for every level of sewing.  If you're newish to sewing start at the beginning and work your way through.  If you've been stitchin' a while dive right in at any point.

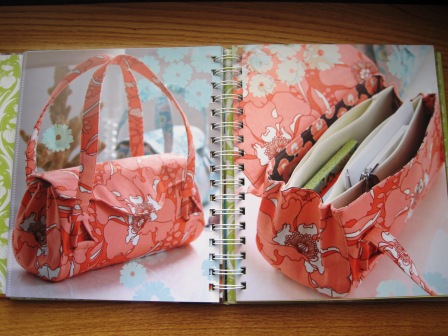
This book is just as beautiful as her previous books, with the gorgeous photography being done by her husband David.   Take a gander at some of the projects I've got marked for making:

A nifty little checkbook cover will use up those fun scraps you've been wondering what you're going to do with.

 I know, I'm weird, but all of those pleats look kind of fun to me...

 Nifty purses to show off some antique jewelry you've been hoarding saving for a special project.

I just adore everything about this one--it's adorable design and unique strap placement, the fabric, the organization...

This one has so much awesome about it I couldn't take a full photo as I didn't want you to swoon...

A few quick comments...

I have a bit of a pet peeve about buying a book like this and finding out that half of the book is devoted to things like definitions of pins and thread, and detailed explanations that quilter's cotton is indeed made of cotton.  A few pages are necessary to explain needed tools/notions and different fibers to be considered depending on your purpose.  And I like a few pages of chatter to get used to the author's 'voice.'  But when I tell you I have a book sitting on my shelf where half of it is devoted to sewing 'baby talk' I'm not kidding. It especially irks me because these books are not inexpensive.  However, this book is not like that at all.  She assumes you know how to sew and gets right to it. There's a handy glossary in the back for bag-related terms, and a full page of this:


Every project requires some kind of interfacing so she very nicely tells you how to best use it.

 And just in case you love it exactly as shown she gives a handy fabric guide.

And the thing that makes books like this totally worth the pesos?

 Yep.  Full-size, baby!

Have a good one, folks!!

Thursday, September 2, 2010

Shirred Lampshade Tutorial

I've been busy busy busy so I didn't get this done as quickly as I'd hoped.  I've got a few goodies to pop up here on the blog so I figured I'd better get to it before I hit overload.  Make sure you read this tutorial if you have never shirred before.

Before we get started I want to mention two things: first, try and match your top thread to your fabric as best you can.  When the light shines through the stitching is much more subtle.  Second, if you can, keep an eye on where your shirring lines begin and end.  Try to begin and end each row along the same line.  Your backstitching will show up thicker in these areas, and if they're all along the same line you can put this part to the back and no one will notice.  OK, here we go.

To make this lampshade I used a plain white lampshade, the kind that looks like a cone with the top hacked off.  I also used elastic sewing thread (a few dollars at almost any craft store), regular sewing thread, and a yard of fabric.  Depending on your shade you may need more or less, but I'd rather be safe than sorry, so I tend to go overboard.

'Dis my lampshade, yo. 

 
 I used Michael Miller's 'Henna Garden' in the pink colorway.
  
If you've ever made a circle skirt these next few steps may seem familiar.  Measure the circumference at the top of the shade.  Mine measured 17 inches.  I  wanted this to fit snugly so I could still see the fabric pattern, so I added an inch for ease, and divided by 4 (you'll see why in a bit).  If you'd like yours to fit a bit looser and show more of the shirring you could add a few inches, but don't go too loose or it won't stay up.  Alternatively, don't go too tight or you'll get lampshade wedgies, haha.  Next, measure the shade from top to bottom.  Mine was 7 inches.  I figured an extra inch at both the top and bottom for hems.  If you look at my picture below, you'll see that my ease-added circumference divided by 4 is 4.5 inches, and my length (with hems) will be 9 inches.   The bottom circumference isn't necessary, but I already drew the picture, so just ignore it.

This is the nicest thing I've drawn in a long time.  No, seriously...it is.

Next, fold your fabric in half, selvage to selvage.  Then fold it half the other way so that the raw edges meet.  You should have 2 sides that are all folds, and 2 sides that are raw edges.  Now you're going to draw two cutting lines.  This will be less frustrating if you sketch yourself a pattern, unless you're super-duper at drawing circles.  You're going to want to make an arc that is the length of your ease-added top circumference divided by 4 (mine was 4.5 inches, remember?). Then, you're going to make a second arc; mine is 9 inches away (my length measurement).  Cut your pattern on those 2 lines you just drew. 

 I hope you're appreciating this fancy artwork.

  Place your pattern piece and pin down on your fabric, matching the edges up with the folds. Cut.


When you unfold this middle piece, you should have a big fabric doughnut.  Make sure you press it nice and purdy.  I probably should have done that first, but I like to live on the edge.


The next part is kinda boring (sorry, but it can't all be high-kicks and giggles).  On both the top and bottom circumferences, I measured up 3/8 inch, pinned and pressed, and then 3/8 again to enclose the raw edges.  As I factored in an inch for each hem, this leaves me with 1/4 inch above and below the rims of the shade.  If you'd like it to fit more flush then do 1/2 inch hems, but I wanted that extra little bit for a slight ruffly effect.  Then stitch and press those hems down.

 You might want to make some tea for this step.

 This picture serves no purpose other than I always like when people post close-ups of their sewing machines at work.

At this point, you should have a big circle with all raw edges under control.  Now you're going to shir.  Have you read that tutorial yet on shirring?   If you're a procrastinator go and do it now....we'll wait for you to get back.  If you have, then carry on....  I tried to keep my lines between 1/4 and 3/8 inch apart; some of the lines are wonky but you can't really tell because of the shirring.  Keep going until you've got the whole thing shirred.  You should have a scrunchy looking little thing:

It's sort of sad looking, but that's because it's not fulfilling its destiny yet...

Give it a little try-on to see if it fits.  

 See? You can still see the shirring, but you can also see the pattern.

If it's a little too large you can sew a small seam to make it a bit tighter.  I then took it off and pressed the top and bottom edges to neaten up that ruffle a little bit, and to tighten up the shirring.  If you like the looser effect then you don't have to press it at all.  Consider yourself done!

I could have just gotten a whole new lamp...but this way I get a cute shade AND that adorable heart pull chain.

See? Cute!  You may think this would dim the lighting a little bit but I can assure you it does not.  I do the majority of my reading in bed aided by this lamp, and I haven't noticed a difference.  The best part is that it's removable--you can get so many looks without having to spend a ton of money.

My sister requested one, but her lampshade is more of a topless pyramid, so I have to figure out the geometry for that one....actually, she'll probably do it.  I didn't get the math brain...

As ever if you have any questions don't hesitate to ask.

Sunday, August 29, 2010

Let there be light!

Big smile on my face right now!  My weekend of sewing has ended triumphantly.  I devoured my new book and have everything checked off that I want to make (which is almost everything).  I finished the last item on my sales list (which is ok because I've been so busy for a while that I need a break to do some different things).  And I redeemed myself from this disaster. 

The lampshade in my bedroom needed replacing big time--it was faded, some of the thin metal rod bits were bent because there's a slight chance it's been knocked over a few too many times so it didn't sit straight anymore, and it didn't really match anything anymore.  But I love the lamp itself so I didn't want to replace it with something I wasn't crazy about.  So what's a crafty girl with too much time on her hands to do?  Make a lampshade cover.  And not just any lampshade cover--a removable, shirred lampshade cover.

I bought a new generic lampshade at Target:

Snooze....a little too bland for me...plus the base is more cream colored so something obviously needed to be done to this glaring white shade.

And now THIS is what it looks like:
I made it just a bit longer to it would have a cutesy ruffle without being too cute.

Once my sister told me what my math malfunction was last time I tried this it was easy.  It's essentially a shirred circle skirt for a lampshade.  I'll be back soon with a tutorial on how to do this should you fancy making one yourself.  In the meantime, you might want to take a read-through of Flossie Teacakes' shirring tutorial to get an idea of the basics, as I am just going to cover the construction of this without getting into the details of shirring.

I'm off to reward myself with vanilla meringue cookies.  Hope you have a Monday that doesn't make you say "Ugh! Mondays!"

Friday, August 27, 2010

What are you up to?

Because this is what I'll be doing this weekend....


Wednesday, August 25, 2010

Mon Dieu! Tres chic! or something like that....

Most of my sewing adventures lately can be categorized as challenging.  Not exactly technically difficult to execute, but requiring a little more thinking (which I'm not always feeling).  The good part about this is that my thinkers usually come out better because I take my time and pay a decent amount of attention to what I'm doing.  This also applies to things I've made bunches of already because there's always gotta be a twist.

A lovely crafty co-worker brought to me a pretty scarf she had bought for almost nothing--it was a black meshy sort of fabric with a flocked Parisian print on it (yours truly of course forgot to take a picture of it).  It was too small to wear as a decent scarf, but even so the print would have been lost in the folds.  She wanted to use it for something, though, as she adores it.  The solution?  Purses (did you have any doubts there?)!  It was just the right size to coax two small purses out of it.  I couldn't just sew the scarf as it wouldn't last a day, so as a stabilizer she decided on a plain hot pink fabric underneath it.  When I went to put these together the mesh was a little thicker than I thought so the pink wasn't as vibrant, but it gave it this look that I don't even know what you'd call it:

The black over the pink makes the photo look highly pixellated, but the sheen is so much more even in actuality.

A slight change in the lighting makes this glasses case look a bit more purple.

To deal with the possible fraying of the scarf, I cut that piece last so it wouldn't have time to change its mind about staying together.  I then immediately applied Fray Check to all of the edges.  It seemed a bit excessive as it held together really well, but if I had skipped this part, with my luck I'd have had a pile of thread on my hands.  Other than that and being really careful about getting all the edges in the seams, it was business as usual.  I had to be verrrry careful with the glue because I don't think picking it off this fabric would have turned out as well as with plain old cotton.  They're sturdy little buggers--that extra layer, thin as it is, added some thickness to it--and they're already interlined with fleece.

For the lining my plan was to add this fun Michael Miller print:

'La Tour Eiffel' in Paris Pink. Yum!

When I got to the store this print was entirely too large to work at the small scale of these purses, and there was nothing comparable.  So I went with something much more basic, but with the same colors and hopefully a bit of the same feel:

It's not an ideal match, but the lining is invisible until you open the purse, so no biggie.  
I like shooting the linings of these bags because they look like big huge muppet mouths.

And that, said Bee, is that.

LinkWithin

Related Posts Plugin for WordPress, Blogger...