So how's this for fun? I'm wasting time on Facebook the other night, and I head over to the Fabric.com page. There's a discussion board asking you to post your favorite blog. I shamelessly plugged my own (all the other kids were doing it!), but there were some real lovelies mentioned. Anyway, I get an email that says I'm the Blog 'o the Month for Fabric.com. I even got a nifty button to post in my sidebar! Sort of made my day.
Once I get this bag I'm working on finished (I'm excited to show you--I haven't made this one before) I'm hoping to do some fun seasonal stuff. Because like it or not (I personally like it) the holidays are just around the corner.
Have a happy Friday!
Thursday, September 23, 2010
Tuesday, September 21, 2010
"The Bag Making Bible" Review
I have sufficiently calmed down enough to review this book in its glorious entirety.
And if you order a copy from her shop it may just land on your doorstep with this inside:
The cover is beautiful, as is the entire book.
Readers of Lisa's blog will not be surprised in the least to learn that this book is just as fun, just as readable, and just as action-packed as all of her tutorials and patterns available on her site. Her instructions are crystal clear, her photographs helpful instead of just filler, and her chatty writing style makes it feel as though you're sewing with a pal instead of reading something that's technically....well, technical.
Unlike many other bag making books, this one is actually useful. This is not a book of patterns for you to simply follow (although there are 8 fun patterns included). This is a book that shows you how to create your very own beautiful custom bags, from top to bottom and everything in-between (because any bag-maker knows that interfacing is key). Need to modify the size? Done. Want a different kind of strap? Done. Want to incorporate fancy-schmancy hardware? Done and done. Many are the bag books I have seen where they offer tips like "Add a lining. Add pockets. Add zippers." And that's it. No instruction whatsoever on how to do it. This book shows how to add more pockets than I knew existed, and different methods for adding zippers (which aren't as scary as you may have heard). The bag you end up with will truly be a one-of-a-kind creation as you build it according to your vision. But to get you motivated, each section has a beautiful bag for you to create that will build upon the skills you just learned. So you go from this:
A simple book bag with different style variations
...to this:
This bag looks quite ambitious, but Lisa's wonderful directions and tips will make it a reality. This is the bag I've wanted to make since she released some sneaky-peeks of her book.
Look at all of the things you'll learn about within these glossy covers:
It's a mixed bag of bag-making knowledge...see what I did? It's a picture of a bag, with the bag parts listed inside. Geddit? Those are the actual chapter headings from the book, by the way.
What's that tucked into the cover? A full-sized pattern sheet! Some tracing is required, but I'd rather trace than spend the day at a copier, trying to enlarge.
And if you order a copy from her shop it may just land on your doorstep with this inside:
Isn't that fun?
OK, so to sum up. You will want to get this book. It's a beautiful book but it's not stuffed with fluff that other craft books are that distract you from the fact that they're just not very good or useful. It's clean and minimalist, but packed with information and tips. The pictures are gorgeous, and focus on what's most important for you to get your bag just right. She tells you everything you need to know to make a "Whoa baby!" bag no matter how many elements you choose to include. Just be careful. Bag-making is very addictive, and you'll be quite busy--because everyone's going to ask "Can you make me one?"
Monday, September 20, 2010
I may injure myself from excitement
It's here!!! I've been waiting for this day for almost a year and it's finally here!! This landed on my doorstep today and was waiting for me after work. It is magnificent. I'm off to devour it. Full review coming soon!
by the lovely Lisa Lam from u-handbag
Sunday, September 19, 2010
This is what I meant the FIRST time
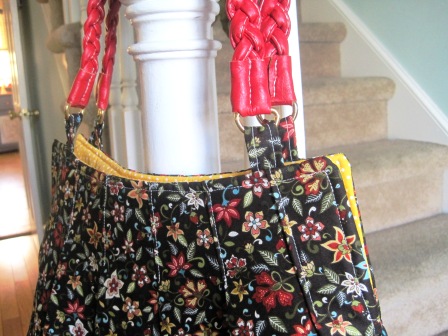
I made another 'For Pleats Sake' bag this weekend. I was hoping to make a dent in my stash with it but it really doesn't use much fabric at all. This one came out the way it was supposed to. I think I'm going to keep this one for myself.
Aren't the colors perfect for autumn? I found the fabric at Walmart. I don't really like buying fabric at my Walmart (or even going in there--it's oddly seedy for a new store in nice neighborhood) but I just loved the print on this one.
I modified the inside a bit from the original. First, I didn't do pleats on the lining because I wanted to add pockets--a voluminous pleated inside wasn't going to make that an easy feat. I did the pleating on the outside and made sure the two pieces were the same size. Then I laid them down on my lining fabric and arranged them in the size and shape I liked, and then cut it. I then laid these lining pieces on my fusible fleece and cut. I inserted the inside zipper pocket (using this tutorial) before I ironed that side to the fleece. For the inside slip pocket, I fused the lining to the fleece first and then sewed the pocket on to give it a little extra stability. I then added a magnetic snap as a closure, even though I don't think that part is entirely necessary.
I have a bit of a thing for polka dots...if I could get away with it I would line everything with them.
For the handles I used another pair of faux leather braided handles that I had. They're not glamorous but they'll do.
It figures I'd finally make myself a bag, and that it would scream "Autumn!!!!"... just when the weatherman is calling for it to be in the nineties again.
I used something on this bag I have never ever ever used before. Fusible woven interfacing. And heavens to mergatroid I am hooked! I've heard how it's supposed to be stronger and have a nicer drape, but it was always a bit pricey for me, so I went with the basic craft-fuse stuff. I never had any problems with it, but this is so much nicer for sure. I found an incredible deal on the stuff, so I stocked up. Plus it was extra wide, so it should last me for a nice long time.
I have one more bag I have to make for a fundraiser, and then I'm hoping to have some easy crafty things to share, one of them being a quilt block that looks much more difficult than it is.
Saturday, September 18, 2010
Thursday, September 16, 2010
It Takes Two to Make a Thing Go Right
For weeks I have been wanting to make the 'For Pleats Sake' bag from u-handbag. It's totally yum, and uses some very posh leather handles. I have not seen the handles that Lisa stocks in her shop anywhere else, but I like to make the most of overseas shipping, so I figured I would wait until I needed a few things and get it all at once. Yeah, totally forgot to order the handles. I dug through my stash and found a few things that would work well together. So here we are:
I know the fabric is from Kona, but I don't know what it is specifically. It was left on my doorstep. No, really--my mother's friend leaves me fabric every now and then on her way to work. Wonderful way to start the day.
Some lovely pleats for your viewing pleasure.
The inside is a fabric called 'Tea Stain' that I found at Joann's. I originally wrote Satan instead of Stain...I find this inexplicable, yet amusing.
The handles are faux leather that I also bought at Joann's a loooong time ago.
I have a confession to make. I remade the bag you see above. And I took the official finished product to work today to show off and promptly sold it (woohoo!), so I don't have pictures of the proper version, but you get the idea from above. Why the remake? Well, some of us may have thought that there is only one way to make a pleat and they were in fact experts at that method. So when something seemed off because they weren't doing it properly, they may have just kept going instead of looking at the stinkin' pattern pictures. The real version is narrower at the top and has a much nicer shape. However, I learned a few things to do differently and it worked out really well for the final version. I am going to make one of these for myself this weekend, so I can show you what it's supposed to look like and the modifications I made.
Disregarding my initial goof, this was a really simple pattern; I was able to make it in one night. The only part that gave me any lip was the v-shape on the side. I think that's just a matter of practice makes perfect. Third time should be a charm...I feel like I say that a lot.
What a Deal!!!
I'm pretty sure everyone in the craft community has heard of Etsy. But have you heard of Artfire? It's the platform from which I run my little online shop, and right now they're offering quite a deal. Normally, Pro accounts cost about $16.00 a month. That's a flat rate by the way--no fees for posting, selling, or anything like that. Just $16.00 for oodles of extra features to sell your stuff. Right now, though, if they get at least 20,000 people to sign up each of those Pro accounts will cost only $5.95. That's an AMAZING savings!!! All you have to do to get a Pro account at such a low cost is head on over to the Artfire Group Deal page and submit your info; once they meet their minimum all of those new Pro accounts will lock in at that special rate. So head on over, sign yourself up. Tell your friends, and have them sign up for their own Pro accounts. Happy selling!
Subscribe to:
Posts (Atom)