Monday, May 6, 2013

Double Zip Wristlet

This may be a bit muddled as I sat down to write this before "Hawaii Five-O" came on, but then I got involved watching it, and any crime-oriented shows that have anything to do with horrific things happening to children worms into my brain and stays there for a bit. I really should just not watch those particular episodes. Plus I've got to do some speaking tomorrow at work, so my brain is now taken over with things not related to anything I'm going to say from this point forward.

OK, so last week a friend of mine at work asked me to make him a clutch. Yes, you read that right--a clutch. And him. He wanted it in all black, and I didn't take any photos as I can never get decent photos of black fabrics. So I made a different version tonight to share with you (hence the crappily lit photos). So here's my double-zip wristlet in 'Washi Tape' fabric by Rashida Coleman-Hale:


I love the muted tones of this fabric, yet it's still bright. I tested out a few zipper colors before I settled on yellow--it looks better when it's not blending in with my cutting mat. I had a 22 inch zipper that I cut in half, and attached two new zipper pulls to so they would match. I didn't attach any fabric to the pull as I think this already had a lot of things hanging off the side of it.


The 'male' version :) of this one had a magnetic-snap pocket on the back that gave me fits (I only included it as he specifically requested it)--I didn't included it on this one as I thought it made the clutch quite bulky (even more than it already is). I was so focused on how many pieces I'd need to cut and what would be showing where and what was going on with raw ends that on the original I didn't line the front pocket fully. It's one of those things that only the maker notices, but I made a mental note and remedied that situation as it would have been more obvious on something that wasn't all black.


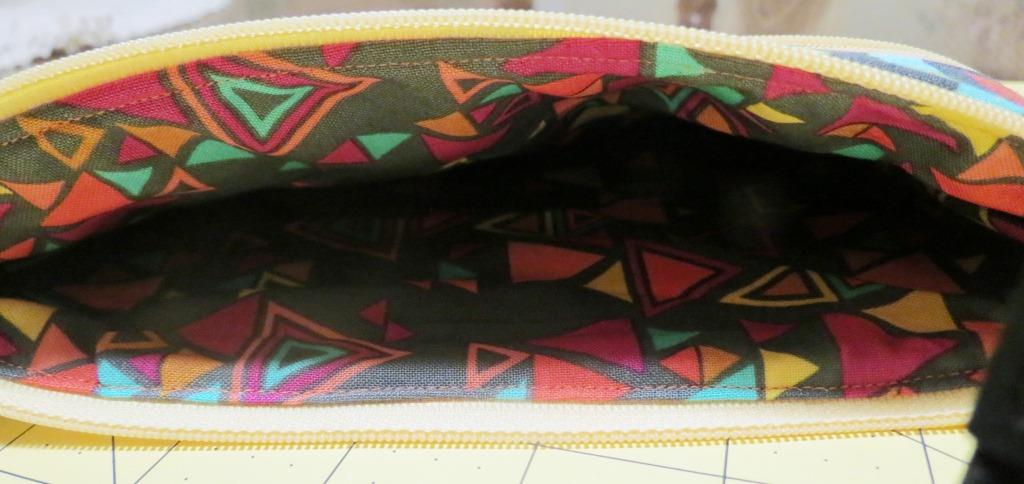
I have one more project in mind for the washi tape fabric, so I mixed the pocket fabrics up a bit to make sure I had enough. They're so funky and different and eighties (according to my sister) that it works. The inside is all triangular confetti, and has no other pockets or adornments--


I cut my pieces to start thinking it would finish up at about six by nine, but it ends up not as wide as that as the bulk eats up some of it. It still finishes at a nice size--larger than an ordinary wristlet but not so huge that it's cumbersome.

Off to bed. See you later!


Thursday, May 2, 2013

A Few for Friday ~ #18

I got a new phone this week. I didn't realize how slllooooowwww my old one was until I got one that wasn't slow. Plus things work on it!! I can use my phone for everything! But I'll probably still use it just for games and texting. I ordered a deliciously cute new case for it that I hope comes soon as I'm petrified I'm going to drop and smash it. I didn't have a super busy week, otherwise. I sewed my first murse. It was a simple black clutch that I didn't take pictures of since I hate photographing black fabrics, so I'm going to make another one, clearing up the one little thing that bugged me, and then I'll show you that one, okay? Plus I haven't forgotten the makeup case/giant pocketed zipped purse tutorial--that's coming too. And now, here are some pictures of other random things.

Yummy....I don't know if this is some kind of gimmick for something fairly mundane, but in my mind it works the opposite--I have no interest in finding out what they're selling as I can't help but take this sign literally.

 This plumber's shop is on my way to work. He's got four toilets and two sinks arranged along this wall just like the aboe. I swear one of the toilets and sinks is the very same model we had in our bathroom for ages. It was a shade of mint green that earned the room the name 'The Green Bathroom' (ignoring the fact that the dominating feature was ugly black tile). The other bathroom, BTW, was christened 'The Pink Bathroom.' Anyhoodle, when my dad put in new fixtures he didn't know what to do with the sink and toilet so he put them out with the garbage. They took the sink, but not the toilet. They left it sitting in the curb, much to my amusement and my sisters' utter and complete mortification. You've got to take those things to the dump yourself, apparently. I told my mom she should use it as a planter. She sneered. But I suppose it's interesting marketing if you're a plumber. Or at least you have an excuse for funky flower decor.

 I aged yesterday. I'm smack dab in the middle of my thirties now. I chuckled when I saw that the Google Doodle was the above--I thought it was a funny coincidence and pretended it was in my honor. When I moved the cursor over it to click and see what it linked to, that little note came up. I had forgotten I was signed in to my account. This amused me so much I had to email my sisters immediately and let them know. Kinda fun, eh?

 So that's been my week. Fairly quiet and lazy. Which is nice. I've been sewing like a mad woman, so that one easy project was a nice change. Have a happy Friday!!!!

Wednesday, May 1, 2013

Entrelac Go Bye-Bye

Remember how way back in January I decided to make a Tunisian entrelac afghan? And how it took me forever to get it started right? And then I had to take it apart and start over because it was doing this?:


When I started again I figured out how to make larger squares and was quite pleased with me:


Well dad-gum and blast it all if I didn't have the same problem again. I was about a third of the way through when I laid it out and saw the same tapering issue happening again. A little more gradual than the other, but happening just the same. After a pep talk of sorts from my mother, we commenced frogging. Since this style of crochet isn't worked back and forth we could each unravel at the same time once one person was a few blocks ahead of the other. We made short work of deconstructing this.

I wasn't a lick upset, for a few reasons. First, the taper would have irked me no matter how gradual. Second, there was an odd loopiness happening on the back side of this that I wasn't fond of. It looked like it was begging to be pulled into obscene dangling loopiness. And third? I wasn't having any fun anymore. I began to dread working on it, as it was work--there was no enjoyment or relaxation about it. And when it's a hobby--what's the point of going on like that? It had taken me months to get not very far. That's not how I like my crochet to roll.

So I started again with the same kind of color scheme in mind, but with a much simpler, much more satisfying granny stripe. I am flying through this as I've only been working on it a little over a week and not even every day. There's no crazy wonk to it, which is delightful. Wanna see what I have so far?


I really wanted this afghan to not be crazy with color, and I think the tan is toning everything down nicely, even though the colors are bright. I'm excited to see it much further along to get a real feel for it. But no matter what--it's not coming out again. No sirree. This is it.


Nice neat edges, eh? I finally figured out where my issue was coming from with the other method. In a traditional afghan you work back and forth, turning the work at the end of every row. Even if you have a tighter hand, the pull on each edge will balance out. When you do Tunisian crochet, you don't turn the work. You go all the way across, cut the yarn, and start over at the other end. Your tension never gets balanced out by an equal pull from the other side. At least I'm thinking that's what it is because I've never had an issue like that with my afghans and that's the only thing that was different.


I dig the look of this stitch so far and it's so simple you can do it by feel (which is helpful when my shows are on). I'm excited for this one to be done, though--I'm kind of getting tired of looking at these colors.


And now that I know I'm pleased with how it's going I can work in those ends so I don't feel like crying when I'm finished.

If you're still with me here--have you ever had misadventures like this where you had to just throw in the towel on the original plan? I feel like I'm getting to be too good at that particular skill....

Saturday, April 27, 2013

What's Funny About Cylon Toast?

Sorry, Big Bang Theory moment. It kept running through my head when I was making this. This what? This toaster cover for my sister. She's been trying to brighten up her home with simple touches---changing the pillows, curtains, etc. And she "let" me help because I sew :)  She wanted some splashes of red in her kitchen to give it a bit of a vintagey look, and I was asked to make a new curtain and a toaster cover. Since the fabrics are one of my favorite combos ever I was only too happy to oblige.


I have a confession to make. This isn't the final version. The final version is on her toaster, fitting over it nicely. I didn't take a picture because it looks just like this one, only bigger. Like big enough to fit and not sit on top of it like a top hat of sorts...a top hat that doesn't fit. Know what dumb-dumb here did? Or did NOT do for that matter? Add in extra room for ease. So I basically handed my sister something in the same exact dimensions as her toaster. At no point did it cross my mind that wiggle room is necessary for such items. She even flat out asked if I had left some room, and I told her yes, of course, because why wouldn't I have done that? I've made these things before, and I usually add too much ease. Talk about a total brain dump. But like I said--delightful fabrics, and an easy thing to make when you do it properly :)  Plus I got to use my ruffler foot to make the gingham ruffle:


A ruffler foot is quite a delightful attachment, though a pricey one, so if your machine model has one that would fit and you'd like to ruffle up some stuff then it might make a nice gift request. I don't use it often but I do love having it available. I also popped it onto my machine to make this matching curtain:


I had made her a curtain like this a few years ago, and she told me she wanted the same exact thing. 'Same exact thing' enters my brain and swirls around and comes out of my fingers as 'kind of different.' The shape is the same, but I hadn't written down every detail so I think it might be shorter, but it's also wider so it's much more ruffly. She loved it and said it looked perfect so I'm not going to overthink it. I will never get tired of this fabric combo. Ever. I had no idea how I was going to photograph a curtain as I couldn't find a spare rod, but I found a long metal rod piece thingee in the basement that goes to the grill but never gets used so it was still wrapped in plastic so I used that as  a makeshift rod propped up on dining room chairs that I cropped out of the picture and wrote a really long run-on sentence about. Got all that?


Curtains aren't the most fun thing to do--it's a lot of pressing and pinning and straight-stitching, but I am always gratified by the results. Hanging some oversized rectangles on a stick can sure do wonders for a room :)

Thursday, April 25, 2013

A Few for Friday ~ #17

I feel like I missed this week. I can't believe Friday is here already. I did some sewing, had a headache that didn't want to quit, gave my sister a sewing lesson, and here we are. I took off from work tomorrow to get some stuff done that I never seem to have time to do on the weekends, and then I'm planning on sewing up a diaper bag this weekend. I used to think old people (aka grown-ups) were crazy when they talked about 'Where did the time go?' and 'Time flies' and all that jazz. Time used to drag. And now I'm all what the hell? It's almost May?

Anyway, since most of the week seems to have eluded me I've only got a few pics to share.

Do these colors look familiar? This is take three. And I do believe it's the one that'll stick. More on that to come.

 THAT is the cutting mat I just got for Christmas. I thought there was a tiny scrap of fabric that I kept trying to flick off, but upon closer inspection I saw this. Talk about aggravated. I immediately hopped online and went to the company website. I filed a warranty claim (since on the site it says this is covered by a lifetime warranty) and, according to the email I received, I should be receiving a new mat shortly. I have no clue how this happens to an allegedly self-healing mat, but I'm hoping it's just a fluke.

 I drive by this board for a breakfast and lunch truck every day on my way to work. And every day that misspelling of you're shrinks my soul. I want to pull over and say "Honk if my hungry what? Finish the sentence!" I know it's kind of ridiculous and I've been a grammar and pronunciation police captain since I was about four years old, but does this irk anyone else?

And that's it for now. A co-worker turned me on to the show 'Hannibal' and it starts in about thirty seconds so I'm off. Happy Friday!!!

Tuesday, April 23, 2013

Buggin'

Here's how it usually goes down. Someone asks me for something simple in an odd fabric or two, or with added features, or something that makes it stand out. I make it and deliver it. Then everybody wants one. Hence my frame purse making frenzy while some of you may have been sewing handbags last week. That plain old makeup bag I made in pickle fabric? It got noticed, and I got an order for another one in ladybug fabric. I thought this was going to plop through the mail slot over the weekend, but the postie let me down and I had to make this up last night as there was a bit of a deadline with this one and I wanted it out of the way (good thing I got it done, as tonight I've got a headache and my next few evenings are iffy for sewing).

Anyway, it came out really cute--the pics aren't great as I took them on my phone. At work. Because I forgot to take some last night.


I have every color of zipper imaginable, except the ones I need, harharhar, so I had to pick up a few at Walmart (thankfully they had the color I needed). I usually use YKK brand zippers, and it's very easy to take the pull off and replace it with a larger one. With this one (Coats and Clark brand) that wasn't happening, so I couldn't do my usual zip pull tab. I frantically searched for ribbon or trim or something to use, and thankfully I managed to find this red and white ribbon that had been eluding me in a box of random junk (which is good, because I would have used it all previously and had none for this).


I've been super well-behaved at using up things in my stash. I did have to order a fat quarter of the ladybugs, but I used every square inch. I didn't think about the lining, though. Luckily, I had the without-a-doubt most perfect coordinating lining for this one--


It's red--my phone camera is making it look pink. It's so reminiscent of the ladybugs on the outside that they seemed made for each other. Sometimes when I find a perfect lining I practically wriggle with excitement until the customer opens it and sees it. They usually don't share my glee as I'm a fabric geek and most people aren't....


My favorite thing about this bag is that you can make it in any size you want just by sketching out a simple pattern. A few people commented on the pickle bag post that they would like a tutorial, and I promise I will get that together for you in the near future.

But for now I must head to bed before this headache splits my skull in two. Ewww, gross.

Sunday, April 21, 2013

Make It With Me - Drawstring Handbag Part 4

Alrighty, my dears. Grab the exterior pieces of your bag that have been patiently sitting by, because now it's their turn to get all prettied up. We're going to start off by inserting the grommets. I'm using grommet pliers, but the tools and a hammer work just as well (I just find that the people around me get annoyed with the banging, for some reason). Remember if you're using the hammer and tools to protect your work surface! OK, let's get moving.

Insert the Grommets
1. Grab a ruler and something to mark with. All of our markings are going to be made 1.25 inches above the seam line that connects the top band with the main panel. You're going to make four markings on both exterior pieces. Make one 2.5 inches from the edge, and another 4.25 inches from that mark (NOT from the edge). Use the same measurements to mark from the other edge. Repeat for the other outside piece.

I like to center my grommet over the marking and trace the circle as a snip guide.

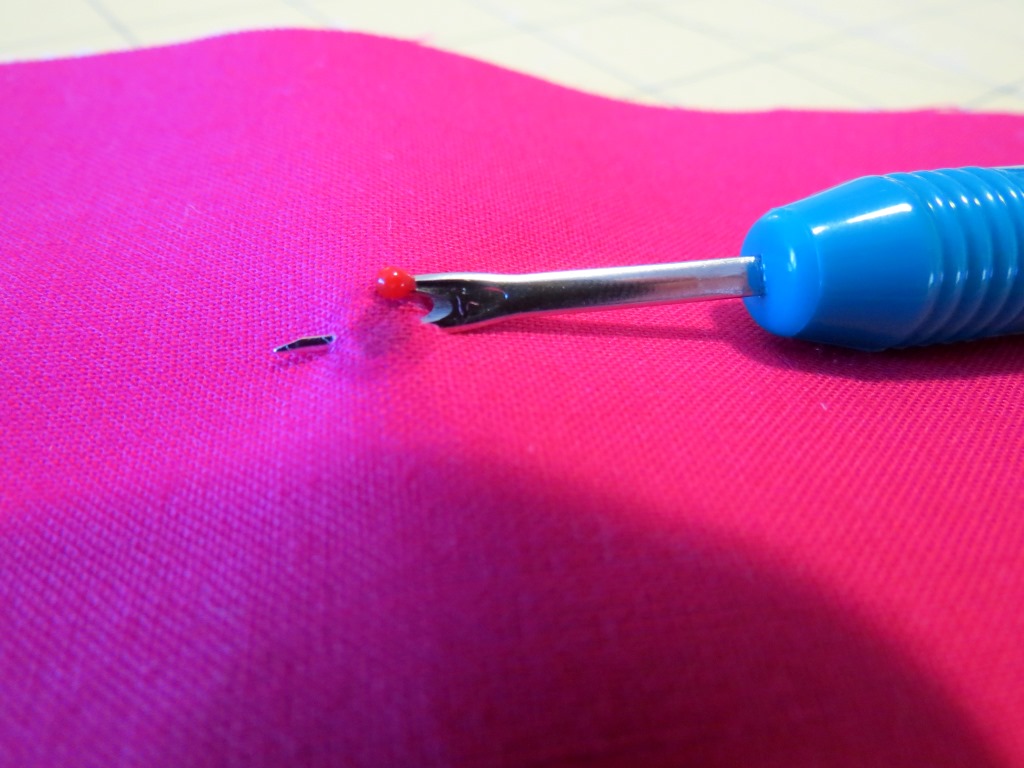
2. Take your seam ripper and insert it on one side of your circle, coming out the other side. Make a clean slice with it.

3. Use your scissors to trim that little circle. It's better to start small and go bigger if you need to, as you can't put back what you've cut off. Snip until the grommet fits through the hole. You want to poke it through to the back, so the flat part is against the front of the bag, and the other part is sticking through the back.


4. Take some of those fusible fleece scraps and cut them about 2 inches square (you'll need 8 total). Cut a hole in the center and place it over the part sticking up in the photo above--this is giving us a double layer of fleece so that our grommet will really be stuck down firmly. 

5. Put the washer over the grommet end, and use either your grommet pliers or your tools to get it firmly in place. It should not be able to wiggle around at all if you've got it in good.

From the outside.

 From the inside. Trim down some of that excess fleece.

6. Repeat for all of your grommet markings. Make sure you've got the 'working side' on the wrong side, and the business end looking nice and pretty on the outside.

Make Up the Outer Bag
1. This will be very familiar as it's almost exactly how we assembled the lining. Line up your pieces, right sides together, and sew all the way across the bottom using a 1/4 inch seam allowance. Press that seam open. Sew up each side, and press those seams open as well.

2. Create the flat bottom for your bag using the same exact steps used for the lining. Due to the bottom band being in the contrast fabric, it makes it look like we've inserted a separate bottom piece.

Haha--I took this picture after the fact, which is why you're seeing my steps in the background instead of my sewing table :)

3. Now we're going to make the bottom of our bag nice and sturdy, and anti-sag by inserting a bag bottom into it. Turn your bag inside out. Measure the bottom seam and knock about a quarter inch off the measurement. We know our flat bottom is five inches deep, so knock a quarter inch off that as well. If your stitching matches mine you'll need a piece of plastic that's 11.75 by 4.75 inches. Cut that piece out now.

4. To keep the plastic from sliding up the sides of your bag we're going to sew some stitches through it into the seams. Thread a needle, tie a knot, and tack it on down. I stitched the center of the piece of plastic through the seam a few times. It doesn't need to be super sturdy--we're just trying to keep it from shifting.


It should look like this when you're finished:


Turn it right side out. You should have a nice flat-bottomed bag exterior with grommets along the top.

5. NOW grab those straps, those straps that have been waiting so patiently. Measure in 4.25 inches from the side seams, and pin/clip your straps in place. You'll want to make sure the piece that we folded and sewed when making the strap is facing up.


6. Stitch it down about 1/4 inch from the top edge. I like to go over these a few times to make sure the straps are secure as that's a major stress point in a bag. Repeat for the remainder of your strap ends, taking care not to get them all twisted.

Make the Drawstring
1. You should have two long, narrow pieces left at this point. We're going to sew them together as though we're making bias tape so there's no bulk. So take those pieces, and lay them perpendicular to each other, right sides facing (unless you're using a solid, and then it doesn't matter). Draw a line as shown in the picture below, then sew on that line.


2. Trim that down to about 1/4 inch seam allowance, unfold, and press the seam open.


3. Trim the strip so that it measures 54 inches (with your seam in the middle).

4. Remember how on our straps we folded in our short ends to hide the raw edges? Do that again--press in the short edges about 1/2 inch each.

5. Now we fold it in half along that loooong edge and press. Unfold, and press the raw edges towards the center fold. Then fold and press in half again.

6. Trot on back to your sewing machine, sew around the perimeter of your drawstring, about 1/8 inch from the edge. 

I picked out those wayward stitches after the photo was taken :)

Insert the Drawstring
1. Figure out which side is the front of your bag, as this will be where our ends will be. 

2. Take one end and feed it through your grommets, starting with one of the more central grommets, and feeding it in and out, around the bag, coming out next to the grommet where you started. If you goof this up just pull it out and redo it.

Here's what the outside looks like at this point.

Finish It
1. Take your exterior bag, and slide it inside your lining so that the right sides are facing. Fiddle with it so your seams match, and pin everything in place. Make sure your straps and drawstrings are in between the two layers and out of the way of your stitches.

 
2. Sew around the top using a 3/8 inch seam allowance. Carefully reach through the gap in the lining and pull everything out so that the yucky parts are hidden, and all you see is your beautiful bag and the lining. Gently poke out the corners so they're nice and crisp.

3. Stitch the gap in the lining shut, then push it down into the bag, neatening everything up.

4. Neaten up the top edge (I use pins or clips to keep it in place) and topstitch about 1/4 inch from the top edge, going all the way around. Watch out for the drawstring. It'll want to get in the way.


5. Trim any dangling threads, give it a press, and tie your drawstring into a bow. You have finished, my dears.

Recap
So how'd you do? Hopefully you learned a bunch of new skills in this sew-along, but if you already knew everything I hope you enjoyed yourself anyway and now have a delightful new handbag to show for your efforts.


Please please please stick them in the Flickr pool (link in the sidebar) so we can all ogle some fabric and handbag yumminess!

LinkWithin

Related Posts Plugin for WordPress, Blogger...