Wednesday, June 11, 2014

The Toiletry Tote Sew Along Part Two: The Lining

Welcome back to part two of our sew along! Today we'll be tackling the lining, which we cut out the other day, so make sure you have that handy. You're also going to need the remainder of your lining fabric as we need to cut a few pieces out of that. The graphic below shows how you should cut these pieces to make sure you can get both of them out of your lining fabric. Another option is to use what's left of your exterior fabric for the pockets. Or mix it up. The choice is yours.


So cutting from your fabric as indicated above (the main piece is just to show placement--remember we have that part already), cut out the pieces for the zip pocket and the pleated pocket. We'll start with the zip pocket first to get it out of the way for those of you have some zipper anxiety. Take your lining piece and lay it down face up with the flappy bits extending towards the sides and not out of the top/bottom. Take the zip pocket piece you just cut and lay it down like so:

The ten inch side runs across the top and is centered, while also being lined up with the line of of the flaps. The 14 inch part is the length that will fold up to form our pocket in a few steps.

Draw a line that is 1 1/4 inch down from the top edge of your pocket piece, and that is one inch in from the sides (see my purple line below?) 


Draw a matching line 3/8 inch down from the first, and then close off the ends to make a long skinny rectangle.


Divide that rectangle in half lengthwise, and draw in some triangular points about 3/4 inch in from the edges like so:


Pin around your rectangle, and then sew that down. Only sew the outer rectangle--pretend the other lines don't exist.


Now very carefully cut along that center line from triangle point to triangle point, and then from the point towards each corner, getting as close as you can to the corner without cutting your stitches.


Now pull your pocket piece through that slit so it is on the wrong side of your lining piece. 


We need to give that a convincing press. If you pick up the top/bottom edges of your pocket piece you'll see some wee seams. Press those open.


Now lay everything back down again, and press along the slit edges nice and neat. Pressing that wee seam open makes this part easier.

See? Nice and neat and flat.

Flip the whole thing over and press again.


Get your shorter zipper, and simply lay the fabric slot down on top of it. Put in a few pins to keep it in place (or fabric glue works just as well if you've got some handy).


I use a standard presser foot for this part. I make sure everything is nice and flat on the underside so nothing gets caught up in my stitching. Then simply sew around the rectangle, securing your zipper in place.


On the wrong side of your lining you'll see your pocket piece is dangling all loosey-goosey with a zipper at the top. Bring the bottom edge up to the top edge and pin in place (this will want to wiggle so definitely pin). Then stitch that edge.


Close up the side seams of the pocket in the same way. Make sure to keep the other bits out from under the needle and just sew the pocket. Trim off any excess zipper tape, and there you go.


Let's do the pleated pocket. This lining fabric doesn't take kindly to showing the marks I make on it, so I'm going to be using pins instead of a marker. The pictures are cuter anyway :)

So take that pleated pocket piece, and fold it in half, longer edges together, and stitch, forming a tube.


Press that seam open lightly so you don't crease the rest of the fabric, turn the tube inside out, and press again. The edge where the seam is will be our top pocket edge, so add a few rows of top-stitching along the edge to secure the seam, and because top-stitching is cute. Now we need to make the markings for our pleats.


Make a mark 5 inches in from each edge (my yellow pin in the photo). You could also go in up to 6 inches from the edge, but I wouldn't do more than that. Five inches gives you a larger center pocket, and up to six will give you three more evenly sized pockets, so decide on your preference. Once you place those pins (two pleats, remember, so do this from each edge), place pins one inch away on each side from both of those original pins.

We'll start with the pleat on the left. Pick up the left edge of your tube, and fold it over so that the two red pins end up on top of each other, and the yellow pin is in the fold.


Pin through all the layers where the red pins meet (I used a yellow pin). I took this photo when doing the other edge, so that's why my fabric is flipped here.


Now, you're going to flatten out that little fold so that the yellow pins are on top of each other. Pin the bits in place on both sides.


Repeat for the other pleat. Neatly arrange your pleat (your fabric will cooperate nicely here) and lightly press it. 


This piece should be 13 inches wide. You may need to trim a wee bit off the edges, as sometimes things wiggle around when sewing pleats, so you can either do that now or after the next few steps.

We're going to sew this pocket down and then flip it up, so placement is very important so you don't end up with a pocket that faces the bottom of your bag. Get your exterior piece and your pockets. I'm calling the side of the pocket that has all the folds showing the wrong side. You're going to place this wrong side up with the bottom edge of the pocket 1/2 inch from the bottom flap, and the rest of the pocket laying across that bottom flap. The pictures make this clearer.


Pin that down, and then sew close to the bottom edge that you've pinned in place (no more than 1/4 inch). Flip your pocket up and press that seam flat. Then top-stitch close to the pocket edge to make it more secure.


You could technically lay your pocket down and just stitch the bottom side and be done with it, but this way makes me feel more secure that my pleats are being held in place by two lines of stitching. Now, manipulate the fabric like the above so that the pleats are reasonably flat near the top. See that line between the pleats? 


That's going to be our guideline for dividing our pockets. Following that line, draw a line to stitch along:


Then, working from the bottom edge towards the top edge, sew along that line. At the top edge I go over the stitches several times as that's a high stress area that benefits from a few extra stitches holding it all in place.


And bam. Cute pleated pockets.


Now your lining should look like this (don't fret--I pressed it after I took this photo):


Let's do one more thing before we set it all aside for the day. You should have a few little bits of fusible interfacing remaining as well as some fabric from all parts of this bag. We're going to make the tabs for the zipper, so decide which fabric you want to use for that. Cut two pieces that are each 2 inches by 4 inches and two pieces of interfacing that are 1 1/2 inches by 4 inches. Fuse the interfacing straight down the center of the wrong side of the fabric.


With right sides together, fold the fabric so the short edges match and stitch 1/4 inch in from the edge (you should be stitching right next to the interfacing).


Trim the corners, but don't get too close to your stitching.


Turn these little bits inside out, gently poke out the corners (don't bust through your stitching), and press. You can add some top-stitching if you'd like but it's not necessary. I didn't because you wouldn't be able to tell on this fabric anyway, but if I was using something plainer I probably would.


At this point, you should have your exterior piece with the handles attached, the lining with two different pockets, your zipper tabs, and one remaining zipper.


Come back on Friday and we'll organize all this nonsense into a bag!

Monday, June 9, 2014

The Toiletry Tote Sew Along Part One: Cutting and Handling the Exterior

Hello! And welcome to our sew-along for this super-cute can-be-used-for-anything bag!


If you need the materials and cutting list click on over to here and then come on back. If you've followed any of my tutorials or sew-alongs before, you'll know that I'm wordy and use a lot of pictures. And if you haven't...well, I guess now you know that, too. I make every attempt to be precise with my instructions so you'll be successful right out of the gate, but if you get hung up somewhere or if I'm being unclear please let me know and I'll try to clarify things better.

Have you got your goodies all together?

The pink is for my straps, the black and white is my lining, and the cassettes are my exterior.

Then let's begin. A couple ground rules so I don't have to repeat myself over and over again. First, backstitch at the beginning and end of every seam. Second, our seam allowance will be 1/4 inch throughout. I'd also recommend that you give a read-through the instructions before you begin (that goes with any project, though).

Start with your exterior fabric. Cut one piece that is 22 inches wide by 24 inches long. From your interfacing cut a piece that is 24 inches long (and it should be by the width of 20 inches). You'll notice that you're about 4 inches short, so cut a piece that is 24 inches long by 4 1/4 inches wide. Fuse those pieces to the wrong side of your exterior piece. You'll have a little bit of overlap, like this, which is fine (and preferable to a gap).


Cut a piece of fusible fleece the same size as your exterior (this should be wide enough that you can cut one piece). Fuse this to the wrong side as well. Set this aside to cool (if you don't give the adhesive time to set you'll get bubbles). While you're waiting, cut a piece from your lining that is 24 inches long by 22 inches wide. Get your pattern. We'll start with the lining as by the time we're done your exterior should be good to go. Place your pattern so that the part with the star is in the corner, like this (note which length of the fabric goes where):

I'm showing you the exterior in this photo, but the same thing applies to the lining.

You can either cut around the paper, or trace around it and then cut it out. Place the pattern in the other three corners, turning or flipping as necessary so that the part where the star is ends up in the corner. That part is critical, so pay careful attention. When you're done, you'll have a piece that is shaped like this (but at this point in your lining fabric):


Take your exterior piece and trim off any bits of interfacing or fleece that may be peeking off the edges. Now place your pattern and cut it out just as you did for the lining. Set these pieces aside.

We're going to get going with the handles now. I need to note that my handles ended up being shorter than what I'm going to tell you as girl genius here didn't have the sense to check her fabric. So if you're looking at what you have and what I'm showing you and wondering why your handles look longer, that's why.

Whatever you're using for your straps (whether it's a contrast piece like I'm using, or your lining) cut two six-inch lengths of fabric from selvage to selvage. Then trim the selvages off.

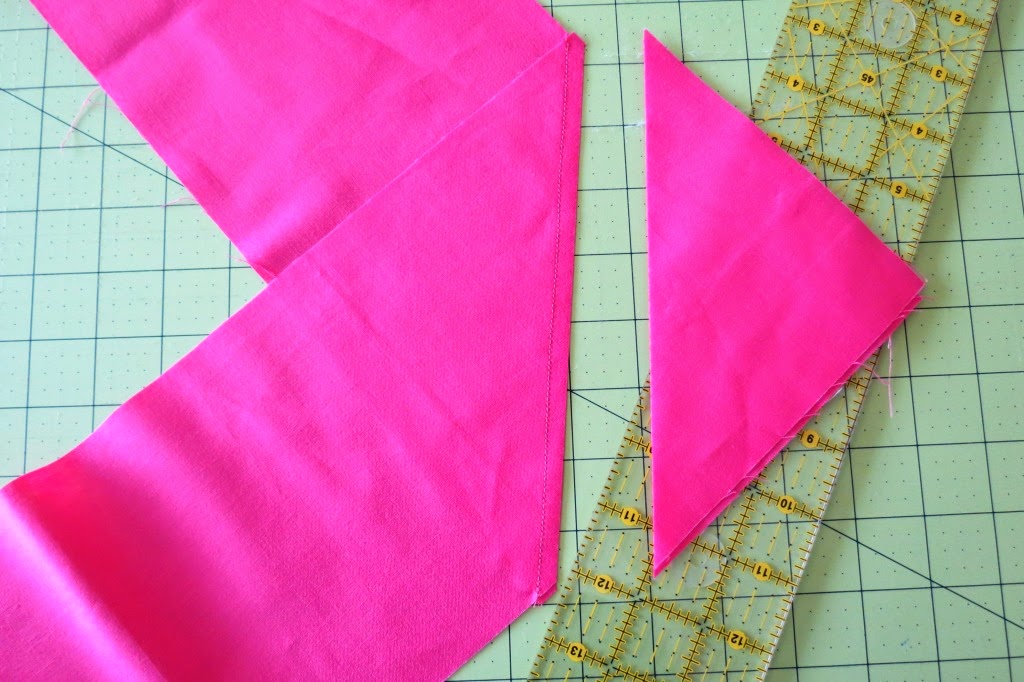
This part is similar to making bias tape. Place the two strips right sides together, perpendicular to each other with a slight overlap. Draw a diagonal line from one corner to another like so:


Sew on that line, then trim a quarter inch from it (see photo just below), and press the seam open. You'll have a long piece of fabric now. Take that long piece and trim it so that it's 60 1/2 inches long.


We need to make a loop, so take one end and bring it over to the other end, repeating the steps above. Try not to get it twisted (pin and check first if you're new at this). It'll look like the below:


Draw your line, stitch, trim, and press. You should have one big loop of fabric. I've connected these this way to cut down on the bulk. Sewing the seams straight would have piled up the bulk over the next few steps; this way keeps it from doing that.

See? As we fold this up those seams will be spread out, minimizing the stress on your needle.

Now we press. Fold the loooooong edges in half and press, all the way around. Then fold the raw edges towards the center and press. All the way around.


Take your remaining bits of interfacing and fleece. Cut three 3-inch by 24-inch strips from each one (you should have enough to go around the loop). Unfold your loop, then fuse the interfacing right down the center (use your creases as your guide to center it). You'll need to overlap as we did when we were interfacing the main panel. When you get all the way around, trim the excess interfacing. Your overlap shouldn't be much more than a half-inch, if that.


Lay your fusible fleece down the center and fuse this as well. Do NOT overlap (way too much bulk will ensue). Simply butt the ends up next to each other. It'll be held in place by stitching. To fuse, I like to fold over the edges and press, then flip over the whole thing and press again to make it more secure.


When you have what looks like the above, fold that in half. It'll look like what you had before we went back and added in the interfacing.

** Please read the rest of this section before doing anything else. It'll make more sense if you see where we're going before you start the journey.

Now we need to make some markings, so you'll need some pins or a disappearing fabric marker. I don't have a picture for this step so I "drew" you a lovely graphic. Lay your handle loop totally flat with one side layered on top of the other, and folds at both ends:


Make a mark along the folds or place a pin through one layer (we don't want to pin the loop shut). Those are your mid-points. Match those up, like the below, and mark along the folds:


That there is a quick and easy way to make quarter marks on a loop of fabric. Pick a pair of midpoint markings, but note that those two marks can't be next to each other or this won't work. Mark 6 1/2 inches to each side of each of those two markings. You'll have a loop that has four sections marked off; two are 13 inches and two are 17 inches with those lengths alternating (13-17-13-17)

In this photo the pin is my midpoint, and the lines are the 6 1/2 inch markings I made.

Now we're going to sew only part of this handle. We're only going to sew those thirteen inch sections we just marked off to close up our handle. So trot on over to your sewing machine, and stitch pretty close to each edge (I like to go about 1/8 inch from each side).

I do my best to start and stop right on those lines.

Sewing up each edge is certainly enough, but I like more of a quilted look, so I added a few more lines of stitching. Do what you want with yours.


Repeat for the other thirteen inch section. You now have a loop with two sections stitched shut separated by two sections that are wide open. We're going to take care of that now. Get your exterior piece and lay that right side up. We're going to use those other two midpoint markings on our handle to line everything up nice and neat. So lay your handle loop down on top of your exterior.


Ahhh, see how this is going now? Don't pin yet, I just wanted to give you the idea of how this is going to go down. I have a bit of a ruler obsession so I line up a few to do this, but if you're a normal person who doesn't have an abnormal amount of rulers you can make a few quick marks to do this part.


The vertical ruler on the left is marking the midline of what will be the bag bottom. The horizontal ruler on the right is marking three inches in from what will be the side of the bag. Where they intersect (in the centerish of the green cassette) is where you want to put the midpoint marking of one of the unsewn sections of your handle loop:


Pin that in place, and repeat with the other unsewn side of the handle. Then pin pin pin so that it doesn't go all crazy before we stitch it down. Trot back over to your sewing machine. Very carefully overlap one or two of your previous stitches, and now continue that stitching line until you reach the stitches at the other end, and carefully overlap a few stitches again. We're shooting for a nice continuous line here, so take your time. Then repeat for the other section.


We're sewing down our handle and closing that open edge at the same time.


One last step. I get a little anal retentive about my straps being secure, so right where our lines of stitching overlapped I like to sew a horizontal line so nothing tries to come loose at any point. So stitch those four lines right now, unless you have a devil-may-care attitude about such things :)


Phew. I know, that strap was a little crazy but it's super secure and eliminated the need for a bottom seam that we then would have to make super bulky by sewing our straps into it. Those kinds of things aren't always kind to needles, so we eliminated that issue by doing it this way.

What we've got so far. Please note that seam ripper is there for...scale...not because I used it or anything like that. Psh...come on.

OK, I think that's enough for the first day. We have our outside finished--it's cut out and interfaced with the handle sewn to it nice and securely. We have the lining cut out, and we'll be tackling that next. See you on Wednesday!

Wednesday, June 4, 2014

Let's Get Our Sew Along On!

Last week I made some time, and stitched and stitched while I took a gazillion photos. All I've got to do now is a little bit of a clickety-click on the keyboard and we'll have ourselves a sew-along. Yes? Yes!


As per usual, I'll be breaking this down into a few parts so it doesn't seem too overwhelming. And I'll have lots of words and pictures to clarify everything as best as I can.

We're not going to start sewing until Monday, but I wanted to give you the materials list so you'll have some time to start getting things together. Note that the measurements given below are the "good" measurements. If the cutting counter at your fabric store cuts you a crooked 24 inches that's not going to work; you'll need 24 inches after squaring up. If you often get crooked cuts (annoying!!) you might want to get 3/4 yard to have a few extra inches to hack off and neaten up (or else explain to them what you'll need and watch them like a hawk so you get all of what you're paying for).

You will need:
  • 2/3 yd. of exterior fabric. Non-directional fabric works best for this pattern.
  • 2/3 yd. of lining fabric
  • 1/3 yd. of a contrast fabric for the handles. If you want to use the lining fabric for the handles then skip this and just get 1 yard of lining fabric
  • 1 1/3 yard of 20-inch wide fusible interfacing. I used Shape Flex 101 (a woven) but a basic craft-weight will work fine, too)
  • 2/3 yard of fusible fleece (I used Thermolam Plus)
  • 1 24-inch zipper
  • 1 10-inch zipper (for the inside zipper pocket)
  • your pattern (I've shown you here how you can make a boxy bag like this in any size that you like, but I kept the sew along math-free. You're welcome :)  Make sure you print at 'Actual Size' or set the scaling to 'None' to make sure your pattern prints at full size.
Once we get all of these things reorganized, we'll have a bag that is roughly ten inches wide, eight inches high, and four inches deep, with a secure zipper opening, lovely inside pockets for organization, and some super sturdy handles. Sound good? Good.

A few other thoughts for you... I originally designed this bag to be used as a toiletry bag, and that's what I'll be using mine for. BUT there are an infinite number of uses for a bag like this. A craft tote for anything you can imagine (crochet, knitting, jewelry making, paper pieced quilting, and so on); a tote for wee 'uns to lug their own treasures around (Legos, paper and crayons, and whatever other treasures they 'need'); make it in coated fabrics and use it as a lunch tote; and, if you feel ambitious and want to size it up a little you could make a wee overnighter for the young 'uns. Anything goes, really. This is one of those bags where the fabrics can help define its use if you'd like, which means a super amount of fun in the fabric shop, eh?

So get thinking, and get shopping. Then meet me back here for some stitching on Monday.

Sunday, June 1, 2014

Loopy-Loo Crochet Cushion

Recently I shared with you this pillow that I made. It only used up about half of the yarn from the color pack I had bought. Seeing as it's chunky yarn I felt like I was really limited in what else I could make with such a small amount of yarn, so I made another pillow. I did this loopy interlocking stripe stitch that looked kind of crazy in the making, but in the end made up this texture that I am in love with.


The basic pattern is a base of single crochet combined with chains that dangle in these big loops that look like mistakes, and then you loop them together and it looks nifty. Let me know in the comments if you'd like a tutorial. It's so easy--you only need to know how to chain and single crochet.


I started to run low on certain colors towards the end, so I had to kind of just make it work. The button flap isn't as long as I'd like it to be, but it works.


I didn't have enough of any one color to make the stripe where the buttons would go, so I used the little of each of the colors I had left to make the flap. I added a few extra rows so that the buttons fell more towards the middle of it instead of along the edge.


The first cover I made was quite a bit too large for the pillow insert I had, so I bought a larger one for that, and then used the original for this one as it was a little bit smaller. They're in there nice and snug, so they should look good for a while.


Here they are together. I do like the button placement on this one a little more, but I do wish that flap could have been longer. These weren't as quick to make as you'd think, and there were a ton of ends to weave in, but I do love the results. And I'm almost giddy that I used all the yarn. Some girls like jewelry, I like using up my craft stash. That's the stuff that makes the world interesting :)

Linking up here:

Tuesday, May 27, 2014

Makery: A Review

I first heard of The Makery in Mollie Makes. It's a crafty workshop in Bath, England where one can go and learn how to make pretty much anything. The concept intrigued me, and the name amuses me, so when I was offered a chance to review "Makery: Over 30 Projects for the Home, to Wear and to Give" by founder Kate Smith I jumped at the chance.


The book is divided into the three title sections, with a good bunch of projects in each.


There are pull-out patterns included, as well as a handy tips section for things you might need to know. And there are a few cute projects for sure:


It's supposed to be a brooch, but wouldn't that be a great package topper for a gift to a crafty friend? Or maybe a Christmas tree ornament?


This pin cushion truck is super adorbs, but with my luck it would roll off the table and I'd be stepping on pins for weeks. It makes for a cute decoration, though, especially in the right toy truck.


And this stuffed reindeer head I find...interesting. Much better than the real thing... Definitely has some cute Christmas potential.

And now here's the part I hate to write. Would I recommend this book? I can't say that I would. If you're on Pinterest you'll have seen some version of almost every one of these projects or could come up with them yourself. I honestly found a lot of these projects to be...not so inspiring. You can find instructions for any of these things by googling, and I think that's what irks me a little. I really dislike saying something negative about someone else's work, especially something they've put a lot of effort into. But I also dislike books that present content that isn't really that original. I received my copy at no charge, but others will pay for it and without the benefit of an in-person perusal I fear they'd be sorely disappointed. 

I can't say that this book doesn't have a place. If you're just getting into crafting (or know someone who is) and you're looking for simple projects in a variety of craft forms then this book would be great to help you discover your niche. It's very pretty, nicely organized, and doesn't require materials that you'll never be able to find. It's a great jumping-off book, but if you made the crafty leap a while ago you might want to pass this one up. 

I was not financially compensated for this post. I received the book at no charge in exchange for an honest review. The opinions are completely my own based on my own experience. For my complete disclosure policy, click here.

Sunday, May 25, 2014

Memorial Day


I am guilty of it myself. I spent yesterday and this morning chopping and mixing and cooking alongside my mother in preparation for today's Memorial Day picnic. I didn't stop to think why I was doing it, just that a bunch of people were coming over and would want food at some point. I imagine if I was the lady in the above photo I would feel tremendously different. So let's all take a moment to pause and reflect on why we all get together and the folks who have made it possible for a couple hundred years now. Thank you, ladies and gentlemen, for your service and bravery. Happy Memorial Day.

LinkWithin

Related Posts Plugin for WordPress, Blogger...