
If you've made a simple tote before (I've got tuts for those, too--check the tab above) you'll know that the bottom corners can be boxed to give a flat bottom. It's easy to figure out, for the most part, and doesn't require too much mathy sort of thinking. But with a boxy pouch, the sides are what gets boxed and the method is therefore a little bit different. I wasn't having an easy time figuring things out (remember--the math part of my brain doesn't function well), and just could not visualize the shape I was going to need. My sample had come out OK, but I wanted better than OK. I was suddenly overcome by the need to know just how this thing went together, mostly so I could make any size I wanted without trial-and-error or things coming out not quite right.
So I took my sample apart. It was a piece of ugly fabric and a zipper in such a weird color I don't even know why it existed, so it didn't break my heart to do it. I've tried to recreate it all here through the magic of PowerPoint, but you'll get the basic idea and hopefully be able to make any size you want as well.

Hmmm. That looks interesting. So let's see what's what (and keep in mind this is just a rough graphic).

If you hack off the bits that say 'Side' you'll see it's just a giant rectangle. BTW, those skinny pink strips along the top and bottom are supposed to be the zipper (note: I also have a very low-functioning art part of the brain. Second note: I cut the ends and pulled the pull off the zipper to open it up like this--it normally wouldn't be possible to do that).
So you can clearly see how the front (or back) shows the width and height of the bag, and the bottom is going to make up the depth of the bag, with the pink zipper strips meeting to form the top. The part left to consider is getting those side flaps to meet. It's as simple as one plus two equals three. Pretty much literally. Let's take a look at one of those corners.
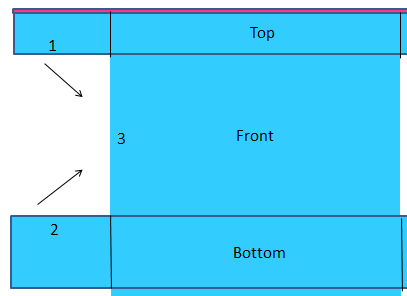
As the pouch gets going along the sewing process, edges 1 and 2 will come up and get stitched to side 3. If your bag is going to be six inches high, for example, those two flaps that stick out need to stick out in amounts that will total six inches. And that's where you can adjust the zipper placement. If you want the zipper to fall dead center, then those two flaps would be the same. If you want the zipper to fall higher, then the tab coming off the bottom needs to be longer than that coming off the top near the zipper. If you wanted it lower then the reverse would need to happen.
What I 'drew' for you above is a rough estimation of my starting point. Now I'm going to show you how you can take this and adjust it as I did to customize the size. Let's say I want to make a bag that is six inches high by ten inches wide, with a depth of three inches. I start off with my 6 by 10 rectangle. I add seam allowances to the sides only. Let's say I'm using quarter inch seams.

Easy enough. Now we need to add the bottom. It's three inches. The length will take some easy math. We know our bag is going to be 6 inches high. For fun, let's place the zipper 1.5 inches up from center (which would be at the 3 inch mark, so our zip will end 4.5 inches up from the bottom). Do I know how to party or what? It'll look like this now:


So there's your bottom, your front or back, and the top. You just need to add the back (or front) and another top piece (because that zipper has two sides) to the bottom and there you go. Just like this.

There's one last thing we have to add, and that is the seam allowances where those flaps are going to get sewn into the sides. You might feel tempted to add to the edges of those flaps but don't do it--you'll have too much fabric in there when you go to sew it all together.

And that's that.
So there you have it. The deconstructing of the boxy pouch. Doing it this way keeps your dimensions intact so that no awkward (or unintended) shaping results. It's especially important if you'd like to make a perfectly square pouch, or if you're making a larger bag and don't want the zipper to sit too far down the side.
I've only ever made one size before (the one I show in the tutorial), so this was very eye-opening for me as I was figuring this out--lots of a-ha moments. Hopefully it helps a bit in your bag-making. They work up to make pretty adorable bags that you could fill with goodies and gift, and they don't take very long once you understand the details.
For those of you who are all "Gah! The math! This reads suspiciously like math!" then never fear. This is just a bit of a primer on the process, but we'll make a few together, and I'll walk you through it. M'kay? Stay tuned!
Linking up here:
Tuesdays: Take-a-Look Tuesday, Show Me What Ya Got, Homework
Wednesdays: Your Whims Wednesday, We did it Wednesday, Whatever Goes Wednesday
Thursdays: Catch a Glimpse, Craftionary
Saturdays: Show and Tell Saturdays
It isn't math, it is engineering! The motto of engineers is "close enough for all practical purposes". It is amazing how well that works in sewing.
ReplyDeleteAhh, that makes complete sense! Well done. =)
ReplyDeleteReally helpful for sizing up for an overnight bag:) All I have to do is work out how big a bag daughter will need!
ReplyDeleteOh my goodness! I just found your sizing tutorial when reading Vicky Myers' blog post and you are a legend. You made it very simple. Thank you!!!!
ReplyDeleteThis is great! Thank you for this tutorial!!
ReplyDeleteThank you for this clever tutorial. Maths is my worst subject and I can't get my head around figures for zipper placement at top of pouch. I need a bag 12"high x 15"wide (knitting needle pouch for sister). I think 6"depth (?) Can you please tell me how many inches from bottom to make zipper go across top of pouch? Thank you so much. Louise Western Australia
ReplyDeleteHi Louise--This sounds like an awfully large knitting needle pouch. Are you sure of the measurements? But also--I'm not entirely sure of your question. Could you provide me with a little clarification so I can help you out?
DeleteThank you Bethany for your reply. Sorry I've been so long in responding.
ReplyDeleteYou are quite right. My measurements were out. I've put this project on hold for a while and making my sister something else. Thank you again for that amazing "dissection" of the Boxy pouch.
Approximately how long does it take you to make from cutting fabric to completion just curious thing
ReplyDeleteHmmmmm....I'd say one to two hours maybe?
Deleteyour description of where the zipper has me confounded - the zipper is sewn to another panel that sits on the top of the 6x10 side panel, and you need 2 of these zipper panels that will be 1-1/2" wide to equal the 3" width of the base and the addition of the zipper widths; so when you write about where the zipper is going to fall and that you choose it to be 1-1/2" "up from centre" -- centre of what? To me it reads as if you're altering the height of the bag;and how does this factor into the length you made the top panels and the bottom panel (where did the 1.5" and 4.5" numbers come from that you added to the side panel widths? I understand that they have to add up to the 6" height of the side panels, but how you got these numbers doesn't compute.) ..... thanks for any clarifications you can offer .... J.
ReplyDeleteThat 1-1/2" up from the center is referring to the center of the SIDE of the pouch. As the zip comes up the side, across the top, and then down the side, that's referring to where the zip will start/end on the sides. So instead of sitting dead center on the sides it's going to sit 1-1/2" UP from the side center. That measurement is based on preference (I like to place the zip a little higher than center to start/end. It allows the bag to open a little more). So depending on where you want that to be, that determines those flaps. If you want it to be center on a 6 inch high bag, they'd be 3 inch flaps. If you want it 2 inches from the bottom, it'd be a 2 inch flap and a 4 inch flap. The seam allowances get sketched in at the end, so those are finished measurement numbers you're playing with as you figure out what you like. I found it very helpful to draw things out on a big sheet of paper and fold it up and play with it that way to get a good understanding of how the parts come together, especially if you want to try different sizes. I hope this helps a little!
DeleteThank you - I just had my "a-ha" moment .... great info!
DeleteThis comment has been removed by the author.
ReplyDeleteHi Bethany
ReplyDeleteNot sure whether this post is still active 10 years later 🤷🏼♀️
I finally found this tutorial - imo it is the best on the internet . 🙏🏻
I understand why no seam allowance on the zip sides - the zip adds approx 1/2”.
What is the maths of no seam allowance on the ends/sides.
Thanks
OK, so if you look at the yellow bars in the last picture that shows the seam allowances--they shorten the sides of the 6x10 segments. If you then add seam allowances to the ends of those pieces sticking out, you'll have too much fabric when you go to box those corners. It's such a weird shape that it's difficult to visualize how it comes together from that drawing because it is not the norm. When I wrote this up I used some scraps and a junky zipper to make sure it was going to work out OK. I remember driving myself a bit crazy over why those pieces didn't need seam allowances. I hope this clarifies things a little bit for you!
DeleteThank you so much. You’re right, it’s hard to visualise. I’m just going to go with it until it clicks 😁. Thanks again.
Delete