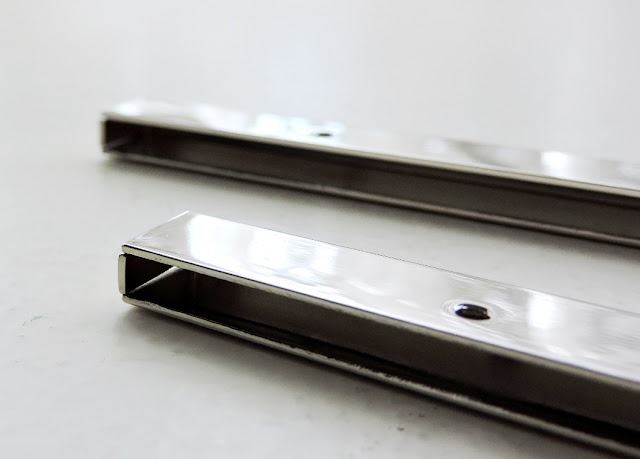
So I thought I'd take some super close-ups of the frame to give you an idea.
They come in two separate pieces--a female and a male side. The male side is the one with the little flippy lock bit in the background. When assembling the wallet in its final stages, you need to cut a bit of a hole so the wallet can close, but it's critical not to cut it too low or else it will be exposed below the edge of the frame.
To the left you can see that the tippy-top edge of the wallet is enclosed on all sides by the frame. Precision is annoyingly key, as if your work is too large, it won't fit, and if it's too small you'll have a bit of frame that extends too far (and it just won't look nice).
You can see there's a decent channel to the frame, as well as the screw holes. The pattern I used calls for you to glue in the frame as well as using the hardware. The channel is nice and deep so there's hardly any glue ooze.
And here are the teeny tiny screws--four per each side of the frame. They're squat little things, and don't look like they'll screw into anything without first poking holes in the fabric (especially with all of the interfacing), but they go right in, smooth as butter.
This frame was interesting to work with, and I love my new wallet. Here are two recently-released patterns that use just such a frame if you're interested:
- This pattern is the wallet I made
- This pattern is just as lovely and would probably be easier if the thought of a wallet gusset makes you queasy
Happy sewing!


love the wallet! Where did you get the hardware? I think I would like to attempt this!
ReplyDeleteYou can search for the 'Diva wallet frame' on Etsy. They seem to come in 8 inches and 7.5 inches (mine were 8, though my pattern called for the smaller size, and I had to adjust). Or, you can buy a pattern kit or the frame and pattern at u-handbag.
Deletethanks Bethany! It doesn't look at all like I'd imagined it. I thought it was more like a clip frame.
ReplyDelete