
Insert the Grommets
1. Grab a ruler and something to mark with. All of our markings are going to be made 1.25 inches above the seam line that connects the top band with the main panel. You're going to make four markings on both exterior pieces. Make one 2.5 inches from the edge, and another 4.25 inches from that mark (NOT from the edge). Use the same measurements to mark from the other edge. Repeat for the other outside piece.

I like to center my grommet over the marking and trace the circle as a snip guide.
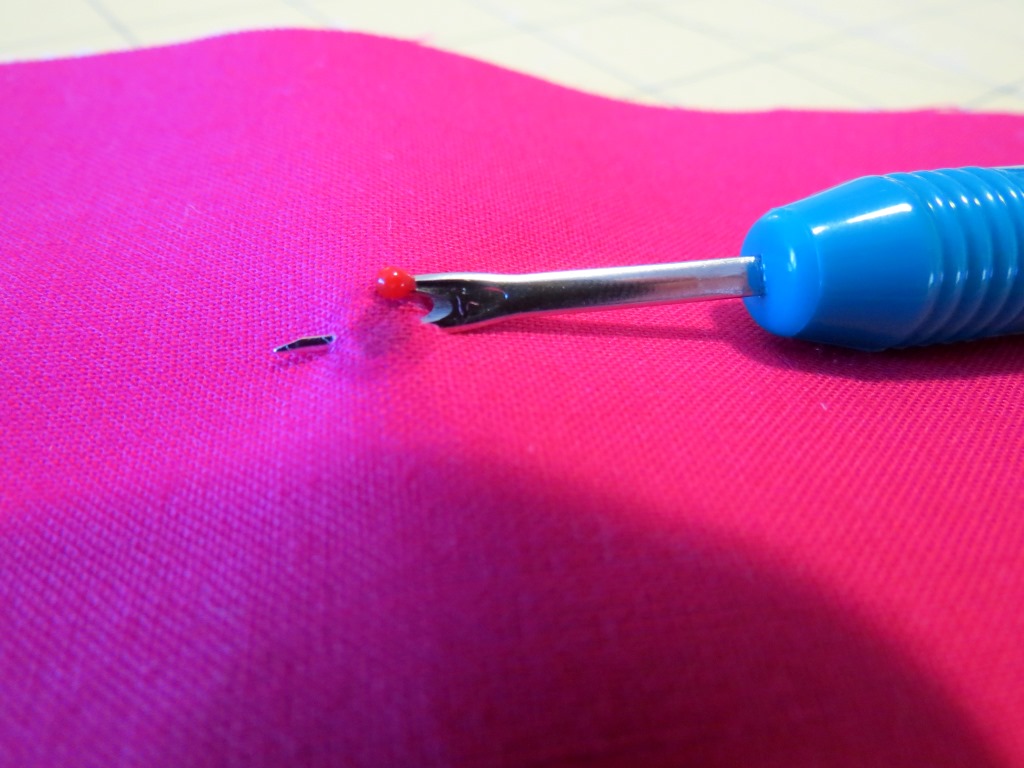
2. Take your seam ripper and insert it on one side of your circle, coming out the other side. Make a clean slice with it.
3. Use your scissors to trim that little circle. It's better to start small and go bigger if you need to, as you can't put back what you've cut off. Snip until the grommet fits through the hole. You want to poke it through to the back, so the flat part is against the front of the bag, and the other part is sticking through the back.

4. Take some of those fusible fleece scraps and cut them about 2 inches square (you'll need 8 total). Cut a hole in the center and place it over the part sticking up in the photo above--this is giving us a double layer of fleece so that our grommet will really be stuck down firmly.
5. Put the washer over the grommet end, and use either your grommet pliers or your tools to get it firmly in place. It should not be able to wiggle around at all if you've got it in good.

From the outside.

From the inside. Trim down some of that excess fleece.
6. Repeat for all of your grommet markings. Make sure you've got the 'working side' on the wrong side, and the business end looking nice and pretty on the outside.

Make Up the Outer Bag
1. This will be very familiar as it's almost exactly how we assembled the lining. Line up your pieces, right sides together, and sew all the way across the bottom using a 1/4 inch seam allowance. Press that seam open. Sew up each side, and press those seams open as well.
2. Create the flat bottom for your bag using the same exact steps used for the lining. Due to the bottom band being in the contrast fabric, it makes it look like we've inserted a separate bottom piece.

Haha--I took this picture after the fact, which is why you're seeing my steps in the background instead of my sewing table :)
3. Now we're going to make the bottom of our bag nice and sturdy, and anti-sag by inserting a bag bottom into it. Turn your bag inside out. Measure the bottom seam and knock about a quarter inch off the measurement. We know our flat bottom is five inches deep, so knock a quarter inch off that as well. If your stitching matches mine you'll need a piece of plastic that's 11.75 by 4.75 inches. Cut that piece out now.
4. To keep the plastic from sliding up the sides of your bag we're going to sew some stitches through it into the seams. Thread a needle, tie a knot, and tack it on down. I stitched the center of the piece of plastic through the seam a few times. It doesn't need to be super sturdy--we're just trying to keep it from shifting.

It should look like this when you're finished:

Turn it right side out. You should have a nice flat-bottomed bag exterior with grommets along the top.
5. NOW grab those straps, those straps that have been waiting so patiently. Measure in 4.25 inches from the side seams, and pin/clip your straps in place. You'll want to make sure the piece that we folded and sewed when making the strap is facing up.


6. Stitch it down about 1/4 inch from the top edge. I like to go over these a few times to make sure the straps are secure as that's a major stress point in a bag. Repeat for the remainder of your strap ends, taking care not to get them all twisted.
Make the Drawstring
1. You should have two long, narrow pieces left at this point. We're going to sew them together as though we're making bias tape so there's no bulk. So take those pieces, and lay them perpendicular to each other, right sides facing (unless you're using a solid, and then it doesn't matter). Draw a line as shown in the picture below, then sew on that line.

2. Trim that down to about 1/4 inch seam allowance, unfold, and press the seam open.

3. Trim the strip so that it measures 54 inches (with your seam in the middle).
4. Remember how on our straps we folded in our short ends to hide the raw edges? Do that again--press in the short edges about 1/2 inch each.
5. Now we fold it in half along that loooong edge and press. Unfold, and press the raw edges towards the center fold. Then fold and press in half again.
6. Trot on back to your sewing machine, sew around the perimeter of your drawstring, about 1/8 inch from the edge.

I picked out those wayward stitches after the photo was taken :)
Insert the Drawstring
1. Figure out which side is the front of your bag, as this will be where our ends will be.
2. Take one end and feed it through your grommets, starting with one of the more central grommets, and feeding it in and out, around the bag, coming out next to the grommet where you started. If you goof this up just pull it out and redo it.

Here's what the outside looks like at this point.
Finish It
1. Take your exterior bag, and slide it inside your lining so that the right sides are facing. Fiddle with it so your seams match, and pin everything in place. Make sure your straps and drawstrings are in between the two layers and out of the way of your stitches.

2. Sew around the top using a 3/8 inch seam allowance. Carefully reach through the gap in the lining and pull everything out so that the yucky parts are hidden, and all you see is your beautiful bag and the lining. Gently poke out the corners so they're nice and crisp.
3. Stitch the gap in the lining shut, then push it down into the bag, neatening everything up.
4. Neaten up the top edge (I use pins or clips to keep it in place) and topstitch about 1/4 inch from the top edge, going all the way around. Watch out for the drawstring. It'll want to get in the way.

5. Trim any dangling threads, give it a press, and tie your drawstring into a bow. You have finished, my dears.
Recap
So how'd you do? Hopefully you learned a bunch of new skills in this sew-along, but if you already knew everything I hope you enjoyed yourself anyway and now have a delightful new handbag to show for your efforts.

Please please please stick them in the Flickr pool (link in the sidebar) so we can all ogle some fabric and handbag yumminess!

Beautiful Bethany. I'm running a little behind. I have the magnetic button to put on before I get to this stage. My friend is about to have her baby and I'm rushing to finish a cot quilt for her as a gift and she's also ordered bedding and a cot and crib bumper so need to finish these things first.
ReplyDeleteThanks so much for doing this tutorial. I can't wait to finish mine.
Yay, well done for getting to the end!
ReplyDeleteThanks Bethany! I hope I can finish today, if not by Wednesday, since Mon-Tues. I babysit my grandson and won't be able to sew those 2 days. But I am ready for this last sew-along part.
ReplyDeleteSo professional!!
ReplyDeletexo KRis
Bethany I finished my bag. Thanks so much for this fun sew-along.
ReplyDeleteGo here to see it; http://patchouli-moon-studio.blogspot.com/2013/04/drawstring-bag.html
This comment has been removed by the author.
ReplyDeleteI really love this bag and it seems so easy. I don't suppose you have thought about putting the directions in PDF form so that it can be printed off? But I am marking these pages to try this bag and will post if I'm successful.
ReplyDeleteThis is a lovely bag. Thank you for sharing. I have only just come across this.
ReplyDeleteCan this bag be made with pre-washed flannel? I think it would make a nice fall/winter bag.
ReplyDeleteYou are a truly amazing teacher. I will tell you when I try it out and complete the bag.
ReplyDelete