A few weeks ago we were asking my sister what A-train wanted for his birthday. And she responded with suggestions of things he "really wanted." One of the things was a backpack, so I asked her what she was visualizing with that as my wheels were turning. She described her image, and then said that he loves helping her pack his bag when they go somewhere, so she thought he might like his own bag to carry. After my heart stopped feeling squeezy from the cuteness of that statement and the resulting image, I told her I would make one for him. Usually I try and draft my own patterns for things, but sometimes I just don't feel like it, and this was one of those instances. Besides, for a few years I've wanted to make the Made by Rae Toddler Backpack, but didn't have a reason to. After a quick trot to Joann's I was stupid eager to get started.
I tried to find some good, solid train fabric but couldn't find anything just right, so went with Spiderman, which he loves. He was playing with his little friend Noah, who was acting like a monster (I don't mean behavior-wise, I mean in a role-playing sense, hahaha) and A-train flung out his hand and said "Thwip!" which is what Spidey does, I guess, to tame evil-doers. I tried to cut the fabric so as many 'thwips' as possible were visible.
Doesn't piping just make everything better? I had a bit of a time getting this gusset in just right. I greatly dislike when I buy a pattern and there's that 'just make it fit' statement thrown in there. If I'm paying for something I do so because I expect it to fit already. But truly that was the only glitch in the making of this--the rest went together as smooth as silk, and was actually quite fun to make.
I discovered at an unfortunate time of day (i.e. the stores were closed) that I had not a lick of bright blue thread. I did have about four spools of red, though, so the loop and straps all have red thread, and I do love the look of it as I actually managed to not make a sloppy job of straight lines.
I wish you could see the teeny cuteness of these straps in real life. I stopped to take a picture to send my sister because they were just that adorable (due to the size--I'm not patting myself on the back here, haha).
Are you ready to see the whole thing?
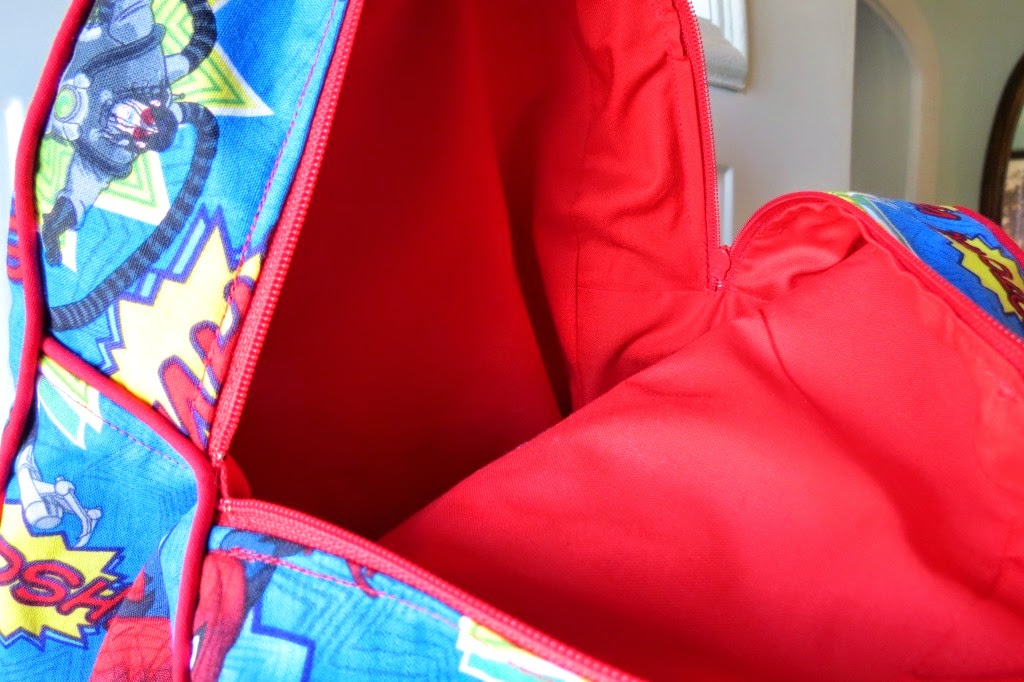
The pattern called for a canvas fabric to be used, but there's nothing cute in the stores, and I hesitate to buy certain things online if I've never used them before. So I used regular quilting cotton, interfaced with Shape Flex 101. Then I threw in a layer of craft-weight Pellon #50 sew-in. It gave it a nice structure without making it too bulky as where the straps, gusset and bag front/back come together it gets layer-licious, especially with the piping.
I also added a lining to it. It was a little fiddly doing the hand-sewing bits as it was a weird angle, but it's in there nice and tidy. Usually I purchase YKK zippers and replace the standard pull with a longer one, but this time I used Coats and Clark. I can't replace the pull on those as they don't fit proper, and the pull seemed so teeny, so I went scouting for a cute zipper pull. I tried for Spiderman, but I didn't need a set of five superhero pulls, so I went another route when I came across a shop that offered the below--
When my sister and BIL Matt were teaching A-train to say his name he'd say "Mac-n-cheese" when he got to his last name. Every time. So stinkin' cute. So you see why I had to get the above, right?
Gusset-fitting issues notwithstanding (and it wasn't really a major ordeal, more like an annoyance) this was a lot of fun to make, and quite easy. It's a good thing I got distracted by other projects, as this is one of things I feel like I could just keep going and going with until I had fifty bags and no toddlers to foist them upon.
It looks so teeny in actuality, but so big on a tot. I'm glad I went with Spiderman, as he'll probably outgrow trains before he outgrows the bag. But if he doesn't I'm fine with making more.
Tuesday, June 24, 2014
Sunday, June 22, 2014
Two Fingers Old
A certain little boy I know turned two over the weekend. And you've never seen a two year old more excited to have a birthday. I am not kidding. The other day we were babysitting and the ice cream truck came by. He had a good old time telling people he was two and was going to have a "Thomas birfday." Little ones are so fun at birthdays and Christmas. When they get to be teens (or close to it) they're all "Can I just have my gift? And don't kiss me."
As the babycakes loves so many things, but especially trains, my sister went with a Thomas the Tank Engine (Thomas and Friends? What's it called these days?) themed party. My brother in law Matt built a cupcake stand for the oodles of cupcakes my sister made. The picture doesn't do it justice and I didn't get a shot of the whole thing because you would have seen mypiles of crap works in some form of progress, but it was stinkin' adorbs.
This little lovebug loves singing happy birthday. To others, to himself, for no reason other than it's Tuesday and he already sang 'Twinkle, Twinkle Little Star' four times. Look at the joy on this boy's face:
And the pride when he blew out the candles (after clapping his hands and saying "Yay!!! I did it!!!"
And then, the presents. Every one elicited either an "Oh, yeeeeaaahhh!" or an "Open it!" My favorite was this reaction--an "Oh yeah"--
--followed by--
--playing with the tissue paper. In his defense, I really like that paper too :)
I got him a game for his Leap Pad, a little set of books (I always try to make a book part of a kid's gift), and a backpack that I made for him that you may have seen in progress on Instagram.
He kept trying to see what was on his back and turning around to see if it was still there. It was absolutely precious, and made the making of it so worth it. It's getting its own separate post as I've never made one before and I love things in miniature and I just want to yak about it a bit.
He was holding a balloon when it flew away, and then wanted to release the others. I know that environmentally speaking we were naughty in letting this happen, but as they flew away he waved at each one and said "Bye bye, balloon!" and sometimes "Have a nice trip!" We were overcome by the cuteness, so fingers were crossed for whales and birds and other creatures we hope we didn't impact negatively.
When I was little I used to hate letting balloons go. Not so a whale wouldn't choke on it if it landed in the sea, but because there was something so sad about it. I still feel that way, like a tiny bit of joy has flown away, unreachable, gone, never to come back. (Well, when you put it THAT way, Bee...)

Ah, childhood. When nothing is sad, and everything is a joy, like discovering the boingy reaction that happens when you snap the clothesline--
I took the babycakes inside to watch Peppa Pig and try to get him to nap a bit, but the others who have a hardier constitution and who can actually play racquet sports worked up a game of badminton.
I would have played, but last weekend when I did play I was subjected to constant reminders of my ineptitude. That's OK, I'm fine with being the family seamstress. And I love snuggle time with the tot (and Peppa Pig) so I feel I got the better end of the deal...
So that's that. Later, taters!
As the babycakes loves so many things, but especially trains, my sister went with a Thomas the Tank Engine (Thomas and Friends? What's it called these days?) themed party. My brother in law Matt built a cupcake stand for the oodles of cupcakes my sister made. The picture doesn't do it justice and I didn't get a shot of the whole thing because you would have seen my
Technically speaking I could not tell you how he did this. I know there was foam, cardboard, paint, washi tape, and a wooden train he painted. I have no idea how he put this tiered contraption together as I couldn't take it apart to figure it out as it was holding the cupcakes (and oh my word were they delicious!).
This little lovebug loves singing happy birthday. To others, to himself, for no reason other than it's Tuesday and he already sang 'Twinkle, Twinkle Little Star' four times. Look at the joy on this boy's face:
And the pride when he blew out the candles (after clapping his hands and saying "Yay!!! I did it!!!"
And then, the presents. Every one elicited either an "Oh, yeeeeaaahhh!" or an "Open it!" My favorite was this reaction--an "Oh yeah"--
--followed by--
--playing with the tissue paper. In his defense, I really like that paper too :)
I got him a game for his Leap Pad, a little set of books (I always try to make a book part of a kid's gift), and a backpack that I made for him that you may have seen in progress on Instagram.
He kept trying to see what was on his back and turning around to see if it was still there. It was absolutely precious, and made the making of it so worth it. It's getting its own separate post as I've never made one before and I love things in miniature and I just want to yak about it a bit.
He was holding a balloon when it flew away, and then wanted to release the others. I know that environmentally speaking we were naughty in letting this happen, but as they flew away he waved at each one and said "Bye bye, balloon!" and sometimes "Have a nice trip!" We were overcome by the cuteness, so fingers were crossed for whales and birds and other creatures we hope we didn't impact negatively.
When I was little I used to hate letting balloons go. Not so a whale wouldn't choke on it if it landed in the sea, but because there was something so sad about it. I still feel that way, like a tiny bit of joy has flown away, unreachable, gone, never to come back. (Well, when you put it THAT way, Bee...)
Ah, childhood. When nothing is sad, and everything is a joy, like discovering the boingy reaction that happens when you snap the clothesline--
I took the babycakes inside to watch Peppa Pig and try to get him to nap a bit, but the others who have a hardier constitution and who can actually play racquet sports worked up a game of badminton.
I would have played, but last weekend when I did play I was subjected to constant reminders of my ineptitude. That's OK, I'm fine with being the family seamstress. And I love snuggle time with the tot (and Peppa Pig) so I feel I got the better end of the deal...
So that's that. Later, taters!
Friday, June 20, 2014
What's This Decision: Blocks 5-8
Ahoy ahoy! I was going to wait until the weekend to post a few more blocks, but I've got a birthday bash for a certain two year old (!!!!) to attend and I didn't want to forget to post. I know you're all on the very edge of your seats waiting for more.
When I was in sixth grade (1989 to be specific) I fell in love with this TV show called 'The Young Riders.' It followed the adventures and exploits of a group of Pony Express riders. I was absolutely obsessed with this show and taped every single one. Even though they finally all came out on DVD I still have the cassettes, as I so vividly remember sitting in front of the TV on Thursday nights, trying to get my timing just right on the record button so as to omit the commercials. When I saw that center fabric, which is the oath any riders had to take, I had to have it, and the postmark fabric is because, well, they delivered the mail across the country. The TVs don't have quite the impact I wanted--I should have put them as the outside triangles so they could be bigger, but it's fine. And as a fun fact, I'm pretty sure the TV we had in 1989 looked like that one :)
"I worked all day. I want to sit here with my beers, and watch Dr. Who! I don't think that's too much to ask!" This block could also be known as "That tardis fabric was pricey and I needed to use the scraps" :)
This one is my homage to the James Herriott-inspired TV series "All Creatures Great and Small." The seventies TV, the adorable lambs (don't you think lambs have an unfair share of cuteness?), the grassy pasture...I've seen a few episodes of that show and it kind of really looks like this :)
And this block is for every kid who's ever heard the words "Will you turn off those video games and go play outside?"
The next blocks will be fairly random. I think I made those when I was getting tired...
Wednesday, June 18, 2014
W(hat's) T(his) D(ecision): Blocks 1-4
Ready to see a few quilt blocks? I figure that four blocks are enough to not make your eyes glaze over while I explain my thinking behind their making. I do realize that the whole economy quilt along craze is done and over with and soooo last quarter at this point, but I like to catch some trains later than others as I feel like the project appeals to me much more when the idea just seems....right. Sometimes I'm so eager to do something I jump right in and either get bored or regret my fabric choices, so waiting felt just right. Anyway, the tutorials I was coming across were for blocks that were too small or too large, or had such weird cutting measurements that I knew I would go slightly mad. After poking around a bit, I found this post that shows you how to make an economy block in any size by first going over the math (ick, no thanks) and then providing a handy cheat sheet. I decided on seven-inch (finished) blocks because the cutting measurements are whole numbers, and because (as an afterthought) I realized that my only square ruler is 7 1/2 inches. Meant to be. There's a bit of trimming involved but I sincerely do not mind it one bit. OK, onward.
I'm going to go through in the order I made them, so here are the first four.
This one is obvious. It's a school block. A larger middle section would have been nice for this one as there was a goat in the classroom and that's what they're all looking at. But I kind of like that only I (and now you) know what all the fuss is about up there. The surrounding black fabric is a chalkboard print (which I later found in green, too). The letters I had leftover from something or other and fit right in with this one.
This one? Well, clearly those adorable little guys are late for school because they were playing football. Now they have to go to the blackboard and write out "I will not be late for school" twenty times in their neatest writing or else. In the chalkboard fabric on the lower right--see where it says 'It looks like...' It got cut off (obviously) but the rest of that sentence is '...a toe.' It looks like a toe. That's what that says. I don't know what is supposed to look like a toe... I hope that the designer worked that oddity in to see if anyone would notice. I love stuff like that.
These kids are the teacher's pets. They finished their blackboard math problems first, so were able to go to the library and help the librarian make sure the books were all in ABC order. After that they became the class bad-asses because that was the most boring task imaginable.
"I want you to write....a theme. 'What I Want for Christmas.'"
This is my A Christmas Story block. Ralphie's notebook that he wrote his essay in was red, and the envelope has some similar wordage to the Red Ryder compass in the stock theme that earned him a C-plus. I just love these colors together!
So that's the first four. These get more interesting as we go along--I tried not to duplicate blocks, and some came straight out of my tired brain that just wanted to make one or two more to have an even number of blocks (anal retentive, anyone?) before I called it a night.
I haven't laid these out in any way, shape, or form, so I have no idea what this is going to look like. I just keep adding to the pile. I thought I might make it a throw and then got excited as I'd be about halfway done already. But I don't know if that'll be enough. I am honestly having a lot of fun making these, even with all the trimming and pressing. It doesn't seem like work this time around.
More to come soon! And I've got a few other projects going that I'm excited to share. See you soon!
Monday, June 16, 2014
What's This Decision?
It's been a tradition of ours for several years now that on Black Friday, late in the day after a large portion of the shoppers have gone home, to head out ('ours' being me, my sisters, and my mom). We start off with eats, and then go to Target, and then wherever else we've all agreed to go. One year we were in Target in the jewelry section. Somehow, casually, without meaning to or even noticing she had done it, my mom stopped to look at something and parked the shopping cart wedged between two display cases, sideways (think parallel parking). We have no idea how she did it, and neither does she since it's not like she tried to do it. When my sister Alicia saw it she said "Um, what's this decision?" doing a wiggly finger-pointing motion at the cart. We all turned to look and started laughing, mostly because the "what's this decision?" statement hit the funny bone at that moment. It's now one of those inside joke catch phrases when we've done something seemingly senseless.
On to my point now... MONTHS ago I bought a bunch of fun fabrics as I had every intention of joining in the economy block-along that everyone seemed to be doing within a reasonable time frame. True to form they've been sitting nice and tidy waiting for me to cut into them, knowing they won't be touched until it's no longer a "thing" to churn out economy blocks. Then I lost my sewjo (which is sewing mojo). Recently, I found it again. And now my quilt is on its way.
I already decided on the name of it. I'm calling it my "What's This Decision?" quilt. Each block makes sense, but possibly only to me. Some have an obvious theme, some are quite a stretch of the imagination and blur the lines of logic. Some are "Oh, that's cute!" and others make my sister get a certain expression on her face and say "Ohhhhhh....oh" because she's wondering which of us is adopted.
I thought it'd be slow-going and that I'd maybe get half a dozen done. I have twenty-eight. It happened before I knew it. The great thing about a quilt that makes no sense is that there's really no chance of getting tired of the fabrics. I'm still excited and eager to stitch away, even with all the trimming. And I do mean all the trimming. Of which there is a ton.
I took photos of the blocks I've made already. Once I get them downloaded I'll share away. Don't worry. I won't hit you with twenty-eight all at once. Back soon!
On to my point now... MONTHS ago I bought a bunch of fun fabrics as I had every intention of joining in the economy block-along that everyone seemed to be doing within a reasonable time frame. True to form they've been sitting nice and tidy waiting for me to cut into them, knowing they won't be touched until it's no longer a "thing" to churn out economy blocks. Then I lost my sewjo (which is sewing mojo). Recently, I found it again. And now my quilt is on its way.
I already decided on the name of it. I'm calling it my "What's This Decision?" quilt. Each block makes sense, but possibly only to me. Some have an obvious theme, some are quite a stretch of the imagination and blur the lines of logic. Some are "Oh, that's cute!" and others make my sister get a certain expression on her face and say "Ohhhhhh....oh" because she's wondering which of us is adopted.
I thought it'd be slow-going and that I'd maybe get half a dozen done. I have twenty-eight. It happened before I knew it. The great thing about a quilt that makes no sense is that there's really no chance of getting tired of the fabrics. I'm still excited and eager to stitch away, even with all the trimming. And I do mean all the trimming. Of which there is a ton.
I took photos of the blocks I've made already. Once I get them downloaded I'll share away. Don't worry. I won't hit you with twenty-eight all at once. Back soon!
Sunday, June 15, 2014
Happy Father's Day!
Quite a few years ago my parents were putting in a new kitchen floor. This meant that everything from the kitchen was crammed into the dining room and living room which made things...interesting. It was an obstacle course of chairs and other bits just to make your way around the downstairs for a few days. As we were all sitting around the dining room table one day (as the kitchen has always been the center of our home and was just in the dining room at the moment) my dad was walking through carrying something when he stumbled. He developed his instantaneous "I'm angry" reaction that we all know too well--hair miraculously on end, face red, and crazed expression on his face--and bellowed "Who left their thong in the middle of the floor?!?!?!" My sisters and I got alarmed expressions on our faces, and looked at each other like "Uhhhhhhh whaaat?" We all craned our necks to see who left their intimate apparel on the dining room floor of all places. And that was the day we learned that my dad calls flip-flops thongs.
So Happy Father's Day, dad. You've had one expression that has burned itself into my brain like nothing else you've ever said, and I am finally thankful for that. "Did you draw a picture?" was the first question he'd ask when algebraic assistance was needed. I used to scoff...but no more. Even if I'm sewing something simple I have to sketch it out first to check my math. And when I figure out something complicated and strut around all proud of myself, my dad will ask "How'd you figure it out?" And I'll say "I drew a picture." And he'll say "Oh, now you want to draw pictures." Yes, I do. Some lessons just take a little longer to sink in. But I thank you for this particular one. I draw the line at clearing the shower drain, though. That's still all you.
Friday, June 13, 2014
The Toiletry Tote Sew Along Part Three: Putting It All Together
Hello again! Are you ready to finish off this bag? We've got all the bits we need--now we just have to organize them into a functional product. When we left off on Wednesday, these were the parts we had:
They're stacked on top of each other, and the zipper is running right down the center. We're going to stitch the lining first. You'll have two flaps of your lining extending off each end, one attached to the zipper, and the other solid. Line those up and pin your short edges together:
First, I want you to grab something to mark with. I prefer disappearing fabric markers, but chalk or even a quilter's pencil will work too. On the wrong sides of both the lining and the exterior pieces, I want you to draw a line 1/4 inch in along the top and bottom edges (where the zipper will go), and also on the short edges of those flaps that extend. It can get a wee bit fiddly, and I find this step to go much more smoothly if I have a guideline to follow.
You should have eight lines drawn per piece--two long, and six quite short. Once you have this done, you'll make a sandwich. I'm talking about a zipper sandwich, but if you're hungry by all means take a break. Take your exterior piece and place it face up. Place your zipper face down on top of that. The zipper I told you to use will be too long, which is fine. It makes it much easier to sew in. I always use zips that are too long as I'd rather trim than spend too much time tinkering with everything and breaking needles on metal bits. OK, so exterior is face up, zipper is face down, and lining is face down. Pin those layers together.
I use a quarter inch presser foot for this part and am really pleased with the results, but if I didn't use that I'd be using a standard foot with a 1/4 inch seam allowance. I almost never use my zipper foot. This part is very important so pay attention to what you're doing. You're going to stitch these layers together following that long purple line that you drew, BUT you need to start and stop 1/4 inch in from the edges. One of the short lines you drew should intersect, and that point will be where you want to start and stop sewing.
That purple line is exactly where I'm starting my stitch line...
...and ending my stitch line.
Arrange everything right side out, and use a pressing cloth or finger press that seam a little bit. Then, starting and stopping exactly where you did when installing the zipper, top-stitch. The seam will be a little bulky, so the topstitching will help keep everything in check.
You can very faintly see my purple mark and how I've left that teeny bit loose at the end.
Repeat for the other side of the zipper--exterior face up, zipper face down, lining face down, pin along the top. It will look like this just before you sew:
Stitch in the same manner as before, making sure to indent your stitching at each edge. Same with the topstitching. This is the part where you'll appreciate the extra zipper length. That wee bit extra makes it easier to maneuver around the ends of the zipper. Once you're all topstitched, you're going to want to unzip, and then pull exterior and lining away from each other so they look like this:
Then turn that whole thing inside out. Zip your zipper closed a little, maybe just less than halfway? You want to make sure your pull isn't going to get sewn outside of your seam, but that it's open enough for turning later.
Arrange your layers like this:
They're stacked on top of each other, and the zipper is running right down the center. We're going to stitch the lining first. You'll have two flaps of your lining extending off each end, one attached to the zipper, and the other solid. Line those up and pin your short edges together:
Sew along that 1/4 inch line you made from end to end, pulling the exterior fabric out of the way of your presser foot as you go. You can leave the zipper laying flat and sew right on over it.
Repeat for the other side. Now we're going to do the same thing with your exterior, but before you pin, grab your zipper tabs. Insert one between the two exterior layers, centered with the zipper. The tab will be tucked inside, and the raw edges poking out a little.
Again, sew long the line that you drew, pulling the lining out of the way As we've already stitched that, it may kick up a little fuss as you try to move it out of the way--
When it does that I do my best to get it out of the way, but it's not too concerning if you stitch over it a little bit. As a matter of fact, here's a second option for you for this part if you find the above too frustrating. Sew along your guideline until you get to the zipper tape, backstitch, clip your threads. Then move your piece ahead just to the other side of the zipper tape and sew the rest of the seam. Then lay all those layers on top of each other--the lining and the exterior. You'll want to put the exterior on top so you can see the little gap where you stopped stitching. Now go back and sew that spot going through all the layers. It should look just fine when you turn it right side out. It's essentially the same as if you accidentally stitched through your lining as it got in your way, but it's less frustrating than trying to fight that fight and won't get you any unintended folds in your fabric.
Repeat for the other side. Don't forget to insert your other zipper tab!
OK, now we've got a big weird piece of thing. All we need to do is sew those gaps on the sides closed and we're finito benito.
Red and blue makes a happy side seam! It also makes purple, but that's beside the point. Essentially, the edges 'marked' by the red and blue lines come together, and we've got a boxy side seam. And we need to do it many times (eight edges between inside and out, remember). So pick one to start with. Get the top and bottom corners pinned in place, then pin the rest of the seam. Everything should line up nice and even, but if it's a little bit off just ease it in and you'll never notice. Stitch.
Do this four times for the exterior and three for the lining as we need to leave a gap in one for turning. I'd recommend that you sew up the edges with the pleated pocket first, as those edges can be machine sewn in nice and tight. If you leave one of those edges as your gap, it'll a little bit annoying to sew shut from the outside while keeping the pocket neat. I like to line up the pocket edge with the side of the bag and pin, then pin the edges together and sew.
You can see here before I pin this side shut that I've pinned the pocket in place so I'm sure to stitch it into the seam.
Once you've done that, carefully reach through the gap in the lining and through your zipper that you left open. If you didn't open your zipper you might be cursing yourself now, but the fix isn't impossible. Simply pick out the seam of one of the exterior sides you just sewed, reach in, open the zipper, and close your seam back up. But if you did leave it open, carefully pull everything through and out of the gap in the lining until everything is right side out.
If you reach through the gap in the lining, you can get your hand into the exterior section of the bag and get your corners poked out nice and neat. Once you've done that, turn in the raw edges of the lining gap, and pin. Then you can either stitch shut by hand or by machine. Tuck the lining down into the bag.
We need a final press to get rid of the wrinkles from all that turning and twisting. A bag like this can be a bit difficult to get your iron into except along the edges where the zipper is. So I like to stuff a few dishtowels in there, zip it shut, and press away. I let it sit for a few minutes and then remove the towels, leaving myself with a nice neat bag.
And that's it!! Hopefully you've learned a few things along the way. I know that I gave you a LOT of information here, but trust me, once you make one any more that follow will be much easier as you'll be familiar with the technique, and may just need to check measurements and placement. I know I'm super excited to use mine for my toiletries and makeup when I travel. It'll be so much nicer than my current multiple ziploc bags method (I know, I should be ashamed of myself).
So let's review:
Insanely sturdy handles? Check.
Delightfully pocketed lining? Check.
Zipper and pull tab? Check. Ribbon on your zipper? Optional check.
A project you can be proud of? Hoping that's a check :)
As always, I do not mind if you sell things made from this tutorial. I'd actually be pretty flattered. I do ask, as this has taken me an incredibly long time to sew, photograph, write, and edit, that you do not distribute this pattern, rewrite it, and/or claim it as your own.
I have done my mind-numbing best to make things as accurate and as clear as possible, but I'm human and we all know what that means. If you've got any questions, please let me know in the comments and I'll do my best to clarify.
Happy sewing!!!
Subscribe to:
Posts (Atom)