Sunday, July 13, 2014

Foldover Clutch for My Leetle Seester

So my sister asked me to make her a clutch. A foldover clutch, to be precise. She showed me exactly what she wanted, and gave me the measurements and everything. Then we went to Joann's. The word to describe my sister Alicia would be...particular. Yes, that's what it is. Once the vision is in her head that's it. No one gets out alive until the vision is in tangible form in her hot little hands. After pulling maybe...all?...the bolts out and deciding that they weren't quite right we were getting discouraged. I walked away for two seconds to look at something else and clear my brain (OK it was longer than two seconds because it was a gnome I was looking at in the seasonal aisle and I was trying to decide if I wanted to spend the money, which I didn't, but it was probably about three minutes if you need total accuracy), and when I walked back to where she was she had a completely different bolt of fabric from anything we had looked at already and had a different plan in mind. My big contribution to the adventure was adding a funky trim to the plain fabric she had decided on (after pairing all kinds of colors with all kinds of laces that would function as an overlay but weren't working she 180'd). The time to put the bits together from that point on was maybe five minutes. The time beforehand? Trust me, you don't want to know.

I got stitching on Saturday, and in a reasonable amount of time had her bag finished.


I say 'reasonable' amount of time because this is the trim I had to sew down. I used a smidgen of fabric glue to hold it all right where I wanted it, turned the speed on my machine down to snail, and carefully pivoted my way down the curvy path of this velvety trim.


A metal zipper was also part of this project. We didn't have time to order anything online (she wanted this for a function she's got in the very near future), so we went with a white zipper tape with white metal teeth. We bought a long zipper, which I then performed major surgery on to shorten (as you can't just sew right over them as you do with normal zippers). I felt like quite the hero with that one. I may have strutted around the room a little.

This shot is the closest to the actual colors, bee-tee-dubs. The not-yellow-not-green trim did not want to cooperate with the camera.

After the trim was down and the zipper in place I had to get the magnetic snap in. I'm not a fan of putting mag snaps into bags with flaps as I feel like I never get the placement perfect, but I'm an engineer's daughter and close enough is good enough sometimes.


The inside is a kicky lime green that is a really fun contrast to the marine blue.


Ready for the whole thing?


It is so simple, really--just a giant change purse, technically speaking. The trim was easier than I thought and gives such a simple but big impact to this bag. I keep trying to think of what it reminds me of, and I just can't place it. It's one of those things where you see it, the thought flits through and is gone before you can grasp exactly what it is. It will be driving me crazy until I think of it (it took me three nights to try and place something from a TV show that my brain was grasping at, and when it finally did you would have thought I cured a major disease. How crazy--a non-amnesiac remembering something unimportant. Woo-hoo. Pick up your trophy on the way out, Bee).

In other stitchy news--I sewed myself an adorbs needle book as the teeny tube the teeny needles came in is going to result in a needles-lost-on-the-sofa sort of situation. You may have seen it on Instagram, but if you haven't I'll be sharing that soon. And I've made good progress on my hexie project. You know what helps with that? Binge-watching TV shows. If you're looking for an excellent show to watch try Copper. It's from the BBC America, and is available on Amazon Prime and Netflix (I'm pretty sure). It's not a family show, so check it out after the tots are in bed.

Sooo....I guess that's it for now. See you soon!

Saturday, July 12, 2014

Giveaway Winner!

Well, I dang near forgot to select a winner for the giveaway!

So who is the winner of this little lot?


Well, that would be this number:


Which lines up with this comment:


Congrats! I've sent an email, but in case you see this before you see that please send me your address so I can get these goodies sent your way.

Side note: I have a few sewing kits left in my shop if anyone is interested :)

See you soon!

Tuesday, July 8, 2014

What's This Decision: Blocks 13-16

I've had such a busy weekend, and with a few days off from work thrown in I plumb forgot to write! I have, however, been very much enjoying reading the comments you've been leaving on the giveaway post. Some of you are quite the busy folks! You've got a few days left to enter if you haven't already.

I haven't had time to work on any more economy blocks (which is irking me, as I don't like having WIPs that I don't get to work on), but hopefully by the time I finish showing you the ones I've already made I'll be back in the swing of making them. So here are a few more for your viewing pleasure :)

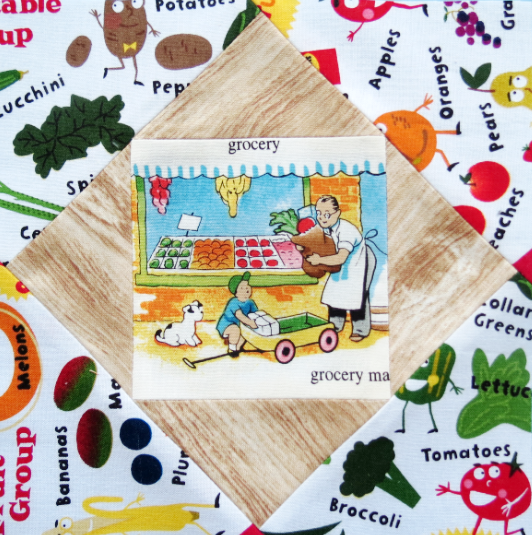
This young boy was sent to the market with his wagon to load it with goodies. That wood grain fabric is supposed to be his wagon :)  Remember when grocers wore aprons and there were local stores like this? Yeah, me neither...other than a corner store my existence has largely been privy to the offerings at the supermarket.

This one is pretty self-explanatory...I really loved the typewriter fabric, so why not 'type' what was written longhand? Remember that? Writing longhand, and then typing it out very carefully? I learned to type on a typewriter and still love that clickety-clack sound. I even remember what the ink ribbon smelled like...remember in 'Breakfast at Tiffany's' when Audrey Hepburn gave George Peppard a typewriter ribbon as a gift? What would you do if someone gave you a ream of printer paper as a gift? Why doesn't that seem as romantic?

Take away that tiny waist and this could have been me this weekend--I baked a few things for our Fourth of July picnic and was quite pleased with the results (though the process was a bit harrowing at times). Note to self: you don't have to use all the berry preserves, unless you like that someone-was-murdered-here-and-the-blood-is-now-congealing look.

Pistachio cookies. That's what this block represents. Because what else is that color? Maybe key lime pie? Are pistachio cookies even a real thing? I think they're real...I don't think I just made that up (can you tell I'm tired?)

I had some projects crop up out of seemingly nowhere, and they've got deadlines, so I'm feeling that frenzy of needing to get all the things done. I realllly want to get back to these economy blocks, so I guess I better just buckle down and get to it. It's such a lovely feeling of relief when all the need-tos are done. 

Ta for now!

Thursday, July 3, 2014

Fussy Cutting and a Giveaway

Hi, kids! Since my previous EPP project went together quickly but was less than satisfactory to me, I decided I needed another one. This one is going together much more swimmingly. It's all hexies, so it's going together quite fast while my rear is plopped on the couch watching Ballykissangel (which reminds me of Northern Exposure except, y'know...Irish), and catching up on the most recent season of Downton Abbey. I don't know if any of you follow along with the sewing adventures of Flossie Teacakes, but she has been working on a massive EPP project that made my jaw hit the floor a few times as she posted progress shots on Instagram. I acknowledge that I do not yet have that practiced eye for selecting fabrics for paper piecing that will result in a kaleidoscopic effect, but one has to start somewhere, so I picked up a few things at Joann's to practice fussy cutting.

This is currently what's making up my EPP kit:

Cute little folding scissors that were too cute to pass up (because I have a scissors fetish as well as a ruler fetish), straw/milliner's needles which are crazy thin and a little bit flexible but poke through fabric like a hot knife through butter, super amazing nearly invisible thread that is also super strong, and Sewline by Moda fabric glue (I'd like to tell you it's the same as ordinary fabric glue but it really is much nicer for this kind of project).

I picked up a few fat quarters at Joann's, as well as about a half yard of this fabric.

I'd love to know why this fabric looks dirty in the photo--I assure you it is not :)

Armed with my paper pieces, I drew up a template so I could fussy-cut a la this tutorial. 


My original plan was to have essentially one giant hexie flower, but when I went to lay things out I realized they weren't going to line up just the way I wanted, so I went with a new plan (which I'm getting very good at). I've got a central 'hub' in one color, and then six fussy-cut 'flowers' that will surround it.


The fabric is a little more doodley than it looks, which I noticed once I started trying to match up my template on the same sections across the fabric. Some of the sections are not exactly the same, which I didn't pick up on right away and so tried to force things a little bit. As such, the matching is a little less precise than I'd like, but only close-up and if you're really looking for it. I'm considering this a practice piece anyway, and the point of practicing is working out the mistakes and the hiccups for when it's time to get serious (if one can consider gluing fabric to paper and sewing it together 'serious').


So what say we do a little bit of a giveaway? I've got a large pack of hexagons, and the template that goes with them, as well as one fun little miniature sewing kit to give to one of you.


I love the template as it's got the outline ready-made for fussy cutting and a generous seam allowance. The little sewing kit is actually a nice little kit inside--


Everything you need for a quick repair is in there (the needles are in that cute little case near the seam ripper) and those scissors are quality for something so teeny. I don't even need to point out how cute the outside is, do I? I will, but I don't need to, harharhar. If you're interested I've got some in my shop you can score for yourself (or for others--who doesn't need something like this for torn hems and popped buttons?).


To enter the drawing for the hexie papers, the template, and the sewing kit, simply leave a comment on this post telling me the most recent thing you've made. You've got until next Friday, July 11, at 11:59 EDT to enter. I'll pick a winner the next day-ish. I'll ship anywhere, so everyone is free to enter. Good luck!

Tuesday, July 1, 2014

Too Much

What seems like a long time ago I told you folks I was working on a new EPP project in order to make myself slow down a little bit. Not long after I wrote that I was finished with it. So much for slowing down. Between then and now I've had so many things I'm working on I simply forgot to share the finished product with you.


I'll be honest--I'm not super in love with it. I love the 30's prints, I love the pattern, but they didn't come together in a way that I was hoping would happen. It's very busy and scrappy looking, with nowhere for the eyes to rest. So while I like the colors and the bit of vintage look that it has, I'm not over the moon about it. Throw in the dense quilting and my busy binding stitching and you've got a thing that....how can I say this...I will hang out with this thing after school, but I won't be best friends with it... Terrible metaphor, I know...


I thought I had placed the black and red across from each other, but I suppose not. And the green and purple prints don't have much to them so they look much...quieter. My favorite part is the yellow center star. It was fun to sew, too.


I ended up loving the black prints the best, which surprises me.


I suppose this is the problem with using a charm pack for this. I made very economical use of it, but there were prints I wasn't crazy about for this piece, and others I wish I had more of. I decided to quilt this in a spiraling hexagon pattern. I started from the outside and worked my way towards the center (which isn't easy when it comes to the final few turns).


I had a good sized hunk of yellow that I used for the back, and then some polka dot binding, which I made even busier by using an asterisk stitch to sew it down.


This didn't come out as large as I thought it would, but it's a good size for placing in the center of a table with a mason jar of daisies plunked on it. But while I enjoyed making this, and like each fabric, as well as the pattern, the end result is a little too busy. If someone ever asks you "Hey, I have some cute fabric I'd like to make look obnoxious" you can direct them to this post for the how-to, hahahahahaha.

Sunday, June 29, 2014

Crochet Tutorial: Interlocking Loops

A few weeks ago I shared with you dearies my little loopy loo cushion I had made with some chunky yarn. I am still seriously digging the texture of this cushion, and it so simple to make that it took me no time to whip up a sample and write up some instructions for you.


In my cushion I used chunky yarn, but this will work with any thickness, really. In this sample I'm going to use regular old worsted weight and an H hook, and I'll be writing in US terms, so keep that in mind if you're used to UK directions. You'll need to know how to chain (ch), single crochet (sc), and change colors (if you want a stripey effect--this could actually be really nifty in a solid, too, as the texture is what stands out more than the yarn).

I suppose in theory you could use any multiple you wanted as long as you kept things evenly spaced, but I'm using a multiple of five to keep it simple. I recommend making a swatch first when learning a new stitch, so this will be a good size for that before you embark on more adventurous hooking endeavors.

So, to start chain 25. Then insert your hook into the first chain (see where my needle is below) and do 5 sc.


Chain 10. Then sc 5 more, leaving that loopy chain bit swinging free and easy.

In this photo I didn't ch 10 yet, but my needle shows where you should carry on with your sc after you have.

Carry on this way, doing 5 sc, then chaining 10, then 5 sc, and so on all the way across. You'll be stitching into each chain stitch but you'll have long loops like the below at regular intervals.


So that's row one. When you get to the end, chain 1 and turn. Insert your hook into the first stitch like I have pictured below.


For row 2 we're going to sc our way back across the row, but we're not going to throw in any chain loops. So you'll do 5 sc and then you hit your chain. What do we do here? Tuck the loop away from you, pretend it doesn't exist, and just keep on going with your sc, until the end of the row (see below). Chain 1, and turn.


Rows 3 and 4 will be the exact same thing as row 2--sc in each stitch across, and ch 1 at the end before you turn. So those first four rows are the first section finished. The first row is all loopy, and the others are solid single crochet. The back should look nice and solid--


--and the front will look loopy--


If you're working solid, you'll be starting a new section (you might want to use a stitch marker to mark the first row to keep track of things). If you're going stripey, you'll need to attach your new color now.

Then repeat the whole thing. Sc 5, chain 10, sc 5, ch 10, all the way across for the first row.


Then do 3 rows of sc. Easy peasy, right? After the second section is done you'll have this on the back--


--and this on the front.


Attach your next color (or keep going if you're going for the solid look). And repeat those 4 rows again.


It's a little too early in the year for candy corn :) so I'm doing one more section before I show you how to finish it off. If you're making something larger you're obviously going to keep working the stitch pattern until your piece is the desired size. For the last section that you stitch, you do the first three rows in the pattern, then hit the pause button.


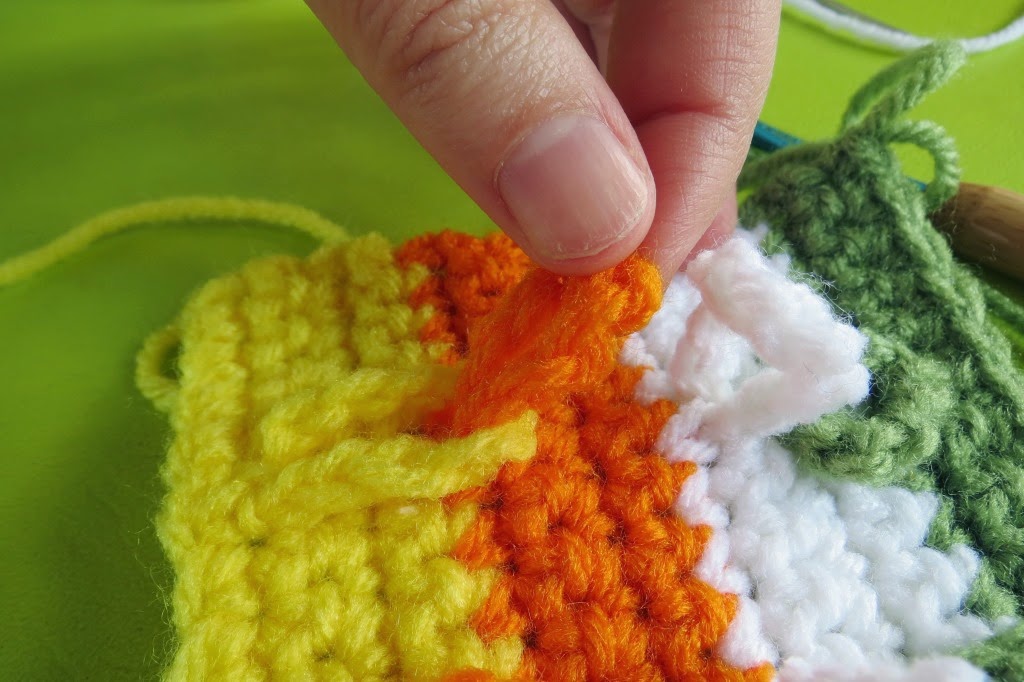
We need to interlock our loops so it looks nice and neat instead of like a hot mess. So, take the second loop (in my case the orange) and loop it through the first (the yellow).


Then take the third loop (white) and loop it through the second (orange). Keep going that way, with each loop linking into the one below until they're all hooked up.


Pick your hook up again, as we're going to lock those loops in place. You simply single crochet across, but every fifth stitch you incorporate the loop into your sc. So you'll sc 4 stitches, then in the 5th you'll put your hook through the sc stitch (as you normally would) AND the loop (see below), yarn over and pull through 2 (the loop and the stitch), then yarn over and pull through two again. Work across the row this way, taking care that your loops don't become unlinked.


When you reach the end of the row, all of your loops should be nice and secure. My piece looks like this from the back:


and like this from the front.


I suggest weaving in your ends as you go as it makes the task so much less daunting that way. This stitch produces an effect similar to the Jacob's Ladder afghan pattern some of you may be familiar with, but I find it easier to link the loops on one side like this.

For my cushion that I made, I stitched up a piece in this pattern the same way Lucy at Attic 24 did for this cushion. At the start I measured my chain against the pillow form I was using until it was the right width, and then stitched. I ran out of yarn near the button flap so it's a little shorter than perfect, but I love the effect of alternating the colors every row (which was forced by a yarn shortage) as it reminds me of a bracelet or a belt or a headband or some accessory I had in seventh grade or thereabouts. I did my button holes the same way as Lucy, but I added an extra row, so I had five rows in the buttonhole section instead of four, with the buttonholes in the center of that strip. Before I stitched my buttonholes, I laid out my buttons in a way that I liked and just fudged with my stitch math until everything was nice and even (it took a few tries and some ripping, but it's not a big piece so it wasn't a bother). I just really wanted all the buttons to be visible instead of the end ones hiding to the sides like in the first cushion I made.

Obviously I love color so that's always my first choice, but I'm thinking in just the right shade of gray or cream this would look like a nifty chunky sweater pillow (gift for a guy, maybe? Christmas is less than six months away, just sayin').

So there you have it. It's a lot of pictures and words because that's how I roll, but it really is super easy. Once you've gotten the hang of my mumbo-jumbo above, you can just follow these directions:

Chain in multiples of five.
Row 1: Starting with the first chain from the hook, sc 5. Ch 10. Sc 5, ch 10. Repeat until the end of the row. Ch 1, turn.
Row 2, 3, 4: sc straight across, chaining 1 at the end of each row before you turn.
Change colors every 4 rows, unless you're going for the solid look.
When you come to your last section, stitch as per the pattern for 3 rows. Pause. Link your loops. Then, in your final row, include the chain loops as part of your sc every 5th stitch.

If you have any questions please let me know and I'll do my best to help you out. Happy hooking!

Thursday, June 26, 2014

What's This Decision: Blocks 9 -12

Hola, mis amigos! You know what's hot? Hot glue. Oh, that's obvious, you say? They should not sell those guns to the general public. I feel that I, as well as society, would be safer if I had a real gun instead of a glue gun. At least I can commit the perfect crime with my left hand and never be found, as I do believe I have obliterated the prints. This is why I sew, folks.

Speaking of sewing (like that segue?) I've got four more blocks to share with you. They're pretty random this time.

My favorite subject in school was always history, and I questioned the American educational system when we always skipped the Wild West and the cowboys and Indians stuff and went straight on to other stuff that wasn't nearly so interesting. I had big plans of moving to Montana, living on a ranch, and getting married on horseback. Those youthful fancies have fled, but my love of history still goes strong. These fabrics are all made for each other--this one is my ode to the pony express in fabric form. True story: in sixth grade we had to give a speech on how to do something or how something works. Some kids made French toast, some made paper flowers. I explained how the pony express worked. Because that's how I roll :)

"Mortimer, do let's leave the noise of the city and take a drive to the countryside."
Fun fact: in the twenties it used to be a thing to graffiti all over your car with pictures and phrases that were popular at the time. Can you imagine doing that today? Watch 'Cheaper by the Dozen' (the original one with Clifton Webb) to see what I mean. And also because it's an adorable film.

As long as it's raining you might as well cuddle up under an umbrella and recite love poems to each other, amiright?

Measure twice, cut once. And press, press, press for a professional finish.

These seem like a lot of fun when I'm stitching them up, but incredibly mundane as I'm writing them out. Good thing I'll be looking at this quilt and not writing about it when all is said and done.

And as far as measuring twice goes--I think I could go so far as to say I'm a pretty good seamstress. I can work most things out and I've made enough mistakes to know what not to do. So if someone could explain to me how it took me three nights to shorten a pair of curtains, but half an hour to make a sunglasses case and some bias tape I'd love to know.

LinkWithin

Related Posts Plugin for WordPress, Blogger...