
Anyhow, we went away for a nice long weekend (still sorting out my pics) and I just remembered to snap some pics of my latest make (along with a fail) this afternoon. You know those little zip around wristlets that Vera Bradley makes? That type of zipper insertion has always stymied me. Even when I would stand there in a store and examine one in a way that a casual shopper would never do (but a drug smuggler looking for a hiding spot might, prompting several instances of edge-to-one's voice "Can I help you?!") it left me scratching my head. The only reason I would ever attempt one would be if I was asked to. Which I was. And as I usually do with things I consider quite challenging, I put it off until a quarter til the last minute.
My brain could just not get itself around it, and I'll be damned if I could find a tutorial online (I finally found one after a looooong search that ended on page twenty of my search results--after I needed it, of course. I just had to keep looking as I couldn't believe there wasn't something out there). I found a pattern on Craftsy that was almost an exact knock-off of the Vera Bradley one I had been looking at. So let's start there. With the fail.
For starters, this version used very little interfacing but used cotton duck to give it stability. And bulk. Oy, the bulk. I wasn't in love with it but went with it anyway as that's what the pattern called for (and I had never used it so I didn't know any differently). Some sections are quite structured, and others (like the pockets) are very floppy and weak feeling. The method of construction also added a lot of bulk to the seams.

I usually make my own piping with bias tape. I don't believe the packaged stuff is cut on the bias which makes it very much not fun for applying to curves.
Just so you know, it's not supposed to be that shape. It's supposed to be a rectangle.

I didn't even finish the turning gaps on the inside. I'm only showing you this so that you can see the inside layout. Credit card pockets and a slip pocket on the left, and a zip and slip on the right. Though bulky they felt very flimsy.
One of my pet peeves is when something is fairly critical to the success of something but is left out of or unstressed in the instructions. Some of you may know (or all of you may) that zippers come in different sizes--size 3 is the norm, size 5 is a bit larger and is frequently used in handbags or couch cushions. I almost use size 3 strictly. The pattern-writer said she "used a size 5" but didn't indicate that the wider zipper tape on a size 5 would be necessary to keep it from getting caught up in all that bulk.

So that happened. Which made this completely kaput. But is interesting if you were ever curious about the nitty-gritty of a zipper.
This one was constructed in lots of bits. Two inside pieces, two outside pieces, and a spine attached to the zipper. The zipper and spine are sewn together to form a ring of sorts. And this gets stitched to the perimeter of the insides and outsides with gaps left for turning. If your stitching is off the slightest bit it won't work. I let out my seams a bit and it still didn't work. Between the bulk and the tightness it just wasn't meant to be, hence the split zipper above.
It may come as a surprise but I didn't get angry, I didn't curse, I didn't whine. I simply figured that I would have to come up with something else. But I had one last search, found a very similar pattern that became available after I had bought this one and done an extensive search, and went with that. And now here's the successful version.

It's not crooked. I just have an insanely fine-tuned knack for making things look that way in photos.

The cell phone pocket has folds to it so it can expand a bit, and it's held shut by a velcro tab (which I changed from the original drawstring version). It will fit an iPhone very comfortably, but not my Galaxy S3 (it's waaayyy too tall--but it would be an easy pattern adjustment).

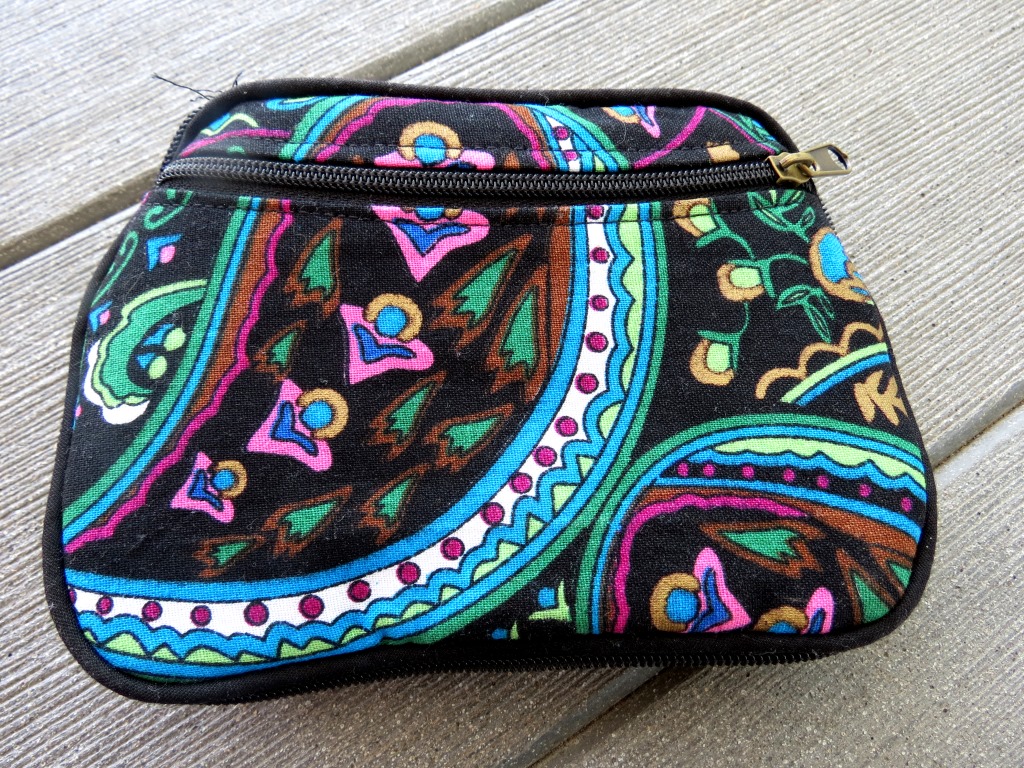
This zipper goes in completely differently and allows a little wiggle room. It wasnt a whooosh! kind of thing, but it was not difficult at all. This one has credit card pockets on the left, and a zip on the right. The main difference is that there isn't a slip pocket, but I do believe I could easily add one just under that zip (which I'll give a crack if I try it again).

This version uses fusible fleece and ends up feeling sturdy without the cumbersome bulk that the duck had. I used a standard zipper as well--there was so much less bulk for it to get caught up in that it worked perfectly.

I really should have d-rings in multiple sizes but I don't. But this little gap left in the spine of the wristlet works perfectly for the hook. I even managed to sew my strap on an angle (like bias tape strips) so there is hardly any bulk in it.

For a first shot at this (let's forget about the fail for a moment, shall we?) I am in no way displeased. There are a few spots that could be a touch neater (and I forgot to replace the pull on the zip pocket) but that's to my eye and not the casual observer (hopefully).
I'm not one for throwing down a name and telling you to avoid that person's wares, unless their practices are unethical or they're selling a shoddy product or something to that effect. So I will not tell you which pattern I failed at, but I will tell you that if you're interested in making the second version that I used this pattern. There's nothing wrong with the first--it's well-written, but it is extremely fiddly and the ultimate in precision is needed (which is not how I usually fly so that may have something to do with the rough time I had of it). I was asked about a tutorial for this one but I won't be offering one--I would essentially be taking someone's hard work and rewriting it in my own words which just wouldn't be right (especially since a fair amount of work must have gone into figuring out the zipper). Sorry kids, but I just wouldn't feel right about it (especially since I didn't contribute any brain cells to it on any level--I simply searched and bought).
OH! And can I just tell you that Vera Bradley charges $50 for one of these? That's insane!!!! You can make one yourself for a fraction of the cost in fabrics that you love for a little bit of effort and some time. The holidays are fast approaching--you could make the cost of the pattern go quite far in providing some unique gifts. But that's all I'm going to say about Christmas. That and it's never too soon to stitch. OK, now I'm done :)

Great projects!;)
ReplyDeletecool decision!
Well done!
OH DEAR!!! I do love Vera Bradley., and have several. But they are SO expensive!!
ReplyDelete: ) XO kRIS
That is lovely!! And that project would've been enough to send me over the edge. Hands down.
ReplyDeleteEsther.
Good to know I'm not the only nutter that stands in shops examining how things are put together ;o) Glad you found a solution in the end though (although I've never actually heard of Vera Bradley, I presume I'm about to be hunted down by the bag making militia ;o) )
ReplyDeleteI have to admit I've never put much though into the method of zip-around construction. Your wristlet looks great though!
ReplyDeleteI'm guessing you'd rather I didn't tell you that there's a pattern for an all-the-way-round zip in the Zakka Style book and that it's a very good one? No? OK, I won't tell you! The finished purse is lovely, well done!
ReplyDelete