Sunday, October 31, 2010

The Loot Loot Bag

My sister Rachel asked me to make her a plaid wool bag a few months ago after she saw this one, and I'm just now getting around to making her one. I needed to rework it a bit since she didn't like that style of pleat, and she wanted it to be a bit larger. I really like the way this one came out--my only concern is that it might not be as large as I thought it would be. This baby is still pretty roomy, though--looks can be deceiving, doncha know...

It has a bit of a softer look than the other one, and has a lusciously curvy bottom (I modeled it after myself--hahahaha...just kidding)

 The piping on this one came out the best of my three piped bags. I cut my fabric on the bias this time instead of on the straight-of-grain--it makes all the difference in the world.

 The lining is my favorite--I had just enough of this left over. I don't like lining my bags in black, so this was a fun alternative.

I had to remake this bag, ripping it out until almost the beginning. The outside yoke was too small and didn't line up right so I fixed that even though I could have gotten away with it. Otherwise, there were no other adjustments I'd make to my chicken-scratch pattern. But I committed a huge bag sin that I didn't notice until almost the last stitch--I forgot about the interfacing. The bag still felt nice and would have been sturdy enough, I'm sure, but it didn't have that structured look that I like them to have. So I added some fusible fleece and it's just so much better now. Best part? Didn't have to buy a single thing for this adventure. I'm sewing through that stash, one piece at a time. My fingers are raw from picking stitches, but it's worth it because it just got the seal of approval from my other sister as I'm writing this--true story. She wants one too. So does my mom. The line forms on the right, ladies :)

And the name? I like when bags have names, but I don't like when it's a girl's name or something. So in naming this one for the sister who requested it, I named it after something she used to say when she was a wee 'un (and I mean wee)--she used to call soda 'loot loot' and this bag is big enough to stash all your loot, so there you have it. The Loot Loot bag. A.K.A. The Rachel.

Happy trails!

Have you entered my giveaway?  Click here for the details--you've got until November 11 to enter!

Saturday, October 30, 2010

Happy Halloween!!

Image found at www.retroist.com

"On Hallowe'en the thing you must do
Is pretend that nothing can frighten you
An' if somethin' scares you and you want to run
Jus' let on like it's Hallowe'en fun."

Friday, October 29, 2010

Paper Pumpkins How-To

I worked on a quick little project last night that ended up being pretty cute and only cost a few bucks. I've seen these in several places this week in Blogville and decided to make my own.

I think they came out kind of cute.

Anyhoodle, here's what you need:
Some ribbon, a few of those harvest pick things sold in most craft stores, 2 matching pieces of paper--I used 12 x 12 inch scrapbooking paper. Not shown: scissors, hole punch, tape, wire cutters.

First, you need to cut strips of paper. I cut mine 1 inch wide by the length of the paper (or width--they're both 12 inches so it doesn't matter). You can use a paper cutter to make life easier, or you can commit a mortal crafting sin and use your rotary cutter and mat to cut the strips (I need to replace the blade anyway so no biggie).


Next, you'll need to punch a hole at each end. Try and make it the same distance from each of the three edges. Obviously I didn't try hard enough but I wish I had...this is a 'do as I say not as I do' moment.


Take some of your ribbon and make a knot at one end. On the other end put a piece of tape around the ribbon (like the end of a shoelace) to help feed it through the holes. Poke this through one of the sets of holes you punched. The knot should end up on the side of the paper that you want facing out (your pumpkin "skin," if you'll humor me).


Take your taped ribbon and feed it through the other holes. Pull it a bit, and you should have this:


Tie a knot at the other end of the ribbon. Both knots should be on the side of the paper that you want facing outwards. This ribbon piece creates a pivot point that the strips can now fan out around. Arrange them until you achieve the look you like. I needed to shorten my ribbon a little bit (I just made a new knot and trimmed the end) so that it would sit properly.

I then took my harvest pick things (this is the technical term for them), and cut them about in half using wire cutters (so THAT'S what they were for!) so they wouldn't be ridiculously large. I poked the stem through the hole--the ribbon being in there gave it a nice fit--and snugged it up a bit. A wonky bow with some festive 
ribbon and that's all, she wrote.


Only thing I would change--I would buy paper that was orange on both sides because I'm not overly amused with the white side that is showing through. But the outside is so rusticy-pumpkin looking that it kind of makes up for it.

This could be a cute craft for kids with construction paper and pipe cleaners, and it's super inexpensive to pull off. I gave these to my mumsy--I adore how she takes all the cheesy things I make and pretends like they're the cutest thing she's ever seen (kind of like when I was in kindergarten).

Have you entered my giveaway? Click here for the details--you have until November 11th to enter!

Wednesday, October 27, 2010

The Take Your Pick Giveaway

I posted my knitted dishcloths on a few link parties this week and received some really nice comments--everyone seems to love these little guys, whether making them or receiving them. Hooray for crafty solidarity! Ahem...sorry...geek moment. I also got a bit of an education. While I know these are made all over, I didn't know what they were called--the consensus seems to be "Grandma's Favorite Dishcloth" and it is indeed alive and well in Googleville. Also, it just so happens that the pattern is printed on the yarn wrapper--I've never even looked at the wrapper because I swear it's printed in a 2 font or smaller. I just tear it off and get stitchin'. I checked through my new skeins, though, and found one. So color me embarrassed over my ignorance, but thankful for the insight. One of the reasons I love comments.

Moving on...

I've reached a bit of a milestone here. This is my 150th post, and my blog will soon be a year young. So I decided to have a giveaway (my first!), and I hope you'll all take part.

I've got two sets of items for this giveaway:

In this group we have some sewing themed folders, a sewing themed emery board, a sewing themed magnetic bookmark, one of the foldaway shopping totes from my shop, and the book 'Quilt Style' by Tammy Tadd. This book is quite fun and lovely, stands up like an easel, and has some of the sweetest quilts I've ever seen.

In this group we have a cable-knit sweater notebook, some intarsia (or is it Fair Isle?) pencils, a handknit dishcloth, a crocheted pot scrubbie (nice and thick and up to the job--even the non-stick coated job), and the book 'Knit Lit,' a collection of stories and essays, some funny, some sad, about knitting adventures and misadventures.

 To enter:
~ Leave a comment on THIS POST stating which you'd prefer if you win, or if you have no preference. I will be selecting two names--the first one drawn will get their first choice, the second one will get the other set of goodies.
~ You don't have to be a follower of this blog--but if you become one or are one already leave a second comment and you get an extra chance to win.
~ Mention this giveaway on your blog either in a post or by grabbing the picture below and placing it in your sidebar. Leave me a comment stating that you did and--you guessed it--another chance to win. 
 

Here are some extra details:
~ All comments must be in by 11:59 pm EST on November 11th, 2010. I will select the winner the next dayish and announce soon thereafter.   THIS GIVEAWAY IS NOW CLOSED!!
~ This giveaway is open to anyone, anywhere.

Good luck!

All day long

That's how much I could watch this. Sit back and have fun!


And if it's not showing fully click the video to watch it on YouTube.

Tuesday, October 26, 2010

Pumpkin Carving with Sweet Bee and Z Man

On Sunday Z-man and I carved a pumpkin. Sort of. Here's the procedure we followed:

1. Get a grown-up to cut off the "lid." For extra fun unintentionally make it look like a mushroom. Then get an eight-year old boy to remove the guts and grossness. Think of how you'll look up how to roast the pumpkin seeds, and also how you'll save a few to try and plant a pumpkin patch next year.


2. Have the kid say a few times "I can't believe you're making me do this part."


 3. Get your sister to scrape the inside of the pumpkin to a one-inch thickness because that's what the directions said but you still don't understand why. Don't take a picture of this part. It's kind of boring.

 4. Tape your pattern to the pumpkin and watch your sister get started. Make sure she is following the directions on the package until everyone else loses interest and leaves the room, leaving you to finish the pumpkin. Your hands are icky so you can't take pictures of this part either.

 5. Wonder why you didn't trace the paper pattern instead of trying to cut through it. Make a hot mess and almost slice your finger off even though your father says to watch out for your hand at least twice. This is because you think you know everything because you regularly use a rotary cutter, for heaven's sake.

6. Sit back and admire your finished work.


7. Tell yourself that it will look better once it's dark and the candle is lit. Remind yourself of what happened last year when it was free-styled based on Z-Man's drawing of what he wanted.


8. Make everyone follow you outside so you can light it up in some weird pumpkin-lighting ceremony that includes a crappy drum roll. Get annoyed when only 3 people come with you.  Oooo and ahhh because it does look better lit up:


9. Tell your nephew to stop blowing out the candle just as you're snapping the photo. Give him a big hug because he keeps doing it, and that's exactly what you would have done.

10. Make some tea. And think about the seeds you tossed because you forgot you were going to save them. You've had a long day.


Disclaimer: this is the first time I have ever carved a pumpkin. True story. I've painted them, used a Sharpie on them, watched someone else hack into them--but the knives necessary to get a good cut make me nervous so I stay away. This year I bought one of those kits and it's much easier than giant knives look.

Sunday, October 24, 2010

Knitting with Grandma: Dishcloths


The first thing I learned to knit was the humble dishcloth. It was a very simple pattern that my grandma showed me one evening over Christmas vacation. I can make them without even looking now (as a matter of fact--this is what I've been doing to feel productive while I'm vegging out and watching 'Lost' DVDs), but that first one made my fingers hurt for days. I couldn't even begin to tell you how many of these I've made over the past few years, as they're one of the things I get asked for the most. I've tried other patterns but they're a little too involved for something that's going to wipe up messes and occasionally end up in the garbage disposal.

I've looked online for this pattern, but I don't even know what it's called so I've had no luck finding it. I've seen pictures of it, so I know it's out there somewhere. Just in case I have any knitters following along, I thought I'd share the pattern here. It's really not difficult to do, and a few of them together make a really nice gift. Plus it's something to keep your hands busy during TV time--and off of the munchies (bonus!).


These are knit on the diagonal--other than the knit stitch you only need to know a yarn over increase, and a knit two together decrease. I use Lilly's Sugar 'n Cream yarn for these--the colors are endless, it knits up nicely, and washes well. I also use #9 needles.

1.  Cast on 4 stitches.
2.  Knit a row. Knit another row (for stability). You're still at 4 stitches.
3.  Knit 2 stitches. Yarn over. Knit the rest of the row.
4.  Repeat step 3 over and over again. Each row should have one more stitch than the one below. You'll begin to see a triangle developing. I usually go up to 48-50 stitches before I begin to decrease.


5. Knit one. Knit two stitches together. Yarn over. Knit two stitches together. Knit across.
6. Repeat step 5 over and over again. Now each row will have one less stitch than the one below.


7. When you get down to 4 stitches, bind off. Weave in your ends. Go wash some dishes.

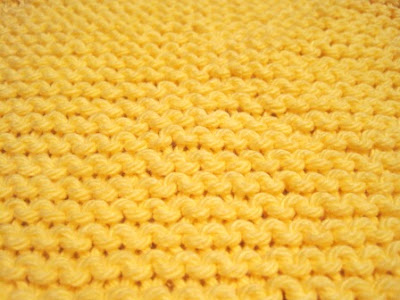
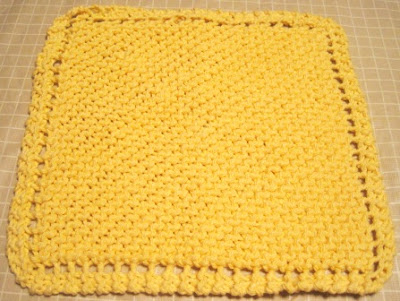
 If you look close you can see the stitches running on the diagonal instead of straight across. The yarn overs also create that nifty border.

If you're new to knitting and need a stitch refresher (or if you want to learn how to knit), click here.  

Have fun!

OH! One other thing--I've got a nice little giveaway planned in the very near future, so stay tuned for that announcement!

Saturday, October 23, 2010

Not Sew Scary

Wanna know something? I haven't made a single thing this week. I have not cut one piece of fabric, sewn one stitch, or even thought about it, really. Well, not since Sunday. I needed a little break. But I'd better get moving because my sister is asking me for a bag she wants that will match her boots in a wicked awesome way. I have to do a bit of design juggling, but nothing too difficult. And then I'm going to get started with my Christmas crafting. I feel a bit relieved since I decided not to take any more custom orders for a bit, like a weight has been lifted off my shoulders.


In other news: tonight my parents, my sisters and I went on a candlelight ghost walk at Fort Mifflin on the Delaware River. It's a fort built just before the Revolutionary War that is allegedly haunted. Here's the thing. I believe in ghosts a little bit. I've never experienced anything, but the over-imaginative part of my brain wants to believe that when I feel eyes on me and no one is there it's just because I can't see that someone. That kind of thing. And when those weird circles show up in my photos I get all "Ooooo!!! Orbs! Look at the orbs!" even though I know it could be a trick of the light or a camera defect (but none of my other photos have such issues...just sayin').

So off we go in the very chilly air, led by our costumed guide who was a bit dramatic and not very interesting. Even with a full moon it was still pretty blasted dark out--I imagine it's a neat place to visit during the day, though.  Needless to say (but I'll say it anyway) we didn't experience a thing. No chills, no mysterious hair pullings, no noises. Nada. We were told numerous times "Once, this other group saw such and such" and "I had a group who said they saw a ghost standing next to me" and "This room will make you feel desperately hopeless." The whole time I just felt kind of hungry. I did get some pictures with orbs in them, though:


I like to think they're something, because it's spooky and romantic and fun to think so. I don't remember anything much of what she said because her speaking manner wasn't conducive to storytelling appreciation. There is one thing I have to share (because it's sewing related, haha). She was telling us that she does a lot of hand sewing as she is the Fort Mifflin seamstress, and sometimes she'll lay down her work to go tend to something and when she comes back the needle will be unthreaded, or moved to a different spot. My dad the cynic muttered "Wow. She's really scaring the hell out of me now," which caused my sister to erupt into hysterics. I was thinking "Sheesh lady, if you really sew you know how cagey a needle can be, no ghosts needed." I swear I've had them disappear into thin air (I'm sure my toes will find them one day--or my bum).

So that's my uninteresting week. Tomorrow night I am going to a haunted house and on a haunted hayride, but I'm forgoing the haunted corn maze. I hate mazes on paper--I certainly don't want a real version made of scratchy stalks of corn. And then on Sunday Z-man and I are going to try and carve the world's most awesome pumpkin. He did tell me that he doesn't want to pick it out but wants it here ready and waiting for him when he arrives. This kid is lucky he has those gray eyes and thick black lashes to demand such things of me.

Have a good weekend, folks!

Tuesday, October 19, 2010

Mmmmm....fabric - Christmas edition

I know it's only Halloween (not even, really) but is anyone else getting geared up for Christmas yet? Not in the sense of braving the shopping malls or decking the halls and all that jazz, but with your crafting. My brain is all aflutter with ideas, especially when I see such fun fabrics out there.

I may buy this to make an 'Attic Windows' quilt...someday. I'm inspired by this one.
The print is by Michael Miller and is called 'Snow Chateau.'


I'm in love with the retro rosy cheeks of these tots. Timeless Treasures 'Merry Christmas Retro.'
(The above prints can be found here).

I'm such a sucker for the sweets--this one is 'Christmas Candy' by A. E. Nathan. I wonder how long it took them to come up with THAT name.

 'It's Snow Fun' by South Sea Imports

 'Classic Christmas Yule Trees' by Michael Miller. This one reminds me of the scene in "Merry Christmas, Charlie Brown" where Linus and Chuck go shopping for a tree.

This one is 'At Home for the Holidays' by Henry Glass and Co. It's so very simple and Scandinavian looking--it makes me crave hot chocolate.

 'Holly Holiday Holly and Berries' by Northcott. Such a classic print, doncha think?

 This 'Christmas in Baltimore Album' print by P and B Textiles will make it look like you spent a gazillion hours appliqueing. There's even a matching floral stripe for the border available.
The above fabrics can be found here. 

I need to stop. After my recent load-up of Christmas fabrics I imposed a fabric ban on myself, but when I see all these it makes my "Complete Order" finger twitch a little. Since I imposed the ban I suppose I can lift it, but that wouldn't be very disciplined now, would it? Maybe if I'm a good girl Santa will drop this in my stocking:

A Fortune Cookie Clutch purse kit by u-handbag in beehive fabric.

Toodles!

Sunday, October 17, 2010

Orange you glad I didn't say banana?

All of my sewing projects this weekend were unintentionally orange. Well, I meant them to be orange but I didn't realize they were all orange until I looked at the pictures. Since it's just some basic stuff I don't have much to say, so I'll get to the pictures.

First up are some flannel loungers. The fabric is a delightful flannel from Robert Kaufman that I found online.

The last time I made these pants the lady at the cutting counter told me I didn't need as much fabric as I was buying. I bought it anyway, and in the end felt like she was correct. So when I bought this time I took her advice and ended up kicking myself because I was short a bit. The intended recipient of these is pretty tall, so I needed a bit of extra length. Hence the cuff with the bit of white bias tape for some contrast. They ended up being cute but I have a future annoyance along these lines--I bought the same amount of fabric in 4 different types of flannel for Christmas PJs for my mom and sisters and me. All of us are tall, so I will need to add a cuff to each. It's simple to do and doesn't take too much time. But the annoying thing is that I made the same mistake so many times due to another's flawed advice. Lesson learned. But I got to use my serger and that's always fun, so woohoo for silver linings.

This is an iPod or small gadget case from a tutorial I found here at Sew Mama Sew!

This was super easy and works up cute and sturdy. I cut it thinner than the directions called for so it ended up being a snug fit, so the next time I'll leave it alone. You can make it using fat quarters or some scrap strips of fabric. Or, of course, patchwork. Which I might try... One tip: if you try this tutorial figure out where your button will be before you sew the second side closed and sew it on then--otherwise you'll be adding to the swear jar or ripping your stitches out, which is never fun when it's a thicker item.

Trick or treating loot bag for my favorite boy. My fabrics are all from Joann's.

Z-man tells me the other day he could use a new bag for Halloween. I may have prompted him and he was in the middle of a video game so he would have said yes to anything. The bag I made him a few years ago is one of my favorite things ever (sadly,no pictures)--the fabrics just worked splendidly. But it was pretty small (it was maybe my second bag I ever made). Now you may think the bag above would be simple--you'd be right, but we're talking about me, so of course I took the simplest thing and goofed it up. It came out too small. I could have reworked something else, but I had a few misgivings about making him a bag anyway (I have no idea why I offered in the first place). He's almost nine, and unless I make it out of something plain and black I feel like it's just going to be girly. I'm probably overthinking it, but the last thing I want is for him to feel uncomfortable carrying it but doing it anyway just because his auntie made it. So amongst my shopping travels today I picked up a few more bags so he'd have options (they're so inexpensive I was out only a couple dollars for a few of them). I spread them all out, and he said without even looking "I'll take the largest one." I asked if he minded if I gave the one I made for him to another little boy I know (my friend's son who he met when I fixed his pillow for him a few weeks ago--he's 3 so this would be more suited to his size), and of course he didn't care. He said "I don't even really like Halloween." And oh, how I stressed over this! 

Finally my favorite thing of the weekend:

A super adorable stuffed pumpkin!

I saw a large version of this in a quilt shop a few weeks ago and thought "Hmph...I can make that." I promptly found out I had no idea how it was put together so I turned to Google for help. I ended up using this tutorial.   I enlarged their template about 75 percent. I would have gone much larger but I was working with limited fabric so I had to go with what would fit. This was pretty neat to put together--I didn't get where it was going until I had most of the segments sewn together. I am not good at stuffing things so there's a bit left to be desired there, and closing up the top and bottom holes was a little fiddly (I ended up sewing long gathering stitches and pulling it in tight so I could sew a straight line across to close it off). You end up stuffing it through one of those segments so it's a little hard to get even. My mother loved it so it's hers; she put it in the living room and it looks pretty cute, actually. Sometimes you have to let the perfectionist part of your brain take a break and realize that some things are ok with a little homemade-ness about them.

I am now officially out of orange fabric. I'm feeling like it's a jinx color for me--have you noticed that every one of my projects from this weekend had some sort of issue? But I guess it's a good thing that only I can tell what they are (at least that's what my mumsy tells me) until I write a post wherein I blab to the world about said issues.

In stark contrast to my opening paragraph I guess I did have something to say after all...

Have a marvelous week!

I'm linking up to these link parties: join the fun!!


Sumo Sweet Stuff

All Thingz Related


LinkWithin

Related Posts Plugin for WordPress, Blogger...